Imagine cutting your heating bill in half. One property owner did just that after spending $500 every month on propane. Their five-acre farm needed a better heating solution. They turned to a classic method to warm their space and save money.
This decision led to a permanent and cost-effective change. It involved careful planning and talking to friends with experience. The goal was to create a warm, self-sufficient home.
This guide provides the essential information you need. We break down the entire process into simple steps. You will learn about budgeting, material choices, and vital safety tips.
A lot of people feel the idea is overwhelming. But with the right approach, it’s an achievable project. We share real stories to help you avoid common mistakes and succeed.
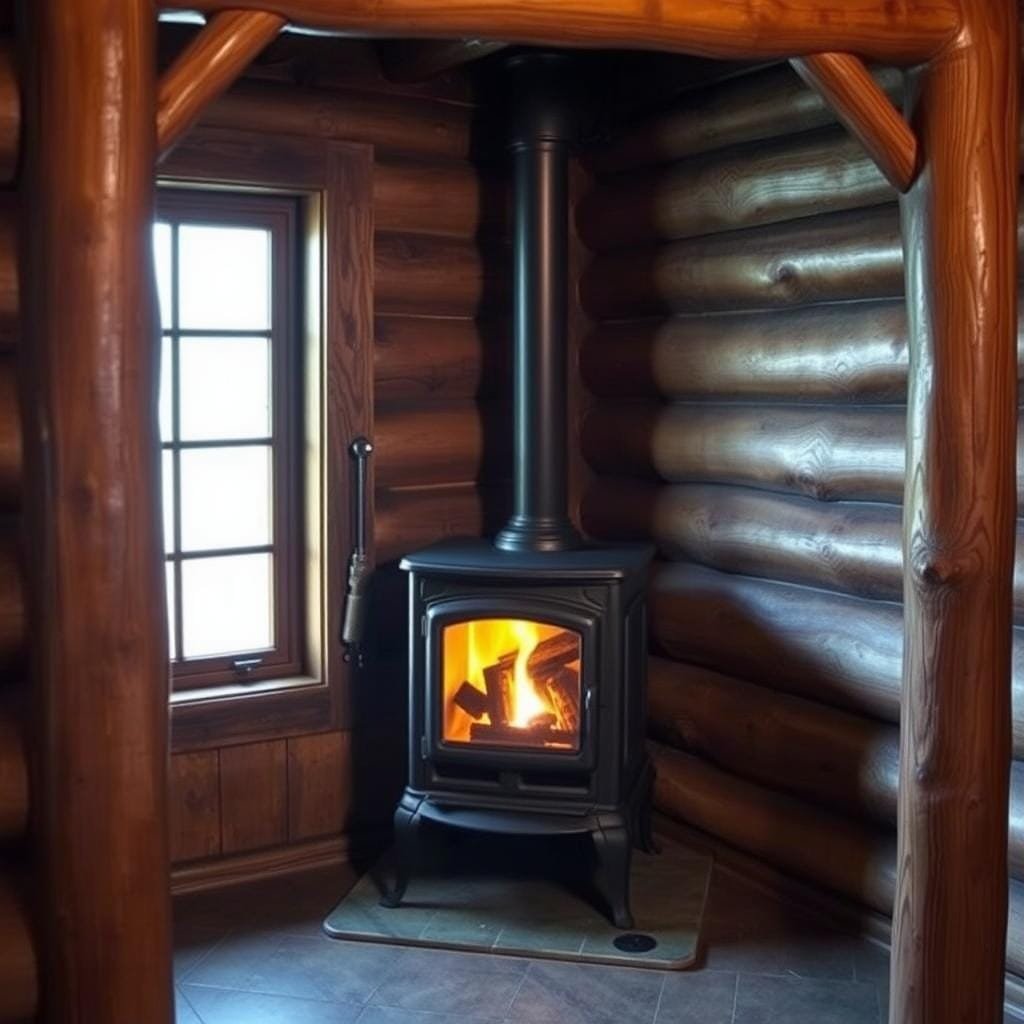
Understanding Wood Stove Options and Safety Features
Finding the ideal heating solution involves balancing cost, capacity, and crucial safety elements. This decision impacts your comfort and protection for years to come. Taking time now prevents problems later.
Exploring Different Stove Models and Their Costs
The market offers heating appliances from $150 basic units to $3,000 premium models. Vermont Castings makes larger units like the “Aspen” for big spaces. Harbor Freight provides budget-friendly choices that work well with proper setup.
One property owner selected their model after consulting a friend with proven experience. This saved research time and provided confidence in a reliable system. The right choice depends on your actual space requirements.
Buying the largest available unit often creates excessive heat in small areas. A model rated for 1,800 square feet will overwhelm a compact structure. Matching capacity to your needs ensures efficient operation.
Evaluating Safety Features and Manufacturer Guidelines
Modern heating equipment includes advanced protection systems. Oxygen deprivation controls automatically manage fire intensity. Adjustable air intake and heat shields provide additional security.
Quality construction matters more than initial price point. A well-made cast iron appliance lasts indefinitely. This means you won’t need to repeat the setup process.
Always review the manufacturer’s manual before purchasing. Understand clearance requirements and chimney specifications. Determine if additional components are needed for your budget.
Create a list of must-have features based on your heating needs. Consider your space size and realistic financial plan. This preparation ensures you make the best choice for your situation.
Planning Your diy wood stove installation for cabin
Before purchasing any components, careful assessment of your structure is essential. This phase determines your entire project’s success and safety.

Assessing Your Cabin’s Layout and Heating Needs
One builder constructed their log home on piers with 2×12 floor joists. The subfloor measured 3/4-inch thick. They used tile near the heating unit and oak flooring elsewhere.
The ceiling featured 2×12 rough-cut cants with 2×6 pine boards above. Joists sat 24 inches apart. From the flue to ceiling measured 6 feet 5 inches.
Roof to second floor distance was 14 feet 8 inches. The roof build-up totaled about 13 inches thick. Understanding these specs helps you plan properly.
Budget Considerations and Material Sourcing
Create a detailed list of everything required. The heating appliance is just one part of your budget. Chimney pipes and support boxes add significant cost.
Local stores carry most items you need. However, prices vary greatly between retailers. Shopping around saves money without sacrificing quality.
| Material | Home Depot | Lowe’s | Local Supplier |
|---|---|---|---|
| Chimney Pipe (per section) | $85 | $92 | $78 |
| Ceiling Support Box | $145 | $155 | $130 |
| Roof Flashing Kit | $75 | $80 | $70 |
| Hearth Pad Materials | $120 | $135 | $110 |
Consider whether you’ll go through the roof or wall. Each choice affects material needs and costs. Accurate measurements prevent expensive mistakes.
Choosing the Ideal Location & Safety Considerations
The heart of your warm retreat is more than just a heating appliance; it’s a central gathering point that demands careful placement. Getting this right affects safety, efficiency, and the entire feel of your living area.
Think about how the unit will become the focal point of the room. Many owners design their entire layout around this warm spot. It creates a natural and cozy gathering area for everyone.
Ensuring Proper Clearance from Combustibles
Safety is the most critical factor. Manufacturer guidelines are strict for a reason. They typically require a minimum of 3 feet of clearance from walls and other combustible materials in every direction.
This rule isn’t just a suggestion. Underwriters Laboratories sets these standards after extensive testing. Even materials that seem safe can become hazards when exposed to constant high heat.
There is a way to save space if needed. With an approved heat shield attached directly to the appliance, this clearance can often be reduced to just 12 inches. This keeps everything code-compliant.
Designing a Kid- and Pet-Friendly Setup
If your family includes little ones or curious pets, your planning needs an extra layer. The chosen location must allow for a protective barrier. This keeps small hands and paws safe from hot surfaces.
You’ll want enough space for this safety zone without making the living area feel cramped. It’s a smart idea to create a layout where the heat source is visible but not easily accessible. This gives everyone peace of mind.
Consider these practical things when picking the perfect place:
- Proximity to your wood storage pile for easy loading.
- A clear path for carrying ashes outside safely.
- Whether the spot provides a good draft for the chimney.
- If installing through a wall or window blocks desired natural light.
Constructing a Fire-Safe Base for Your Cabin
Building a protective platform is your first line of defense against potential fire hazards. This critical component sits between your heating appliance and the floor, creating essential separation.

The entire structure needs to withstand high temperatures without breaking down. Proper materials ensure long-term safety and peace of mind for years of use.
Selecting the Right Materials
Cement board serves as an excellent foundation layer. This non-combustible material is readily available and easy to install with basic tools.
One successful project used a 5×4 foot area covered with cement board screwed to the subfloor. Tile was then laid on top using high-heat mortar.
Different material combinations offer varying levels of protection and cost. Consider these options for your specific needs:
| Material System | Protection Level | Cost Range | Installation Time |
|---|---|---|---|
| Cement Board + Tile | Excellent | $150-300 | 2-3 hours |
| Pre-made Hearth Pad | Good | $200-400 | 30 minutes |
| Firebrick Base | Superior | $250-500 | 4-5 hours |
The layering system creates multiple protective barriers. Cement board forms the base, with tile providing the final durable surface.
Allow 48 hours for mortar to fully cure before placing any weight on the finished base. This drying period is essential for proper adhesion and strength.
If you cannot cover the entire area initially, ensure the section directly under the unit is complete. You can add remaining tiles later for full coverage.
Installing the Chimney Kit and Pipe Safely
The chimney system is arguably the most critical component of your entire heating setup. Proper installation ensures efficient operation and prevents dangerous situations. This phase requires careful attention to details and manufacturer specifications.
Choosing Between Single, Double, or Triple Wall Pipe
Your interior section typically uses single-wall black pipe from the unit to the ceiling. This material works well for visible indoor runs. At the ceiling penetration point, you must transition to insulated Class A pipe.
Double-wall and triple-wall options provide crucial insulation. The triple-wall variety remains cool enough to touch even during extreme operation. This safety feature makes it worth the additional investment.
Techniques for Roof Penetration and Securing the Kit
The ceiling support box provides structural stability for your entire system. This 12×12-inch unit maintains required clearances from combustible materials. Proper installation here prevents future problems.
Roof flashing must match your roof’s pitch precisely. Modern kits include high-temperature silicone seals for weather protection. In windy areas, chimney braces are essential for stability.
Always use high-temperature sealant designed specifically for heating applications. This prevents smoke leakage and carbon monoxide issues. Verify your entire system is perfectly vertical for optimal draft.
Adapting Installation for Small Cabins & Custom Designs
When your living area is compact, heating decisions become a delicate balance of warmth and comfort. Owners of tiny retreats consistently share the same story: oversized units create excessive heat that drives people from their home.

For spaces like a 10×12 structure, even modest models generate surprising amounts of warmth. One owner with a 16×16 space reported that just two pieces of fuel created enough heat to require opening doors.
Incorporating Aesthetic Touches for a Cozy Interior
Your heating appliance can become the heart of your interior design. Many people arrange their entire living space around this warm focal point.
Consider adding non-combustible stone veneer or tile work behind the unit. This adds rustic charm while providing extra heat reflection. The result is both beautiful and functional.
Budget-Friendly Tips Without Sacrificing Safety
You can save on the initial price without compromising protection. Budget-conscious builders have successfully used basic units when paired with quality safety components.
The unit itself can be economical, but chimney pipes and ceiling supports should never be cheapened. This approach keeps everyone safe while managing costs.
| Stove Model | Recommended Space Size | Heat Output |
|---|---|---|
| Four Dog Portable | Up to 120 sq ft | Low |
| Caboose Pot Belly | 100-150 sq ft | Moderate |
| Vermont Castings Aspen | 300+ sq ft | High |
Custom designs solve space challenges creatively. Through-wall venting or window penetration can optimize your limited area. Every design decision should maintain clear traffic flow and safety barriers.
The idea that bigger is better doesn’t apply here. Proper sizing ensures you enjoy cozy heat without wasting fuel or comfort.
Wrapping It All Up with Best Practices for Your Cabin Wood Stove
Transforming your living area into a cozy haven involves careful coordination of materials and techniques. The satisfaction of creating a warm retreat makes the effort worthwhile.
Following the proper sequence ensures safety and efficiency. Allow adequate drying time for mortar and tile before placing your heating appliance. This attention to detail prevents future problems.
Professional help makes sense if roof work or structural modifications concern you. Local experts understand regional codes and weather challenges. Their experience provides valuable peace of mind.
Check with your insurance company before starting your project. Some providers require inspections for coverage. Proper documentation protects your investment.
Regular maintenance keeps your system functioning safely for years. Create a checklist for seasonal inspections of the chimney and connections. This simple habit ensures lasting warmth and security.


