Upgrading the glass panes in your home is one of the most impactful changes you can make. This project touches everything from your monthly energy bills to your property’s overall value. It’s a big decision that requires careful thought.
The central question for many homeowners is whether to tackle this project themselves or bring in experts. This choice depends heavily on your skill level, available budget, and the complexity of the job.
While the idea of a self-managed project can be appealing for saving money, it’s crucial to consider the details. Proper techniques, safety, and long-term performance are all vital factors for success.
This guide will explore both sides to give you a complete picture. Our goal is to help you make an informed choice that fits your skills and goals. These features are integral to your home’s design, providing light, air flow, and insulation.
With the right information, you can confidently decide on the best path for your home improvement journey. Getting it right is absolutely critical for comfort and efficiency.
Understanding the Importance of Proper Window Installation
A home’s defense against the elements and its energy consumption are directly tied to how well its features are integrated. Getting this step right is not just about aesthetics; it’s about performance and protection.
Impact on Energy Efficiency and Home Comfort
Correctly installed windows create a powerful thermal barrier. This seal keeps your indoor air stable, reducing the strain on your heating and cooling systems.
According to the U.S. Department of Energy, this can cut your energy bills by 12-15%. You enjoy consistent temperatures and lower monthly costs. Well-installed windows also dampen outside noise, adding to your comfort.
Risks of Poor Installation
Mistakes during the process can have serious consequences. Gaps and misalignments are the main culprits, allowing conditioned air to escape. This forces your HVAC to work overtime, wasting energy and money.
Moisture is another major threat. Improper sealing can lead to water seepage, which promotes mold growth and can cause wood rot. Over time, this weakens the structure around the opening.
The table below summarizes the key differences between a job done right and one done poorly:
| Factor | Proper Installation | Poor Installation |
|---|---|---|
| Energy Bills | Potential 12-15% reduction | Increased costs due to drafts |
| Indoor Comfort | Stable temperature, less noise | Drafts, uneven temperatures |
| Long-Term Risk | Protects structural integrity | Risk of mold, rot, and damage |
Ultimately, the quality of the work is just as critical as the quality of the product itself. A poor fit can undermine even the best materials, leading to frustration and expensive fixes down the road.
Key Considerations Before Starting Your DIY Project
The foundation of any successful home improvement endeavor lies in understanding both your skills and the project’s complexity. Taking time to evaluate these factors upfront can save you from costly mistakes and frustration down the road.

Assessing Your Skills and Experience
Be honest about your comfort level with tools and technical work. Previous experience with home improvement projects is valuable, but window work demands precision measurement and careful sealing techniques.
Consider whether you’re comfortable using power tools and working at heights. Following detailed instructions over extended periods is also crucial for quality results.
Evaluating Project Scope and Home Improvement Needs
The scale of your project makes a huge difference. Replacing one standard unit on the ground floor is much simpler than handling multiple custom sizes or second-story work.
Look at your home’s specific requirements. Check if structural changes are needed or if existing frames require repair. Unique architectural features add complexity to the job.
Realistically assess your available time. This type of home improvement project often takes longer than expected, especially for beginners. Research your specific product requirements thoroughly before committing.
Exploring diy window installation pros cons
Choosing the self-reliant route for a home improvement task means balancing freedom of choice with the burden of responsibility. This section offers a fair look at both sides to help you decide if it’s the right fit for you. For a deeper dive, see our comprehensive overview of the pros and.
The most attractive benefit is often the significant financial savings. You avoid paying for expert labor, which can be a large part of the total cost. You also get to set your own pace and work around your life without waiting for a contractor’s schedule.
There’s also a great sense of pride in finishing a complex job with your own hands. It builds confidence and valuable skills for future projects around your house.
However, the challenges are real. This kind of work demands a high level of precision and technical know-how. Simple errors in measurement or sealing can lead to big problems like drafts and water damage.
Be prepared for a major time commitment. What might take a pro a few hours could easily consume your entire weekend. Mistakes might even mean calling in experts to fix them, costing you more.
Finally, check the product warranty. Many manufacturers require certified installation to keep the warranty valid. Doing it yourself could leave you without protection if the product fails.
| Advantages | Disadvantages |
|---|---|
| Substantial cost savings on labor | High skill and precision required |
| Complete control over your schedule | Can be very time-consuming |
| Personal satisfaction and skill development | Risk of costly errors and performance issues |
| Potential voiding of manufacturer warranties |
Understanding these points helps you make a smart choice based on your skills, budget, and comfort level.
Cost Savings Versus Professional Labor Costs
When planning a home upgrade, the financial aspect often becomes the central deciding factor. Understanding where your money goes is the first step to making a smart choice for your budget.
The fee for expert work is a major part of the total expense. This makes the self-managed route very appealing for those looking to reduce upfront spending.
Budget Benefits of DIY Approaches
Hiring experts for a project can range from $150 to $800 per unit. For a whole-house project, these fees add up quickly.
By handling the work yourself, you eliminate these labor costs. This can potentially cut your total project expense in half. You could save money significantly, perhaps around $2,500 on a ten-unit project.

This immediate financial benefit is a powerful incentive. It puts you in control of the timeline and the budget.
Long-Term Financial Considerations
Initial savings are great, but it’s crucial to look further down the road. A mistake during the process can lead to ongoing issues.
Poor sealing might increase your energy bills every month. You might also need to pay for corrections, which can cost more than hiring a pro initially.
Don’t forget hidden expenses like buying special tools. Also, a flawed result could lower your home’s value. A true cost analysis weighs both immediate and future financial impacts.
Essential Tools and Materials for DIY Window Installation
Having the correct gear on hand makes all the difference between a smooth project and a frustrating experience. The right tools ensure precise measurements and proper sealing from the start.
Must-Have Tools for Accuracy and Efficiency
A 25-foot measuring tape provides the reach needed for accurate sizing. Combine this with a quality 4-foot level to guarantee perfect alignment.
Your toolkit should include a reliable utility knife for trimming materials. A caulking gun with exterior-grade sealant creates weatherproof barriers. Don’t forget a cordless drill with various bits for secure fastening.
Materials Checklist for a Successful Project
Low-expansion foam insulation fills gaps without warping frames. Exterior flashing tape provides critical waterproofing protection.
Wooden or composite shims allow for micro-adjustments during placement. Have appropriate fasteners ready for your specific home construction type.
| Essential Items | Optional but Helpful | Primary Purpose |
|---|---|---|
| Measuring tape & level | Reciprocating saw | Precision measurement |
| Caulking gun & sealant | Pry bar set | Weatherproof sealing |
| Low-expansion foam | Angle finder | Insulation filling |
| Flashing tape | Laser level | Water protection |
Many home improvement stores offer rental programs for specialized equipment. Creating a complete checklist before starting prevents unnecessary delays.
Investing in the right tools upfront pays dividends in project quality. Proper preparation makes the entire process more efficient and successful.
A Step-by-Step Guide to Installing Windows Yourself
If you’ve decided to handle your home’s upgrade personally, this guide will walk you through the essential stages. Careful attention to each step is crucial for a successful outcome.

Rushing through the process often leads to problems. Patience and precision will ensure proper performance and longevity for your upgrade.
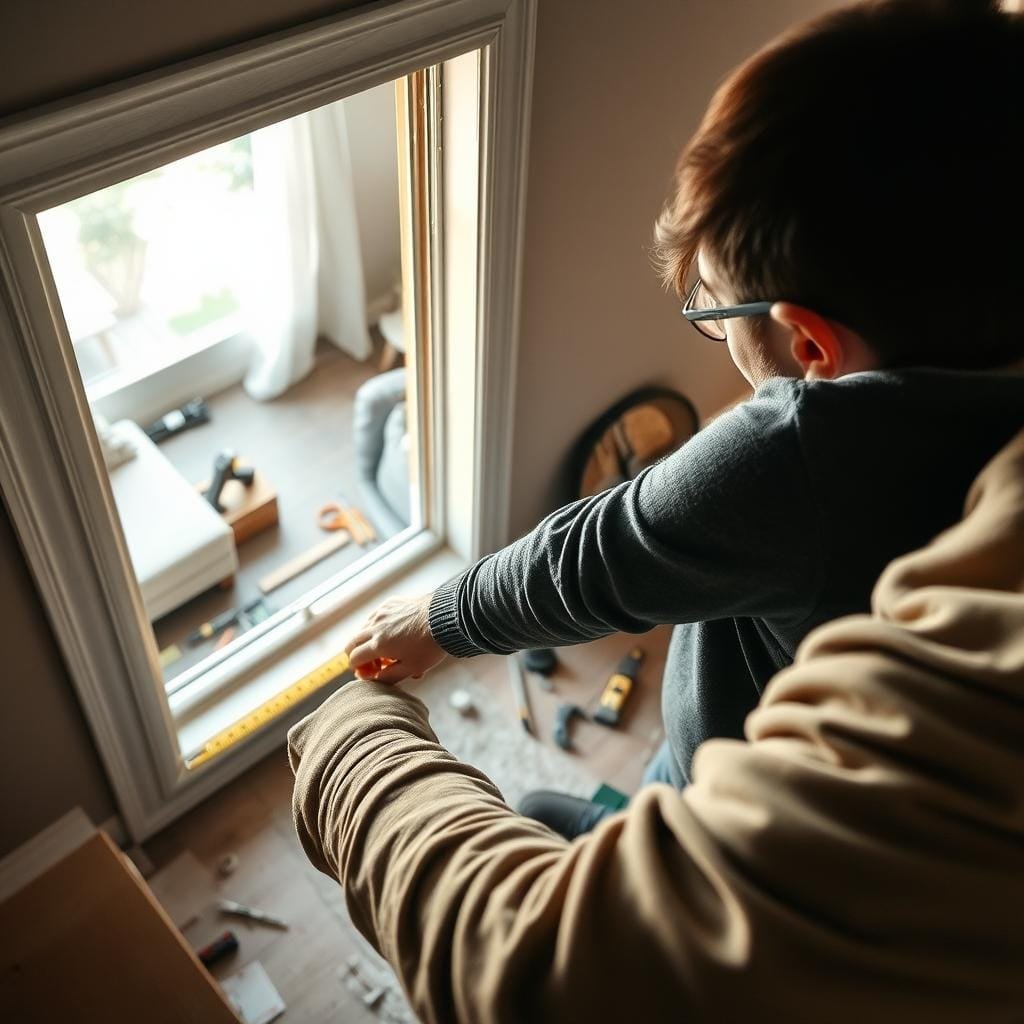
Measuring and Preparing the Opening
The first step in installing windows is taking exact measurements. Measure the width and height at multiple points. Use the smallest measurement to guarantee a good fit for your new window.
Next, focus on removing old components. Carefully detach the interior and exterior trim. Unscrew or pry out the existing frame without damaging the surrounding wall.
Thoroughly clean the opening, scraping away all old caulking and debris. Inspect the frame for any rot or damage that needs repair before proceeding. A clean, square opening is vital.
Proper Sealing and Finishing Techniques
Place the new window into the opening. Check that it is perfectly level and centered. Use shims to make micro-adjustments for a perfect fit before securing it permanently.
Sealing is the most critical phase for installing windows correctly. Apply flashing tape to create a waterproof barrier. Use a high-quality caulk around the perimeter.
Fill any gaps with low-expansion foam insulation. Be careful not to overfill, as this can warp the frame. This step is essential to prevent drafts and leaks.
Finally, secure the unit with the appropriate fasteners. Reinstall the trim and conduct a final inspection. Check for smooth operation and a tight seal to ensure proper weatherproofing.
| Key Step | Primary Goal | Critical Tip |
|---|---|---|
| Precise Measurement | Achieve perfect fit | Measure at top, middle, and bottom |
| Removing Old Unit | Create clean opening | Work slowly to avoid wall damage |
| Inserting New Unit | Position correctly | Use a level in both directions |
| Sealing & Insulating | Prevent air/water leaks | Apply foam sparingly to avoid bowing |
Identifying Common Risks and Pitfalls
Many homeowners underestimate the hidden challenges involved in home improvement projects. What may seem like a simple replacement task actually involves precise technical work. Recognizing these potential issues early helps prevent expensive mistakes.

Even small measurement errors can create major problems. An ill-fitting unit allows drafts and moisture to enter your home. These issues often lead to costly repairs for mold removal and structural damage.
Risk of Mistakes and Potential Structural Damage
Proper sealing requires careful attention to detail. Inadequate weatherproofing may seem minor initially but can cause long-term deterioration. Water infiltration damages insulation and promotes rot in wooden frames.
Structural integrity depends on correct fastening techniques. Over-tightening can warp frames, while insufficient support causes sagging. Modifying openings without proper knowledge compromises wall strength.
Warranty Concerns and Safety Issues
Many homeowners discover too late that manufacturer warranties require professional work. Self-installation often voids protection against product defects. This leaves you responsible for any future failures.
Safety hazards present serious risks during these projects. The CDC reports approximately 150,000 emergency room visits annually from home improvement injuries. Falls from heights and heavy lifting accidents are common concerns.
This type of home improvement requires both technical skill and safety awareness. Understanding these risks helps you make realistic decisions about your capabilities.
Advantages of Professional Window Installation
There are compelling reasons why many homeowners choose skilled contractors for their home upgrades. Expert services provide benefits that extend well beyond the initial project completion.
Expertise and Faster Installation Times
Experienced contractors bring specialized knowledge from handling hundreds of similar projects. They complete work in a fraction of the time it takes amateurs. This minimizes household disruption and reduces weather exposure during the process.
Their efficiency comes from using industry best practices and specialized tools. This ensures optimal energy efficiency through proper sealing techniques. The result is superior performance that lasts for years.

Ensuring Warranty and Structural Integrity
Many window manufacturers require professional installation to validate product warranties. This protects your investment against defects and performance issues. When you hire professional services, you also get labor warranties for comprehensive protection.
Contractors carry proper insurance and licensing, protecting homeowners from liability. They can identify underlying issues like rot or structural problems that amateurs might miss. This attention to detail preserves your home’s value and safety.
Comparing Long-Term Home Improvement Outcomes
The real success of your home upgrade becomes clear years after the project is complete. Properly installed windows deliver ongoing benefits that extend far beyond the installation date.

Energy Efficiency and Home Value Impact
Correctly installed windows can reduce your energy bills by 12-15% annually. This translates to hundreds of dollars in savings over their lifespan. Proper sealing prevents air leaks that undermine efficiency.
Poor installation creates thermal bridges that increase heating and cooling costs. These mistakes can negate any initial savings from a DIY approach. Quality work ensures optimal performance for 20-30 years.
Your home’s resale value also depends on installation quality. Professionally installed windows can recoup up to 73% of their cost upon sale. Appraisers and buyers view quality work positively.
Flawed installations become red flags during home inspections. They often lead to price reductions or required repairs. Making the best choice between methods requires considering these long-term outcomes.
For maximum value protection, consider professional installation services. They ensure warranty compliance and structural integrity. This home improvement decision impacts your comfort and investment for decades.
Wrapping Up Your Window Installation Decision
As you weigh your options for this important home improvement, remember that both paths have distinct advantages. There’s no universal answer that fits every situation.
Handling the project yourself can bring significant savings and a real sense accomplishment. This approach works well if you have the right tools and experience. Consider starting with one unit before tackling a whole-house diy window installation.
Professional services offer expertise and warranty protection. This is often the best choice for complex projects or multiple units. They ensure proper sealing and energy efficiency for your new window.
Honestly assess your skills and available time. Quality results affect your home’s comfort and value for decades. With this information, you can confidently choose the right approach for your situation.


