Building the roof for your cabin is a key part of construction. A strong timber framework keeps you safe from rain, snow, and wind. It also holds up the weight of your cabin for years.
Many people feel scared when they think about building a roof. Standing high up on scaffolding with heavy lumber isn’t fun. But, with the right steps, you can do it.
What makes a roof great? It’s knowing the basics and using tested methods. Quality timber can last decades if done correctly the first time.
This guide will show you how to build a strong roof. You’ll learn how to keep your cabin solid all year. We’ll cover picking materials to the final beam, making it easy for you to build.
Understanding Cabin Roof Framing Basics
Building a cabin roof is more than just nailing rafters together. It’s about making a strong system that can handle nature’s forces. The roof above your cabin walls must support weight, resist wind, and keep its shape for years. Getting the roof framing basics right saves you from expensive repairs and dangers later.
Your roof frame is like the skeleton of your cabin’s top part. Just like your body’s bones, your roof needs strong connections and enough strength. You don’t need an engineering degree to understand these basics. Just some practical knowledge and detail.
The Science Behind Roof Strength and Longevity
What makes a roof last 50 years versus one that fails after five? It’s about three key things: good engineering, quality materials, and the right installation. These factors are what make a roof strong and long-lasting.
Engineering tells us how forces move through your roof. When snow piles up or wind hits your cabin, these forces need a clear path. Any weak spot can cause failure.
The shape of your roof is also key to its strength. Triangles are the strongest shape, which is why you see them in roof framing. Each rafter pair forms a triangle with the ceiling joists or collar ties, making a strong structure.
The quality of your materials is just as important as the design. A roof made with weak or warped lumber will struggle, no matter how well it’s installed. Your materials must be straight, properly sized, and strong enough for the job.
How well your roof’s parts connect is also critical. The points where rafters meet the ridge board, sit on the top plate, and where collar ties attach need strong fastening. The right hardware is essential here.
https://www.youtube.com/watch?v=mjBEeN-O_Oc
Breaking Down Your Roof’s Essential Parts
Every cabin roof has several key parts working together. Knowing what each does helps you build confidently and spot problems early.
Rafters are the sloped beams from the ridge to the walls. They carry the main loads and must be sized right for the job. Think of them as the roof’s ribs.
The ridge board runs along the roof’s peak where rafters meet. It’s not load-bearing but aligns and connects the rafters. It must be straight and well-supported during installation.
Collar ties connect rafters in the roof’s upper third. They prevent the rafters from spreading apart under load, adding strength. They’re vital in areas with heavy snow.
Top plates sit on top of your cabin walls. They provide a surface for rafters to rest on and transfer loads down into the walls. Properly installed top plates ensure even load distribution.
Bird’s mouth cuts are notches at the bottom of each rafter on the top plate. They increase the bearing area and create a secure connection. Getting these cuts right is key to the roof’s integrity.
Other parts like purlins and gusset plates add strength where needed. Not every roof needs these, but they’re useful for special conditions or extra loads.
Load Calculations and Code Requirements You Can’t Ignore
Understanding load-bearing capacity is important for building safely. Your cabin roof must handle two types of loads: dead loads and live loads.
Dead loads are the permanent weights your roof carries every day. This includes rafters, ridge beam, roof sheathing, roofing materials, and any permanent fixtures. These loads are predictable and easy to calculate.
Live loads change over time and include snow, wind, maintenance workers, and equipment. In Canada and northern U.S. states, two feet of snow can be 60 pounds per square foot. Your frame must handle this force.
Your local climate determines the load requirements for your cabin. Mountain areas with heavy snow need stronger framing than coastal areas with high winds. Building codes are based on decades of engineering data and real-world failures.
| Load Type | Common Sources | Typical Weight Range | Design Consideration |
|---|---|---|---|
| Dead Load | Rafters, sheathing, shingles, ridge beam | 10-20 lbs/sqft | Permanent and constant |
| Snow Load | Accumulated snow and ice | 20-70 lbs/sqft | Varies by climate zone |
| Wind Load | Uplift and lateral pressure | 15-45 lbs/sqft | Requires proper anchoring |
| Live Load | Workers, equipment, maintenance | 20-40 lbs/sqft | Temporary but significant |
Building codes exist because roofs have failed before, sometimes with tragic results. Your local building department can give you specific requirements for your area. This includes minimum rafter sizes, maximum spans, required connections, and necessary inspections.
Most places require engineered plans for roofs with long spans or unusual designs. Don’t see this as a problem—it’s a chance to ensure your cabin roof is safe. An engineer can help design your roof, saving you money while ensuring it’s strong.
Snow load calculations consider the depth, density, and how it might drift or accumulate unevenly. Wind loads require attention to uplift forces that can tear a roof off the walls. These are real forces your roof framing basics must address.
Remember, building codes set minimum standards, not ideal ones. In harsh climates or exposed locations, going beyond code minimums often makes sense. A little extra cost for slightly larger rafters or extra bracing gives huge peace of mind and long-term value.
Choosing the Right Roof Design for Your Cabin
Your cabin’s roof design is more than looks. It affects how easy it is to build, the cost of materials, and how well it handles weather. The right choice balances your carpentry skills with your local climate needs. It also affects the look you want.
Understanding your options helps you make a smart choice early. Some designs are simple and great for beginners. Others need advanced framing skills but perform better in harsh weather.
Your choice also affects your cabin’s interior space. Some designs offer big attic areas for storage or future expansion. Others have less headroom but are simpler to build and cost less.
Gable Roof Frames: Pros and Cons
Gable roof construction is the most popular choice for cabins. It has two sloping sides that meet at a central ridge. This creates the familiar A-frame profile seen on many homes and cabins.
Gable roofs are easy to frame. You’ll work with common rafters that all have the same cuts. This makes them perfect for beginners. The steep slope sheds rain and snow well, preventing leaks.
Gable designs also offer great attic space. This area is perfect for storage, insulation, or even a sleeping loft. The simple design means you use fewer materials, keeping costs down.
But, gable roofs have some downsides. The open gable ends face directly into the wind, making them vulnerable in storms. High winds can lift the roof if not properly braced.
In extreme weather, gable roofs may need extra reinforcement. You’ll need to connect the rafters securely to the wall plates. Using hurricane ties and proper engineering helps overcome these weaknesses.

Shed Roof Structures for Simple Cabins
Shed roof framing is the simplest method for cabin builders. This single-slope design eliminates the need for a ridge board and complex rafter connections. It’s ideal for small cabins, additions, or your first project.
The basic shed roof has rafters that run from a higher wall to a lower wall at a consistent angle. You won’t deal with complicated bird’s mouth cuts or matching rafter pairs. Everything runs in one direction, speeding up the building process.
This design works well for modern or minimalist cabin aesthetics. The clean lines create a contemporary look that many builders find appealing. You can also use the higher interior wall for large windows that bring in natural light.
Material costs stay low with shed roofs. You need fewer structural members. The simple framing means less chance of making measurement errors. Even complete beginners can achieve professional results with basic carpentry skills.
The main drawback involves limited headroom on the lower side of the cabin. You’ll have less usable interior space compared to other designs. The single slope also means water drains to just one side, requiring careful planning for gutters and drainage.
Wind direction matters more with shed roofs too. Position the higher wall into the prevailing wind direction for best performance. Strong winds can create uplift forces that stress the connections.
Hip Roof Designs for Added Stability
The hip roof structure is a step up in complexity but offers superior performance in challenging weather. Unlike gable roofs, hip roofs slope downward on all four sides, creating a pyramid-like shape that offers exceptional wind resistance and structural integrity.
This design eliminates the vulnerable gable ends that catch wind like sails. The inward slope on all sides creates a self-bracing structure that holds together better during storms. Hip roofs are the preferred choice in hurricane-prone regions and areas with frequent high winds.
The even overhang around your entire cabin provides consistent protection from rain and sun on all walls. This symmetrical weather protection helps preserve your siding and foundation. The distinctive appearance also adds visual appeal that many find more refined than basic gable designs.
Building a hip roof requires more advanced carpentry skills. You’ll need to cut and install hip rafters that run diagonally from corners to the ridge. Jack rafters of varying lengths fill in between the hip rafters, requiring precise measurements for each piece.
Material costs run higher with hip roofs. The design uses more lumber and creates more waste during cutting. The additional complexity also means longer construction time. You’ll spend more hours measuring, cutting, and fitting pieces compared to a simple gable roof.
Despite the extra work, many experienced builders prefer hip roofs for their long-term performance. The added stability and weather resistance justify the increased effort, making them a good investment in harsh climates.
Gambrel and Other Specialty Roof Types
Gambrel roof design brings the classic barn aesthetic to cabin construction while maximizing usable interior space. This style features two distinct slopes on each side—a steep lower section and a gentler upper section—creating a distinctive profile that’s both functional and charming.
The main advantage of gambrel roofs is the dramatic increase in attic or loft space. The nearly vertical lower slope provides almost full-height walls on the second floor. This makes gambrel designs perfect for cabins where you want significant living space on an upper level without building a full second story.
You’ll find this style useful for workshop cabins, studio spaces, or small homes where every square foot matters. The design effectively gives you a two-story cabin with the simpler foundation and wall construction of a single story.
Building a gambrel roof requires careful planning. You’re working with two different rafter angles on each side. The transition point where the steep and gentle slopes meet needs proper structural support. You’ll typically install a horizontal beam or purlin at this location to carry the load.
Beyond gambrel designs, several other specialty cabin roof styles deserve consideration. The saltbox roof features an asymmetrical gable with one side significantly longer than the other, creating a Colonial-era look. This design works well on sloped building sites where one side of the cabin sits lower than the other.
Butterfly or V-shaped roofs slope inward from both sides, creating a modern architectural statement. These designs collect rainwater in the center and require excellent waterproofing. They’re more complex to build but create stunning contemporary cabins.
Curved or arched roofs offer unique aesthetics but typically require specialized materials like structural insulated panels or metal roofing. These designs push the boundaries of traditional framing and work best when you have professional help or extensive building experience.
| Roof Style | Difficulty Level | Best Climate Application | Interior Space | Cost Factor |
|---|---|---|---|---|
| Gable | Beginner-Friendly | Moderate snow/rain regions | Good attic space | Most economical |
| Shed | Easiest | Light to moderate weather | Limited on one side | Lowest cost |
| Hip | Advanced | High wind/hurricane areas | Reduced attic space | Higher investment |
| Gambrel | Intermediate-Advanced | Moderate climates | Maximum loft area | Moderate to high |
| Specialty | Expert | Varies by design | Design dependent | Highest cost |
When evaluating these cabin roof styles, consider your local building codes first. Some regions require specific designs or engineering calculations for certain roof types. Your climate plays a huge role too—steep roofs handle snow loads better, while low-slope designs may work fine in dry regions with minimal precipitation.
Your skill level matters just as much as performance factors. There’s no shame in choosing a simpler design that you can build confidently. You can always tackle more complex projects as your skills develop.
Think about future needs as well. If you might want to expand your cabin or add living space later, certain designs accommodate modifications more easily. Gable and gambrel roofs allow for dormers and extensions, while hip roofs present more challenges for alterations.
Essential Tools and Equipment for Roof Framing
Having the right tools makes roof framing easier and safer. A good cabin builder knows this well. They say, “A remote cabin location is no place for injuries!”
Start with the basics. You don’t need to spend a lot to get what you need. Knowing what’s essential helps you save money.
Power Tools You’ll Need
Power tools make your work faster and better. A corded circular saw is a must for cutting lumber. For remote sites, a battery-powered saw is great too.
A cordless drill/driver is key for fastening. Look for one with 18-20 volts for strong screws. A framing nailer also speeds up your work.
The DeWalt cordless nail gun is a favorite for its ease and reliability. Pneumatic nailers are good with a compressor. They save a lot of time compared to hand-nailing.
More power tools can make your job easier. These include:
- Miter saw or compound saw – Makes precise angle cuts for rafters
- Reciprocating saw – Useful for making adjustments and corrections
- Power planer – Helps fine-tune rafter fits when needed
- Cordless impact driver – Drives lag bolts and heavy-duty fasteners with ease
Hand Tools and Measuring Equipment
Hand tools and measuring equipment are vital. They help you work accurately and safely. Accurate measurement is key for roof framing.
Start with a 25-foot tape measure as your main tool. A good framing square is also essential for marking cuts.
A speed square is great for marking angles. It’s small and fits in your belt. Many builders use two or three for convenience.
Other important hand tools include:
- Chalk line – Marks straight layout lines across long distances
- Torpedo level and 4-foot level – Ensures proper alignment and plumb cuts
- Framing hammer – Needed even with a nail gun
- Hand saw – For quick corrections and fine-tuning cuts
- Pencils and marking tools – Choose carpenter pencils that won’t roll away
- Adjustable wrench and socket set – For tightening bolts and hardware
- Ratchet straps – Useful for plumbing temporary support posts
Many builders use a pattern rafter for precise measurements. This method saves time and reduces errors.
Safety Gear and Fall Protection
Safety gear is a top priority for roof framing. Falls are a major cause of injuries. Proper fall protection is a must.
A fall protection harness is essential for heights over six feet. It includes a harness, shock-absorbing lanyard, and anchor points. OSHA requires fall protection at these heights.
Other safety gear you need includes:
- Work boots with slip-resistant soles – Good ankle support and traction prevent slips
- Safety glasses or goggles – Protect your eyes from sawdust and debris
- Work gloves – Choose ones that balance protection with dexterity
- Hearing protection – Essential when using power tools for extended periods
- Hard hat – Protects against overhead hazards and bumps
- Dust mask or respirator – Important when cutting treated lumber
Think of your ladder and scaffolding as safety equipment. Sturdy ladders with stabilizers are safer than makeshift solutions. Many builders use scaffolding towers for big projects.
Having a helper is safer for critical tasks. Two people can handle tasks that are risky for one. This is true for tasks at height.
Always use safety gear consistently. Safe habits from the start are key. With the right tools and safety gear, you’re ready to choose quality materials for your roof frame.
Selecting Quality Materials for Roof Frame Construction
Your roof frame’s strength depends on the materials you choose. Lumber, fasteners, and sheathing are key. They decide if your cabin roof lasts decades or needs expensive fixes soon.
Choosing quality materials might seem pricey at first. But they save you money in the long run. Wood is a top choice for framing because it’s strong, versatile, and easy to find.

Understanding Lumber Grades and Wood Species
Every piece of framing lumber has a stamp. These stamps show the lumber’s grade. The grade tells you about the wood’s strength, looks, and any flaws.
Select Structural is the highest grade. It’s strong and has few flaws. It’s pricier but best for key parts like ridge beams. No. 1 grade is strong and has few flaws, great for most framing. No. 2 grade is common for rafters and framing, balancing cost and quality.
The wood species you pick is also important. Douglas fir is a top choice for its strength and stiffness. It resists warping well and handles snow loads well. Southern yellow pine is similar but cheaper in some areas.
Spruce-pine-fir (SPF) lumber is common in many places. It’s a mix of species with similar traits. SPF is good for standard framing and is usually the cheapest option.
Before buying, check each board carefully. Look for big knots, splits, twists, and moisture damage. These can weaken the wood.
Store your lumber right before installing it. Stack it flat and cover the top but leave the sides open. This stops warping and moisture damage.
Essential Fasteners and Metal Connection Hardware
Strong lumber won’t help if your connections fail. Toe-nailing is weak and can pull apart under stress. Modern hardware is stronger and tested in labs.
Hurricane ties are small metal pieces that link rafters to walls and foundations. They resist strong winds that could rip your roof off. Brands like Simpson Strong-Tie make reliable options.
Metal connectors make roof parts work better together. Rafter hangers support rafters at their ends. They make connections strong and reliable.
Looking into roofing materials and installation methods shows connectors are better than nailing. Each connector has a load rating. Match this to your roof’s loads for strength.
Gusset plates strengthen joints where many members meet. They’re flat and attach to both sides of a connection. They’re key at peak connections like where rafters meet ridge boards.
Don’t cut corners on fasteners. Use screws or nails rated for framing. Common nails are weak. Galvanized or stainless steel fasteners resist rust better, which is key in humid areas.
Choosing the Right Sheathing for Structural Integrity
Sheathing turns framing into a solid system. It spreads loads and supports roofing. OSB and plywood are the main choices.
OSB is made of wood strands bonded with adhesive. It’s cheaper than plywood but consistent. It holds fasteners well and resists damage.
But OSB soaks up water more than plywood. Its edges swell when wet. If using OSB, protect it from weather and consider sealed edges for moisture resistance.
Plywood sheathing comes in grades, with CDX common for roofs. The grades show the quality of each face. Plywood handles moisture better and dries faster.
| Material Property | OSB Sheathing | Plywood Sheathing |
|---|---|---|
| Cost per sheet | 15-20% less expensive | Higher initial cost |
| Moisture resistance | Swells when wet, slower drying | Better water tolerance, faster drying |
| Structural consistency | Uniform throughout, no voids | May have gaps in inner plies |
| Fastener holding power | Excellent and consistent | Very good, varies by grade |
Thickness is key for performance. For rafters 16 inches apart, use at least 15/32-inch sheathing. For 24-inch spacing, use 19/32-inch or thicker. This ensures stiffness and support for roofing.
Install sheathing with the long side to rafters. Stagger joints for strength. Leave 1/8-inch gaps for expansion and contraction.
Edge support is vital. Use H-clips or blocking for better performance. Fasten panels as the manufacturer suggests, usually 6 inches on edges and 12 inches in the field.
Whether using traditional lumber or engineered wood, match materials to your loads and climate. Steel framing is gaining popularity for its durability, but it’s pricier and needs special installation.
Calculating Roof Dimensions and Pitch
Before you start cutting rafters, you need to know your roof’s shape and structure. Getting the roof dimensions right is key. Mistakes here can waste a lot of money and time.
Roof geometry is not hard, if you break it down. We’ll guide you through the math needed for your cabin’s roof. This includes figuring out the right pitch for your climate, rafter lengths, and ridge board sizes.
Determining the Correct Roof Pitch for Your Climate
Roof pitch calculation starts with understanding what pitch actually means. Pitch is the ratio of vertical rise to horizontal run. A 4:12 pitch means the roof rises 4 inches for every 12 inches of horizontal distance.
Your climate affects the right pitch for your cabin roof. Steeper pitches shed snow and rain better in snowy areas. Gentler slopes are good for areas with little rain but may collect debris.
Here’s a practical breakdown of pitch recommendations based on climate considerations:
- Heavy snow regions (Northern states): Use pitches of 6:12 or steeper to prevent dangerous snow accumulation
- Moderate climates (Mid-Atlantic, Pacific Northwest): Pitches between 4:12 and 6:12 balance drainage with construction ease
- Low precipitation areas (Southwest): Pitches as low as 3:12 work well and reduce material costs
- Hurricane zones (Coastal areas): Pitches between 4:12 and 6:12 offer wind resistance without creating excessive uplift
Steeper pitches need more lumber and are harder to work on safely. A 12:12 pitch uses more material than a 4:12 pitch on the same building. You’ll also need better fall protection equipment when working on steeper slopes.
The pitch you choose affects your cabin’s height. A steeper roof means a taller structure, which might trigger different building code requirements or affect your cabin’s aesthetic appearance. Always check local codes before finalizing your pitch decision.
Measuring and Calculating Rafter Length
Once you’ve settled on a pitch, calculating rafter length becomes your next critical task. The rafter length formula relies on basic geometry—specifically, the Pythagorean theorem. Don’t worry if geometry class feels like ancient history; we’ll make this simple.
Start by measuring your building’s span—the total distance from outside wall to outside wall. Divide this number by two to get the run (the horizontal distance each rafter must cover). For a cabin that’s 20 feet wide, your run is 10 feet or 120 inches.
Next, calculate the rise based on your chosen pitch. If you’re using a 6:12 pitch with a 120-inch run, your rise is (6/12) × 120 = 60 inches. Now you have two sides of a right triangle: the run (120 inches) and the rise (60 inches).
The rafter length is the hypotenuse of this triangle. Use this formula:
Rafter Length = √(Run² + Rise²)
For our example: √(120² + 60²) = √(14,400 + 3,600) = √18,000 = 134.16 inches, or about 11 feet 2 inches. This gives you the length from the ridge to the wall plate, but you’ll need to add extra length for overhangs if your design includes them.
Here’s a practical approach many experienced builders use:
- Calculate the basic rafter length using the formula above
- Add your desired overhang length (typically 12-24 inches)
- Add a few extra inches for trimming to ensure precision cuts
- Create one pattern rafter and test-fit it before cutting the rest
Measure every piece of lumber twice and cut it once. This old carpenter’s wisdom applies to rafters. Online calculators like TimberToolbox.com can verify your math and calculate rafter thrust and other structural factors. These tools are lifesavers for double-checking your work before you start cutting expensive lumber.
Don’t forget to account for the thickness of your ridge board when making final measurements. A 1.5-inch thick ridge board means each rafter should be cut slightly shorter so they meet properly at the ridge. Subtracting half the ridge board thickness from each rafter length ensures a perfect fit.
Figuring Ridge Board and Hip Rafter Dimensions
Ridge board sizing is more straightforward than rafter calculations, but it’s equally important. The ridge board runs the entire length of your roof at the peak, providing a nailing surface where opposite rafters meet. Your ridge board length equals your building’s length, plus any gable overhangs you’re planning.
For a 24-foot long cabin with 12-inch overhangs on each end, you need a ridge board that’s 26 feet long. Most ridge boards use 2×6 or 2×8 lumber, depending on your rafter size. Larger rafters require wider ridge boards for adequate nailing surface.
Hip rafters are more complex because they run at an angle across the roof corners. Hip rafter dimensions require different calculations than common rafters. The hip rafter is longer than a common rafter because it travels diagonally across the roof plane.
| Roof Component | Calculation Method | Typical Lumber Size | Key Considerations |
|---|---|---|---|
| Common Rafter | √(Run² + Rise²) | 2×6 or 2×8 | Add overhang length to base calculation |
| Ridge Board | Building length + overhangs | 2×6 to 2×10 | Must be wider than rafter stock |
| Hip Rafter | Common rafter length × 1.414 | 2×8 or 2×10 | Requires compound angle cuts |
| Valley Rafter | Similar to hip rafter | 2×8 or 2×10 | Bears significant load concentration |
To calculate hip rafter length, multiply your common rafter length by 1.414 (the square root of 2). This accounts for the diagonal path the hip rafter takes. For a common rafter of 134 inches, your hip rafter would be approximately 189 inches, or just under 16 feet.
Hip rafters also require different angle cuts than common rafters. While common rafters have simple plumb cuts, hip rafters need compound angles that cut both vertically and horizontally. A good framing square or construction calculator becomes essential for these more complex roof geometry calculations.
If you’re building a hip roof, consider using online calculators to verify your hip rafter dimensions. These tools account for all the angles and provide cutting guides that ensure accuracy. Many professional framers use these calculators even after years of experience—there’s no shame in double-checking complex geometry.
Keep detailed notes of all your calculations and write dimensions directly on your lumber with a carpenter’s pencil. When you’re up on the roof frame, having measurements clearly marked saves time and prevents confusion. Some builders create a simple cut list with all rafter dimensions, quantities needed, and notes about special cuts.
Creating Your Framing a Cabin Roof Guide Plan
Creating a detailed framing a cabin roof guide before starting saves you from mistakes and delays. A good plan is like a roadmap for your building project. It helps you see how parts fit together and makes sure you don’t miss important details.
Professional builders know that planning is key to avoiding problems. Your roof framing plan should have detailed measurements, material specs, and how things connect. This info is very helpful when you’re actually building the roof.
Drawing Your Roof Framing Layout
Start by drawing your design on paper. You don’t need fancy software for a good roof framing plan. A simple pencil sketch with the right measurements works well for most cabin projects.
Your drawing should include important details. Clearly mark the rafter spacing, which is usually 16 or 24 inches apart. Include all the dimensions like span width, roof pitch, and overhang length.
Having multiple views helps you see the structure better. Create a plan view to show where the rafters go. Add section views to show how the rafters connect to the ridge board and top plates.
Remember to mark where connections and hardware go. Note where you’ll use hurricane ties, metal connectors, or gusset plates. This detail helps avoid confusion and ensures you buy the right hardware.

Obtaining Necessary Permits and Inspections
Working with your local building department is important. It ensures your cabin is safe and meets building codes. Even remote cabin builders need to get building permits for legal and safety reasons.
Contact your local building department to learn what you need. You’ll likely need detailed plans, engineering calculations, and site information. Some areas have extra rules for cabins in flood zones or high wind areas.
Building inspections happen at key points during construction:
- Foundation inspection before framing starts
- Framing inspection after the roof is built but before sheathing
- Final inspection after all work is done
- Electrical and plumbing inspections if your project needs them
Plan inspections ahead to avoid delays. Keep your approved plans on site for inspectors to check. Working with licensed contractors helps ensure your project passes inspections smoothly.
| Permit Stage | Required Documents | Timeline | Typical Cost Range |
|---|---|---|---|
| Application Submission | Site plans, roof framing drawings, load calculations, property deed | 1-2 weeks processing | $200-$800 |
| Plan Review | Engineering stamps, material specifications, contractor licenses | 2-4 weeks review | Included in permit fee |
| Framing Inspection | Approved plans on site, completed roof frame structure | Schedule 24-48 hours ahead | Included in permit fee |
| Final Approval | All corrections completed, final walkthrough documentation | Same day or next day | No additional cost |
Estimating Material Quantities Accurately
Accurate material estimation saves you from extra trips for supplies and reduces waste. Start by figuring out how many rafters you need based on your cabin’s length and spacing. Add extra for gable ends and special framing around chimneys or skylights.
Use basic formulas to calculate lumber needs. For common rafters, multiply the length by the number needed. Add 10-15% for waste. For remote builds, increase this to 20% to be safe.
Your material list should include these key items:
- Rafters: Based on span, pitch, and spacing
- Ridge board: One long piece or multiple for the cabin’s length
- Collar ties: One for every third or fourth rafter pair
- Sheathing: Square footage divided by sheet size (4×8 feet)
- Fasteners: Nails at 1 pound per 100 square feet, plus specific connectors
Keep detailed notes of your calculations and lists. This helps when ordering supplies and for future projects. Having extra materials is very helpful for remote sites.
Order all materials at once for consistency. Lumber from different batches might vary slightly. Buying everything together can also get you contractor discounts.
Preparing the Top Plate and Wall Structure
The connection between your walls and roof is key. Without proper wall prep, even well-cut rafters won’t work right. This stage is where your roof framing meets the structure below.
This phase is like building a launchpad for your roof. Getting these foundations right is critical. The roof’s base, where it meets the walls, must be secure. Builders use wall plates, bolted to the top of walls, as anchors.
Your wall structure must handle downward and outward forces from the roof. This prep work stops problems that are hard to fix later.
Installing and Leveling the Top Plates
The top plate installation is where rafters sit. It caps your wall framing and spreads roof loads down through studs. Getting this part level and secure is key for a strong roof.
Most builders use a double top plate system for strength. The first plate goes on the studs, and the second overlaps the first’s joints. This ties the walls together and makes a continuous load path.
- Select straight lumber: Use the straightest 2×4 or 2×6 boards for top plates to minimize leveling work later
- Attach the first plate: Nail the first top plate to the wall studs using two 16d nails at each stud location
- Check for level: Use a long level or laser level to verify the plate is level in both directions before adding the second plate
- Shim as needed: Place shims under low spots to bring the entire top plate to a consistent level plane
- Add the second plate: Install the second top plate so its joints fall at least 4 feet away from joints in the first plate
- Secure thoroughly: Nail through both plates into the studs with 16d nails every 16 inches
For log cabins or other wall types, you need a flat surface for rafters. This might mean cutting a flat area on the top log or attaching a plate with lag bolts. The goal is a level, solid surface for rafters.
Leveling is important. A roof’s levelness depends on the wall framing below. Small height differences in the top plate will show up in your roof.
Marking Rafter Placement Locations
Accurate rafter placement marking is key. It ensures rafters line up on both sides of the ridge. This step prevents the frustration of finding misaligned rafters when you’re halfway through.
Standard rafter spacing options are 16 inches on center or 24 inches on center. The 16-inch spacing is common because it supports roofing materials well and matches wall stud spacing. The 24-inch spacing works with larger lumber like 2×10 or 2×12 rafters.
Follow these steps for precise rafter placement marking:
- Start at the same end: Begin your measurements at the same end of both walls to ensure rafters line up across from each other
- Mark the layout: Measure and mark your chosen spacing along the top plate on both walls simultaneously
- Use a square: Draw a line across the top plate with a speed square to show exactly where the rafter will sit
- Mark both sides: Draw an X on the side of the line where the rafter goes to avoid confusion during installation
- Account for gable ends: Place marks for gable end rafters or lookouts according to your roof design
- Double-check alignment: Stretch a string line across the building to verify marks on opposite walls align perfectly
Your layout should account for any special conditions like where rafters meet valley boards or hip rafters. Mark these locations clearly with notes so you remember to cut special rafters for these spots.
Some builders prefer to mark the layout on both the top plates and on a story pole. This redundancy helps prevent mistakes and makes it easier to verify spacing during installation.
Reinforcing Wall Structure for Roof Loads
Walls that stood strong on their own may need reinforcement once roof loads are added. The roof creates both downward pressure and outward thrust at the bearing points. Your wall framing must be ready to handle these forces without bowing or shifting.
Load distribution through the wall structure depends on having adequate bracing and support. Areas requiring extra attention include corners, long wall spans, and any walls that will carry concentrated loads from beams or heavy roof sections.
Consider these reinforcement strategies for your wall structure:
| Reinforcement Type | Application | Best For |
|---|---|---|
| Corner Bracing | Diagonal let-in bracing or structural sheathing | Preventing racking and lateral movement |
| Support Posts | Tripled up 2x6s or 4×4 posts under heavy load points | Areas with concentrated beam loads |
| Mid-Span Blocking | Horizontal blocking between studs at mid-height | Long walls over 10 feet that need stiffening |
| Hurricane Ties | Metal connectors from rafters to top plate to studs | High wind areas or areas with uplift concerns |
For heavy snow load areas, you might need to create tripled up 16 foot 2x6s to form the main center post or add additional support columns. Use blocking and bracing to hold these posts squarely in place and transfer loads properly to the foundation.
Check your wall corners carefully. These areas often need extra studs or blocking to provide adequate bearing surface for roof loads. A standard corner built with three studs usually provides enough support, but corners with only two studs might need reinforcement.
Don’t forget about temporary bracing during construction. Your walls need to stay plumb and square while you’re installing the roof frame. Diagonal braces from the top plate down to stakes in the ground keep everything in position until the roof structure ties it all together permanently.
Take time now to add any reinforcement your wall structure needs. Once the roof goes on, these areas become extremely difficult to access. Strong wall preparation creates the foundation for a roof frame that will last for generations.
Step 1: Cutting and Preparing Your Rafters
Getting your rafters ready starts with knowing each cut and why it’s important. This is where your plans turn into real parts that support your roof. Making these cuts right saves time and ensures a perfect fit.
Each rafter needs different cuts. You’ll make notches for the wall, angles for the ridge board, and cuts for the overhang. Taking your time now avoids mistakes later.
Making the Bird’s Mouth Cut
The bird’s mouth cut is a notch for your rafter on the cabin wall. It transfers the roof load to the wall. Without it, your rafters won’t sit right.
This notch has two cuts. The seat cut is horizontal and flat on the top plate. The heel cut is vertical and against the wall’s edge.

Remember, never cut more than one-third of your rafter’s width. Cutting too deep weakens it. For a 2×6 rafter, the max heel cut is about 1.83 inches.
Mark your bird’s mouth cut with a framing square. Place the square where your rafter will sit, matching the roof pitch. Draw the seat cut line horizontally, then mark the heel cut perpendicular to it.
Use a circular saw for the cuts, stopping before they meet. Finish the corner with a handsaw to avoid weakening the joint. The notch should fit snugly over the top plate.
Some builders cut the bird’s mouth at both the top and bottom of the rafter. This spreads weight across the wall and ridge beam. It’s less common but great for heavy roofs.
Cutting the Plumb Cuts for Ridge and Tail
Plumb cuts are angled cuts at both ends of your rafter. They run perpendicular to the ground at the right pitch. These cuts ensure your rafters fit the ridge board and create a clean fascia line.
The ridge end plumb cut sits flush against the ridge board. Mark it by aligning your speed square at the roof pitch angle. This cut angles away from the bird’s mouth at your pitch.
The tail plumb cut is for the roof overhang. It affects your cabin’s look. Mark it the same way as the ridge cut, keeping the angle consistent.
Measure carefully for both plumb cuts. Use your rafter length calculations from earlier planning. Double-check your measurements before cutting, as these angles must be exact.
Make smooth, straight cuts following your marked lines. A sharp circular saw blade makes cleaner cuts. Support the rafter while cutting to prevent binding or kickback.
Creating a Pattern Rafter for Consistency
A pattern rafter is a template for cutting all rafters. Once you’ve cut one perfect rafter, you can trace its shape onto other lumber. This saves time and improves consistency in your roof frame.
Start by measuring, marking, and cutting one rafter carefully. Test-fit this rafter in place if possible. Verify all cuts are accurate, including the bird’s mouth and ridge cuts.
Once verified, use this pattern rafter to mark subsequent pieces. Lay it on new lumber, trace around it, and transfer all cut marks. This method works well for small to medium projects with consistent lumber dimensions.
But, for larger builds, measure each piece of lumber individually before cutting. This takes more time but prevents rafters that don’t fit. Small variations can cause alignment problems during installation.
The best approach is to use your pattern rafter as a guide but verify key measurements on each board before cutting. This gives you speed without sacrificing accuracy.
Pre-Drilling Nail and Bolt Holes
Pre-drilling holes for fasteners is an optional step many builders swear by. It involves drilling pilot holes for nails, screws, or bolts before installing the rafters. While it adds time, the benefits often outweigh the extra effort.
Pre-drilling prevents wood from splitting when fasteners are driven near board ends. This is key at the ridge connection and where hurricane ties attach. Split wood loses holding power and weakens your structure.
This technique also speeds up installation when working at height. Having holes already positioned means less fumbling with tools. You can focus on alignment and securing the rafter.
Use a drill bit slightly smaller than your fastener diameter. For 16d nails, a 1/8-inch bit works well. For structural screws or bolts, follow the manufacturer’s recommendations for pilot hole size.
Mark hole locations based on your connection hardware needs. If using hurricane ties or metal connectors, position holes to match their fastener patterns. This ensures proper alignment when installing these critical safety components.
Not every fastener needs pre-drilling. Focus on connections near board ends, in harder wood species, or where using larger fasteners. Mid-span toenail connections usually don’t need pilot holes.
Label or organize your rafters after cutting so you know which end goes where. Stack them carefully to prevent warping before installation. Proper organization keeps your installation process smooth.
| Cut Type | Purpose | Key Measurement | Common Mistake |
|---|---|---|---|
| Bird’s Mouth Notch | Seats rafter on top plate | Maximum 1/3 rafter depth | Cutting heel too deep |
| Ridge Plumb Cut | Connects to ridge board | Matches roof pitch angle | Wrong angle measurement |
| Tail Plumb Cut | Creates overhang end | Distance from bird’s mouth | Inconsistent overhang lengths |
| Pre-Drilled Holes | Prevents splitting, speeds install | Slightly smaller than fastener | Holes too large or misaligned |
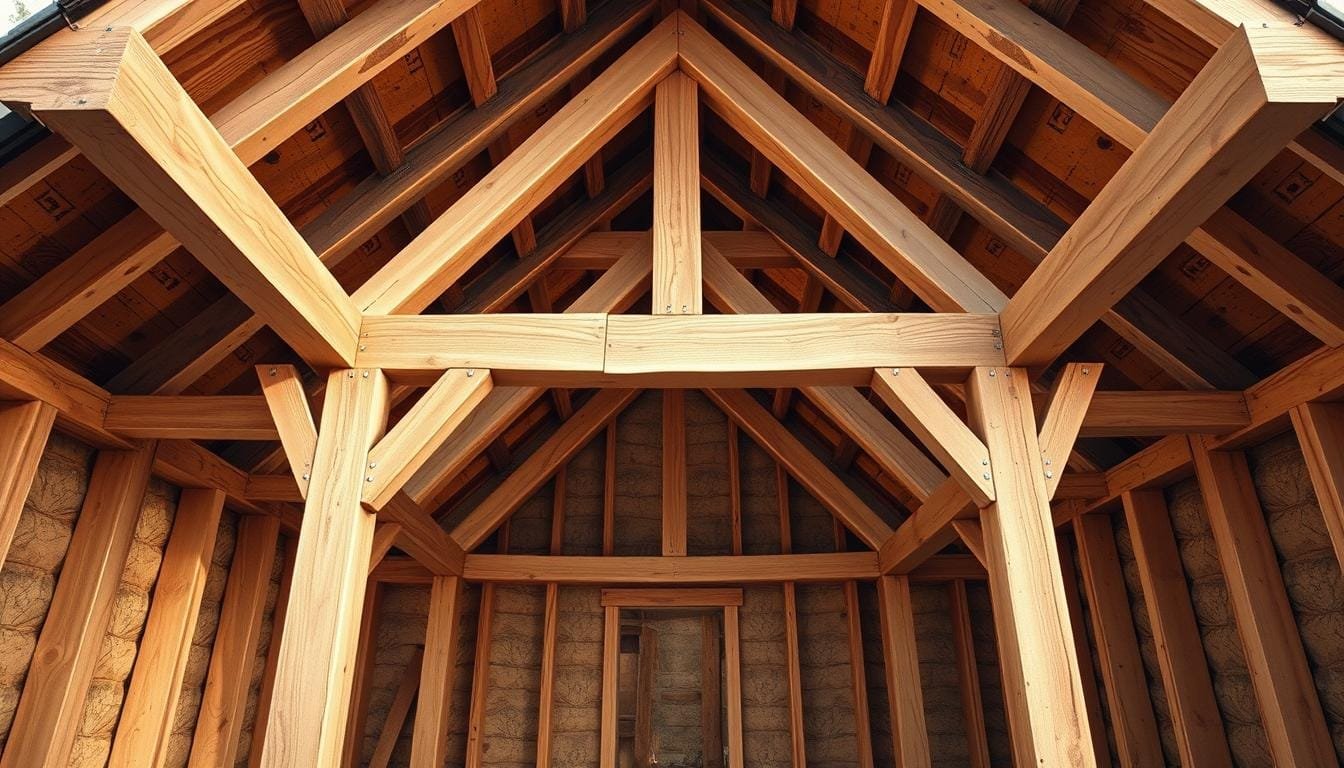
Step 2: Installing the Ridge Board
Getting the ridge board up is a critical moment in roof framing. This beam runs along the roof’s peak. It’s where your rafters meet. Without a solid ridge board, your roof could be crooked or weak.
This step is about precision, not just strength. You must hold a heavy board at the right height and keep it level. Proper planning and temporary supports are key.
Take your time with this step. Rushing can lead to problems later. Let’s go through it together so you can do it right the first time.
Setting Up Temporary Support Posts
Before placing your ridge board, you need rock-solid temporary supports. These posts will hold the board at the correct height. Building them properly is vital for safety and accuracy.
Use multiple pieces of lumber for strong posts. Many builders triple up 2x6s or 2x4s. This makes a column strong enough to handle the load without bowing or shifting.
Here’s how to build effective support posts:
- Cut your lumber pieces to the calculated height needed for your roof pitch
- Fasten three 2x6s or four 2x4s together with construction screws every 16 inches
- Add diagonal bracing on at least three sides to prevent any movement
- Secure the base to the floor or top plate so nothing can kick out
- Place posts at the center and approximately every 8-10 feet along the ridge span
Calculating the height is critical. Measure from the top of your wall plate to where the ridge board needs to sit. Remember, your bird’s mouth cut already accounts for the wall plate thickness.
Double-check that each post stands plumb (perfectly vertical) using a level on two adjacent sides. Even a slight lean can throw off your entire roof alignment. Once positioned, add temporary 2×4 bracing to lock everything in place before you start lifting heavy beams.

Positioning and Securing the Ridge Board
With your temporary supports ready, you can tackle the actual ridge beam positioning. For cabins with ridge boards longer than 12 feet, consider building the beam in sections. This makes the work safer and more manageable.
The sectional approach makes the work safer and more manageable. Start by lifting the first section into place on your support posts. You’ll want at least one helper for this—two people working together can control the board much better than one person struggling alone.
Once you have the first section resting on your supports, use metal connector plates to secure it temporarily. Simpson strong ties work exceptionally well for this purpose. Installing two connector plates on each support post creates a stable cradle that holds the board while you work.
For a laminated ridge beam (multiple boards fastened together), here’s the assembly sequence:
- Position the first 2×10 or 2×12 board on the support posts
- Apply construction adhesive along the entire length of the first board
- Lift the second board and press it firmly against the first
- Secure with 16d nails or 3-inch construction screws every 12 inches in a staggered pattern
- Add a third board if your engineering requires a triple-ply beam
When joining sections end-to-end, make sure the joint falls directly over a support post. Stagger the joints between layers if you’re building a multi-ply beam—never line up joints from different layers at the same spot.
Use plenty of fasteners at these connection points. This isn’t the place to save a few nails. The ridge board will carry significant loads, and proper fastening ensures it acts as a single, solid unit.
Ensuring Proper Height and Level
Here’s where patience pays off big time. Before you permanently fasten anything, you need to verify that your ridge board sits at exactly the right height and stays perfectly level along its entire length.
Start with the level check. Place a quality 4-foot level on top of the ridge board and check multiple locations. For spans longer than your level, use a longer straight edge with the level on top, or invest in a laser level for foolproof accuracy across long distances.
If you find high or low spots, use cedar shims or wooden shingles to make adjustments. Slip shims between the ridge board and the support posts wherever needed. Add shims gradually—thin adjustments work better than one thick wedge that might compress over time.
The height verification is equally important. Your rafters were cut to specific dimensions assuming a particular ridge height. Measure from the top of the wall plate to the bottom of the ridge board at several points. These measurements should match your rafter calculations exactly.
Here’s a comparison of different leveling techniques you can use:
| Method | Accuracy Level | Best For | Cost |
|---|---|---|---|
| 4-foot spirit level | Good for short spans | Ridge boards under 12 feet | $30-$60 |
| Water level | Very accurate | Long spans, multiple reference points | $15-$25 |
| Laser level | Extremely accurate | Professional results, complex roofs | $100-$400 |
| String line method | Good with careful setup | Straight runs, budget builds | Under $10 |
Don’t skip the straightness check either. Sight down the length of the ridge board from one end. Any bow or curve will be obvious when you look down the board like a rifle barrel. A slight bow can be corrected by adjusting your support posts or adding an additional support.
Once everything checks out—level, straight, and at the correct height—go ahead and permanently secure your ridge board to the temporary supports. You’ll remove these supports later after the rafters are installed and carrying the load properly.
Take a moment to verify everything one more time before moving forward. Fixing a misaligned ridge board after you’ve installed rafters is a nightmare you definitely want to avoid. This extra ten minutes of checking now saves hours of frustration later.
Step 3: Raising and Securing the Rafters
Raising rafters is a mix of preparation and action. It turns your plans into a real roof that will protect your cabin for years. You need to be careful, safe, and methodical to get each rafter right.
Working high up is serious business. Having someone help makes it safer and faster. But, you can do it alone with the right steps and support.
Getting the First Pair Positioned Correctly
The first rafters set the tone for the rest. They help stabilize the ridge board, making it easier to add more rafters. Start at one end, not the middle, for better access and stability.
Place the first rafter so its birdsmouth notch fits flat on the top plate. Make sure the plumb cut at the ridge fits the ridge board well.
Lifting one rafter at a time is safer than moving big pieces. A 20-foot 2×8 weighs about 54 pounds. This makes it easier to handle without special tools.
Secure the first rafter with a few nails in the birdsmouth. Don’t nail it all the way yet, as you might need to adjust. Install the opposite rafter the same way, making a pair.
Use a level to check if both rafters are straight. Add temporary bracing to hold them in place. This keeps the rafters steady while you finish the fastening.

Moving Systematically Down the Roof
Once the first pair is secure, move along the ridge board adding more rafters. Install them in pairs or alternate sides. This keeps the roof even and the ridge board straight.
Use your layout lines on the top plate to place each rafter. These lines should match your rafter spacing, usually 16 or 24 inches apart. This ensures the roof loads are evenly distributed.
Check each rafter fits well before nailing it down. The birdsmouth should fit snugly, and the ridge cut should meet the ridge board without gaps. Small adjustments are normal, but big issues need fixing.
Work steadily but don’t rush. Quality connections are more important than speed. A roof framing guide can help you install efficiently.
As you add more rafters, the structure gets stronger. The rafters support each other, making later installations easier. Always check alignment after installing a few pairs to catch any problems early.
Installing Hurricane Ties for Maximum Strength
Simple toe-nailing isn’t enough for strong connections. Metal connectors are better for resisting wind and heavy loads. They wrap around the rafter and attach to the top plate securely.
Hurricane ties and metal clips create strong connections. They keep rafters from pulling away from walls in strong winds. Use the right nails for these connectors.
Put hurricane ties on both sides of each rafter. Make sure they wrap around the rafter without gaps. The metal should sit flat against both the rafter and the wall plate.
Use the right nails for the connectors, as specified by the manufacturer. Fill every hole with a nail. Partially filled connectors are weaker and may not pass inspection.
Quality metal connectors make your roof safer and last longer. They distribute loads well and are stronger than toe-nailing. Many areas now require these connectors for building codes.
Checking Spacing and Alignment Throughout
Keep an eye on rafter spacing and alignment as you work. Small mistakes can add up and cause problems. A crooked roof or wrong spacing makes sheathing hard to install.
Make a spacing gauge from a scrap piece of lumber. Use it to check spacing as you install each rafter. This quick check prevents big mistakes.
Check rafter alignment along the ridge board by sighting down the row. They should form a straight line. At the bottom, verify the birdsmouth cuts are straight.
Use a straightedge or string line to check alignment. If a rafter is off, fix it before adding more. Small adjustments are easy before final fastening.
Proper alignment ensures even loads and a smooth surface for sheathing. Twisted or misaligned rafters cause uneven surfaces and water pooling.
As you finish the rafter installation, step back and look at your work. The roof should look even and sturdy. This visual check often finds issues that measurements miss.
With all rafters up, secured with metal connectors, and checked for spacing and alignment, your roof frame is complete. Next, add collar ties and bracing to make the rafters strong enough to hold heavy loads for decades.
Step 4: Adding Collar Ties and Structural Bracing
The fourth step in building your cabin roof frame is adding structural support. This keeps everything in place under stress. Your rafters form the basic framework, but more bracing turns them into a strong system. This stage makes your roof strong and rigid for years.
Structural bracing is like insurance for your roof. It stops rafters from spreading and keeps the roof square. Proper bracing now saves you from expensive repairs later.
Installing Collar Ties for Additional Support
Collar ties are horizontal members that connect opposing rafters in the upper third of the rafter span. They stop rafters from spreading apart under load. Without them, the roof can spread over time under weight.
Place collar ties in the upper third of the rafter height. This is between one-third and one-half the distance from the ridge to the top plate. Too low, and they’re like ceiling joists. Too high, and they’re less effective.
Fasten collar ties with structural bolts or multiple nails, as local codes require. Use at least three 16d nails on each end. In high-load areas, half-inch bolts with washers are better. Space them to match rafter spacing, or every other pair.

Cathedral ceilings need special care because you can’t use lower joists. Collar ties are critical for these roofs. You might need them on every pair and use heavier lumber.
Adding Ridge Bracing and Purlins
Ridge bracing and purlins add lateral bracing. They prevent sagging and keep the roof aligned. These components are key for longer spans and heavy snow loads.
Purlins are horizontal members that run perpendicular to your rafters, providing intermediate support along the rafter length. They stop rafters from sagging between the ridge and the wall. For long rafters, purlins are vital for a straight roof.
Put purlins at the midpoint of your rafter span. They should run from one end of the roof to the other. Use the same lumber size as your rafters. Secure them to each rafter with two or three 16d nails.
Ridge bracing keeps the ridge board straight. For long ridges, add vertical bracing every 8 feet. This keeps the ridge straight and level, avoiding wavy lines.
Purlins and ridge bracing create a grid support system. This system distributes loads evenly and prevents overloading. It’s great for areas with variable snow loads.
Strengthening with Gusset Plates Where Needed
Gusset plates reinforce critical connections in your roof frame. They strengthen joints that might rely only on nails or fasteners. In high-wind or seismic areas, codes often require them.
The most common locations for gusset plates include the ridge connection where rafters meet the ridge board and where collar ties connect to rafters. These joints face a lot of stress. Gusset plates help by spreading forces across a larger area.
Size your gusset plates for the loads they’ll handle. A typical plate is at least 16 inches on each leg, cut from half-inch plywood or OSB. For heavier loads, increase the size.
Proper fastening is key for gusset plates. Use construction adhesive and mechanical fasteners. Space 8d nails or structural screws every 3 inches around the perimeter and every 6 inches in the field.
| Bracing Component | Primary Function | Typical Location | Material Size |
|---|---|---|---|
| Collar Ties | Prevent rafter spread and outward thrust | Upper third of rafter span | 2×4 to 2×6 lumber |
| Purlins | Provide intermediate rafter support | Midspan of rafters | Same size as rafters |
| Ridge Bracing | Prevent ridge sag and maintain alignment | Every 8 feet along ridge | 2×4 or 2×6 vertical supports |
| Gusset Plates | Strengthen critical joint connections | Ridge and collar tie joints | 1/2-inch plywood, 16″+ legs |
In traditional rafter construction, bracing elements counteract roof loads. Some modern designs avoid rafter thrust, but most need these components. Collar ties, purlins, ridge bracing, and gusset plates keep your roof strong for decades.
Don’t skip structural bracing to save money or time. These elements are a small part of your cost but offer huge benefits. A well-braced roof resists nature and time, keeping your cabin safe for generations.
Step 5: Installing Roof Sheathing
Installing sheathing turns your roof frame into a solid base. After framing, plywood or OSB sheathing covers the roof. This layer supports underlayment and shingles, tying the roof together.
The quality of your roof sheathing affects how well your cabin withstands weather. Proper installation ensures stability and load capacity. Following best practices makes your roof last for decades.
Choosing Between OSB and Plywood Sheathing
OSB and plywood are common sheathing materials. OSB costs 15-20% less and has consistent quality. It doesn’t have knots or weak spots like plywood.
Plywood is better at resisting water and is stronger. It holds fasteners well, making it good for wet climates.
Thickness depends on rafter spacing. For 16-inch spacing, use 7/16-inch panels. For 24-inch spacing, use 15/32-inch or 1/2-inch panels.

Check panel markings before installing. These stamps show the panel’s rating and orientation. The marking indicates which side should face up.
| Feature | OSB Sheathing | Plywood Sheathing |
|---|---|---|
| Cost | 15-20% less expensive | Higher initial cost |
| Moisture Resistance | Swells more when wet | Better water resistance |
| Consistency | Uniform with no voids | May contain knots or gaps |
| Strength | Good overall strength | Slightly stronger |
Proper Sheathing Layout and Staggering
Never align sheathing panel joints in rows. This weakens the roof. Staggering panels makes the roof stronger and more even.
Start with a full panel on one end of the roof. Begin the second row with a half panel. Keep alternating this pattern.
Place panels with the long side across rafters. This makes the roof stronger. Center panel edges on rafters for better fastening.
When panels don’t fit on rafters, add support. Use blocking or H-clips to prevent sagging.
Fastening Techniques for Maximum Strength
Good fastening is key for a strong roof. Inadequate fastening can cause roof failure. Follow specific spacing for edges and the field.
Fasten edges 6 inches apart. In the field, space fasteners 12 inches apart. This pattern is strong without over-fastening.
Use ring-shank nails or screws that go 1.5 inches into rafters. For 1/2-inch sheathing, 8d nails are good. Screws are better in windy areas.
Keep fasteners 3/8 inch from edges to avoid splitting. Make sure fasteners are flush with the surface.
Key Fastening Guidelines:
- Panel edges: 6 inches on center along rafters
- Field areas: 12 inches on center on intermediate supports
- Minimum penetration: 1.5 inches into framing
- Edge distance: 3/8 inch minimum from panel edges
- Fastener placement: Flush with surface, not overdriven
Leaving Expansion Gaps and Edge Support
Wood panels expand and contract with weather changes. Expansion gaps prevent buckling and damage. Leave 1/8-inch gaps between panels.
Use an 8d nail head as a spacer. This is the right thickness. For tongue-and-groove edges, follow manufacturer specs for spacing.
Panel edges between rafters need support. Use blocking or H-clips to prevent sagging. H-clips are faster and cheaper.
Edge support is critical at panel corners. These areas carry heavy loads. Make sure corners have solid backing.
Common Mistakes to Avoid When Framing Your Cabin Roof
Knowing what can go wrong with roof framing helps avoid costly repairs and safety hazards. Even experienced builders make mistakes that can harm the structure. Most roof framing mistakes can be prevented by knowing what to look for.
Shortcuts in framing may save time but cost more later. Finding structural problems after the roof is done is bad. Doing it right the first time saves money and keeps your cabin safe.
The most common framing errors include sizing and spacing problems, connection issues, and ignoring local climate needs. Each mistake can lead to serious structural problems. Let’s look at how to spot and prevent these errors before they become expensive.
Sizing and Spacing Problems That Compromise Strength
One big mistake is using lumber that’s too small for the span or spacing rafters too far apart. This mistake makes the roof unable to support loads. Many builders don’t realize how important proper sizing is.
You can’t guess the right rafter size based on another project. Every building has unique needs based on span length, roof pitch, and local load requirements. Span tables from lumber associations and building departments show the right size for your project.
Using small rafters causes problems like a bouncy roof or even structural failure under heavy loads. This is serious.

Standard rafter spacing is usually 16 to 24 inches on center, depending on size and load needs. Cutting corners by spacing rafters too far apart is dangerous. This makes each rafter carry too much weight.
Always check your rafter size with official span tables before cutting lumber. These tables consider wood type, grade, spacing, and expected loads. If unsure, talk to a structural engineer.
Building too big is also a problem, though less dangerous. Using too large rafters wastes money without improving performance. Following proper framing guidelines helps you build just what’s needed.
Fastening and Connection Issues
Poor connection details are another common roof failure cause. Just toe-nailing rafters to top plates is not enough for modern building code compliance, which is important in areas with high winds or seismic activity. These simple connections can pull apart under stress, causing the roof to separate from the walls.
Hurricane ties, metal clips, and other hardware connectors provide much stronger connections than nails alone. These engineered products are designed to resist uplift forces and lateral movement. Skipping these connectors to save money is risky.
Using the wrong fasteners or the wrong length for fasteners creates serious problems. Each connection point needs specific fasteners installed in precise locations. Using screws where nails are specified, or vice versa, weakens the connection.
Many builders don’t know that different fasteners have different load ratings. A connector rated for six 10d nails can’t use six screws instead. The manufacturer’s instructions tell you exactly what fasteners to use and where to place them.
Connection failures often happen during extreme weather. Rafters can lift off walls during high winds when connections are weak. They can also separate from ridge boards under heavy loads, causing roof collapse.
Never reduce the number of fasteners for any connection. Each fastener adds to the connection’s strength. Removing one reduces the connection’s capacity. Always follow the manufacturer’s specifications for every metal connector you install.
Climate and Load Calculation Mistakes
Ignoring local snow and wind load requirements is very dangerous. Building codes set minimum design loads based on historical weather data for each area. These are not just numbers; they are what your roof must withstand to stay safe.
A roof design that works in Georgia might fail in Minnesota or Colorado if not engineered for local conditions. Snow loads vary a lot across the country, from 10 pounds per square foot in warm areas to over 100 pounds per square foot in mountain regions.
Wind speeds also vary a lot by location and terrain. Coastal areas face hurricane-force winds, while mountain valleys may experience extreme downdrafts. Your local building department provides the specific load requirements for your area.
Uneven weight distribution across the roof structure causes problems. When loads aren’t spread evenly, certain areas get too much stress. This can lead to sagging, warping, or even localized collapse under load.
Using materials not suitable for your climate is another common error. Some lumber species resist moisture better than others. Metal connectors need proper corrosion protection in humid environments. Choose materials rated for your specific climate conditions.
Rushing through construction without proper inspections lets framing errors go unnoticed until they cause problems. Schedule inspections at each critical stage of framing. Building inspectors catch mistakes before they become hidden behind sheathing and roofing materials.
| Common Mistake | Consequence | Prevention Method | Estimated Fix Cost |
|---|---|---|---|
| Undersized rafters | Excessive deflection or structural failure under load | Use official span tables for all sizing decisions | $3,000-$8,000 for rafter replacement |
| Inadequate fastening connections | Roof separation from walls during high winds | Install rated hardware connectors per specifications | $2,000-$5,000 for connection upgrades |
| Incorrect rafter spacing | Sagging roof deck and possible collapse | Follow code requirements for spacing (typically 16″ or 24″ OC) | $4,000-$10,000 for additional rafter installation |
| Ignoring local snow loads | Catastrophic failure during winter storms | Design for local climate conditions using building code data | $5,000-$15,000+ for structural reinforcement |
| Skipping building inspections | Hidden defects that worsen over time | Schedule inspections at each framing stage | $1,000-$20,000+ depending on required corrections |
Remember, building code compliance is more than just passing inspection. Codes are based on decades of engineering research and real-world failures. Following these standards keeps your cabin and everyone who uses it safe.
Take time to research your local requirements before starting construction. Contact your building department for specific snow load and wind speed data for your property. Include these requirements in every design decision during the planning phase.
Document your work with photos at each construction stage. This creates a record showing you followed proper procedures and used the right materials. If questions arise later, you’ll have proof that the work was done correctly.
Learning from others’ mistakes is cheaper than finding problems after your roof is done. By avoiding these critical errors, you’ll build a roof frame that works well for your cabin’s whole life.
Finishing Strong: Final Inspection and Next Steps
Finishing your cabin roof frame is a big achievement. Now, do a detailed roof frame inspection. Check if rafter spacing is even, connections are right, and the ridge is straight.
Before adding sheathing, get a building inspection. Inspectors will check if your work meets local codes. Fix any problems they find to stay on schedule.
Now, your roof is ready for finishing. Next, install waterproof underlayment and roofing material. Paletz Roofing says a solid frame avoids future costs.
Take photos of your work and keep records. Check your roof every year for damage. Your well-built roof will last for decades with care.


