Welcome to your complete guide on creating a sturdy, reliable base for your small cabin. This project can save you both time and money while providing a permanent solution that meets building codes.
Choosing this method offers significant benefits over other types. It is cost-effective and versatile, suitable for any size structure. It also adapts well to challenging terrain like slopes or damp areas.
The process involves digging holes down to the frost line and filling them with concrete. This creates stable support points that resist ground movement in cold climates.
Whether you’re planning a weekend retreat or a backyard workshop, understanding the proper way to construct this support system will give you confidence. We will walk you through every step, from planning to the final curing process.
This guide is perfect for diy enthusiasts who want to tackle their own project. You can achieve professional-quality results and make your cabin dreams more affordable.
Planning and Layout for a Secure Foundation
Before a single hole is dug, careful preparation sets the stage for a successful and durable structure. This phase is all about translating your cabin’s design onto the actual building site.
A precise layout is your most important tool. It prevents future problems and ensures everything fits together perfectly.
Determining Shed Size and Pier Placement
Start with your cabin’s exact dimensions. Your building plan provides key information about how many support points you’ll need.
Larger structures or those holding heavy items require more piers. It’s always safer to add extra supports than to risk having too few. For a comprehensive detailed planning guide, consider these factors.
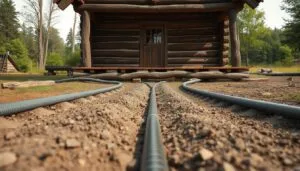
Select your building area wisely. Think about water drainage, property lines, and easy access.
Marking the Border with Stakes and String
Once you pick the spot, outline the perimeter. Drive wooden stakes into the ground at each corner.
Connect these stakes with a tightly stretched string. This creates a clear visual border for your cabin’s footprint.
Use this string layout to mark where each support post will go. This includes corners and spots along the walls.
For a perfectly square shape, double-check your corners using the 3-4-5 triangle method. This simple check guarantees a level base.
Preparing the Site and Essential Materials
Getting your site and supplies ready is a crucial step for a solid build. Proper groundwork prevents future headaches and ensures a smooth construction process.
This phase involves two key things: understanding your land and having the right tools on hand.
Checking Frost Line, Soil Conditions, and Local Codes
First, contact your local building department. They provide vital information about the frost line depth in your area.
Your support posts must extend below this line to prevent damage from ground freezing. In cold regions, this can be very deep.
Next, assess your soil conditions. Good soil has strong bearing capacity to hold weight.

Watch how water moves across your site after rain. Avoid spots where it pools, as soggy ground is weak.
| Soil Type | Bearing Strength | Recommendation |
|---|---|---|
| Sands & Gravels | 2000 psf | Excellent, provides strong support |
| Silts & Clays | 1500 psf | Good, typical for many yards |
| Expansive or Wet Soil | Below 1500 psf | Avoid, can shift and cause instability |
Gathering Concrete, Gravel, and Fiber-Form Tubes
With the site checked, gather your supplies. Having everything ready makes the job quicker.
You will need concrete, gravel, and fiber-form tubes. The gravel goes in the bottom of each hole for drainage.
Make sure you have enough materials calculated for all your support points. For more details on materials for shed foundation piers, this is a great resource.
Having the right tubes and mix on site keeps your project moving forward without delays.
DIY Pier Foundation: Step-by-Step Construction Process
The construction phase transforms your layout markings into permanent support structures for your cabin. This hands-on work builds the stable base that will support your entire building.
Digging Pier Holes and Installing Fiber-Form Tubes
Start by digging your support holes at each marked location. Make each opening about 2 inches wider than your fiber-form tubes. This extra space allows for proper positioning.
Dig all holes to the required depth, typically below your local frost line. Use a post hole digger for smaller supports or an auger for larger diameters to save time.
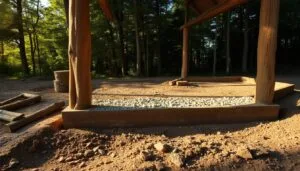
After reaching proper depth, add about 4 inches of gravel to each hole bottom. Compact it firmly with a long 4×4 post to create a stable, well-drained base.
Fiber-form tubes come in various sizes from 6 to 36 inches in diameter. For most small cabins, 8-inch to 12-inch tubes provide adequate support. Cut them to the proper height using a handsaw or circular saw.
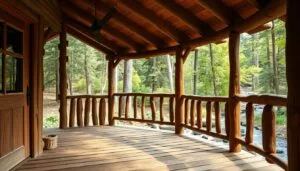
Ensure each tube extends at least 6 inches above ground level. This protects your wooden beam structure from ground moisture.
Aligning Piers and Ensuring Level Surfaces
Carefully lower each tube into its prepared hole. Use a 4-foot level against the tube side to ensure it stands perfectly straight. Backfill around each tube with soil, tamping firmly in layers.
The most critical aspect is ensuring all tube tops are perfectly level with one another. This creates a level plane for your floor beam system.
| Cabin Size | Recommended Tube Diameter | Typical Spacing |
|---|---|---|
| Up to 120 sq ft | 8 inches | 6-8 feet apart |
| 120-200 sq ft | 10 inches | 5-7 feet apart |
| 200-400 sq ft | 12 inches | 4-6 feet apart |
Stretch a taut string line across your installed tube tops. Use a long level or laser level to verify all supports are at exactly the same height. Make adjustments by adding or removing soil beneath tubes as needed.
Take your time during this alignment phase. Getting your supports perfectly level now prevents structural problems later. Precision here ensures your cabin doors and windows will operate smoothly for years.
Pouring, Curing, and Securing Your Pier Structure
Now comes the exciting part where your prepared tubes transform into permanent supports. This phase combines precision with patience to create a rock-solid base for your cabin.
Mixing and Pouring Concrete Smoothly
Begin your concrete pour by mixing bags according to package directions. Add water gradually until you achieve a smooth, workable consistency without lumps.
Work efficiently once mixed, as time is limited. Pour the poured concrete slowly into each tube, filling halfway first.

This pause allows for critical consolidation. Use a spare rebar to stab through the mixture, releasing air bubbles that weaken the structure.
Complete filling each concrete pier to the top, then smooth the surface with a trowel. For detailed techniques on pouring concrete, proper execution matters.
Managing Cure Time and Installing Post Bases
Immediately embed zinc-galvanized post bases into each wet concrete pier. Stretch a string line to ensure perfect alignment for your beam connections.
The curing process develops strength over several days. Mist the surface with water daily and cover with plastic to slow moisture loss.
Proper curing time is non-negotiable. The longer the concrete cures, the stronger your piers become.
Remember that elevated designs require floor insulation. This prevents heated and cooled energy from escaping, saving money year-round.
Wrapping Up: Final Checks and Building Confidence
With your structural supports now in place, you’re ready to move forward with confidence. Your hard work has created a permanent base that meets all code requirements.
Before starting your floor frame, do a final inspection. Check that each support extends the proper distance above grade. This keeps your wooden structure safe from ground moisture.
Verify that all support tops are perfectly level across the entire area. Use a long straightedge to confirm your beam will sit on a flat plane. Minor height differences can be fixed with shims during beam installation.
Your elevated design creates valuable crawl space beneath the floor. This area provides access for utilities and prevents moisture problems at the bottom. Install insulation between joists to save energy year-round.
Document your project with photos and material information. These records are valuable for future reference. You’ve gained skills that will serve you well in future building projects.