Welcome to your complete guide on creating an affordable rustic retreat. Many people dream of owning their own peaceful getaway but worry about the costs. This article shows you how to make that dream a reality without spending a fortune.
You’ll discover practical approaches that real homeowners have used successfully. These techniques prove that constructing your own structure is more achievable than you might imagine. Everyday people with different skill levels have created beautiful, functional spaces.
Some ambitious individuals have completed impressive projects for between $8,000 and $13,000. This demonstrates that log cabin ownership doesn’t require enormous financial resources. With careful planning and smart choices, your vision can become tangible.
We’ll walk through everything from initial planning to material selection and hands-on construction. You’ll learn from real-world examples of successful building projects. Whether you want a weekend escape or permanent off-grid living, this guide provides a clear path forward.
By the end, you’ll understand the fundamental principles of budget-conscious construction. You’ll feel empowered to start your own project with confidence. Let’s begin this exciting journey toward creating your personal sanctuary.
Welcome to the World of Budget-Friendly Cabin Building
The growing movement toward self-built structures reflects a desire for hands-on creation and connection to nature. Recent years have inspired many to pursue personal construction ventures.
Filmmaker Graeme Jenvey exemplifies this trend. He transformed his passion for woodworking into a beautiful backyard retreat. His journey shows what’s possible with determination.
Different approaches suit various skill levels and goals. Consider these construction methods for your project:
| Approach | Skill Level Required | Time Investment | Cost Efficiency |
|---|---|---|---|
| Kit-Based Assembly | Beginner | Low to Medium | Moderate |
| Traditional Framing | Intermediate | Medium | High |
| Alternative Materials | Advanced | High | Maximum |
Many successful builders started with minimal experience. The learning process itself becomes one of the most rewarding aspects. You gain practical knowledge while creating your space.
This guide welcomes you into a supportive community. Cabin ownership should be accessible to anyone willing to invest creativity and effort. Your dream retreat awaits.
Understanding the Basics of DIY Cabin Construction
Before swinging a hammer, it’s crucial to understand what makes a structure stand strong. Learning these fundamentals saves you time and prevents costly mistakes during your project.

Overview of Essential Cabin Components
Every durable shelter relies on the same essential framework. The foundation supports everything above ground. Wall studs and rafters create the skeleton.
Roofing and finishing elements protect against weather. These components work together for stability. Understanding their relationship is key to success.
DIY Versus Professional Builds
Many people worry they lack sufficient experience. Graeme Jenvey started with elementary school treehouses. He later learned framing techniques during a gap year.
Hands-on practice often beats formal training for small structures. The main difference usually involves time investment rather than final quality. Patient attention to detail yields excellent results.
| Aspect | DIY Approach | Professional Build |
|---|---|---|
| Cost Factor | Labor savings up to 60% | Includes full labor costs |
| Time Commitment | Learn as you progress | Fixed schedule |
| Skill Development | Gained through project | Pre-existing expertise |
Your starting skill level matters less than your willingness to learn. Many successful creators developed abilities during construction. Research and consultation provide strong foundations for any project.
Step-by-Step Guide: cheap diy cabin build methods
Creating your own personal retreat becomes much simpler when you approach it as a series of logical, manageable phases. A clear plan is your best tool for success.
Graeme Jenvey’s project, completed over a year using weekends and evenings, shows the power of this approach. He dedicated around 55 working days to the process.
Planning Your Build Process
The first step is always planning the sequence. You start with the foundation and work upwards. This logical order prevents having to redo work later.
Spreading the work over many days, or even a full year, makes a large project feel achievable. This way, you can balance construction with other life responsibilities.
Mapping Out the Construction Steps
A typical sequence begins with site preparation and a solid foundation. Next comes the floor frame, followed by wall framing. The roof structure is a critical step that requires precision.
Finally, you add exterior finishes like roofing and siding. Taking your time with each phase ensures a quality result. Rushing often leads to mistakes that waste time later.
Documenting your progress with photos helps you track achievements and serves as a useful reference. This method turns a daunting task into an enjoyable journey.
Planning and Budgeting Your Cabin Project
Smart financial planning turns your cabin dream into an achievable reality. Establishing a realistic budget forms the foundation of successful project management.
Recent constructions demonstrate functional structures can be completed for $8,000 to $15,000. Graeme Jenvey’s project totaled approximately $12,745.
Setting Your Budget and Timeline
Break your budget into logical phases: foundation, framing, exterior, and interior. This approach helps you understand where money goes.
Exterior construction typically consumes 60-65% of total costs. Interior elements like flooring and climate systems account for the remainder.
Setting a realistic timeline requires honest assessment of your available time. Most weekend warriors complete projects over 6-12 months.

Tips for Cost-Effective Project Management
Land acquisition represents a crucial early consideration. Property costs vary dramatically by location.
Many experienced creators recommend looking for land early in your planning process. Understanding pricing in your desired area provides strategic advantages.
Asking the right questions about permits and regulations prevents costly surprises. Thorough planning saves considerable time and money during construction.
Consider shopping for materials strategically and building relationships with local suppliers. Reclaimed wood can offer significant savings.
Making your project a financial priority may require redirecting discretionary spending. This approach makes costs more affordable over time.
Materials and Techniques for Efficient Building
Choosing the right materials and mastering efficient techniques are the twin pillars of successful construction. This phase directly impacts your budget, timeline, and the final quality of your retreat.
Smart choices here make the entire process smoother. You can create a durable and beautiful structure without overspending.
Selecting Affordable Lumber and Supplies
Understanding standard dimensional lumber is your first step. Common sizes like 2x10s for floor joists and 4×4 posts form a strong skeleton. This knowledge helps you plan purchases accurately.
For character and savings, consider rough-sawn wood from a local mill. It often costs less than finished lumber from large stores. This type of wood is perfect for authentic board and batten siding.
Manage costs by buying materials in phases and watching for sales. Building a relationship with a local lumber yard can lead to discounts. This way of purchasing helps spread out expenses.
Learning from instructional videos can prevent costly errors. They show the correct way to handle stuff like insulation board and furring strips. Proper installation from the bottom to the top ensures everything works together.
Innovative Framing and Roofing Methods
A 5/12 pitch is a practical choice for your roof. It sheds water well and is simple to construct. Using a quick square to mark rafter angles ensures precision.
Installing purlins on top of the rafters provides excellent support for metal roofing. This modern method is long-lasting and easier for a self-builder to install than traditional shingles.
Keep your work area organized to save time. Having all your essential stuff on hand makes the build process more efficient. These techniques help you create a solid structure.
Practical Floor, Wall, and Roof Construction Tips
Proper execution of foundational elements creates the stable base needed for a secure and lasting shelter. Getting these core components right ensures your structure stands strong for years.

Flooring and Foundation Insights
A solid foundation begins with 4×4 posts set in the ground. Dig holes below your region’s frost line for stability. Use a post hole digger to create uniform openings.
Attach 2×10 stringers at the bottom and upper positions. Install floor joists at 16-inch centers for maximum support. This spacing prevents bounce and meets building standards.
Nail 1×2 furring strips one inch below the top of joists. This creates space for insulation while maintaining structural height. Secure everything with 3×3/8 inch lag bolts for lasting stability.
Designing Durable Walls and Roofs
Wall construction for a shed-style design requires different heights. The tall wall typically measures 12 feet with the lower wall at 8 feet. This accommodates the sloped roof design.
Install hurricane studs at angles matching your 5/12 roof pitch. These 13-inch supports connect walls to roof framing securely. They provide critical structural connections.
Roof rafters need precise top and bottom angle cuts. Create uniform 9-inch tails for consistent overhang. Metal roofing should extend 2 inches beyond the roof edge.
| Component | Key Measurement | Purpose |
|---|---|---|
| Foundation Posts | 4×4 treated wood | Ground support system |
| Floor Joists | 16-inch centers | Eliminate floor bounce |
| Wall Height | 12ft tall / 8ft short | Roof slope accommodation |
| Rafter Tails | 9-inch overhang | Weather protection |
Working with a helper makes installing heavy components safer. Having an extra set of hands improves accuracy during critical assembly steps.
Lessons from Experienced Builders
Every successful builder has a story filled with lessons that can guide your own construction adventure. The collective wisdom from those who’ve walked this path before you provides invaluable shortcuts and reassurance.
Real-World Advice from DIY Enthusiasts
Many people start with minimal construction experience but achieve remarkable results. One common theme emerges: don’t let lack of knowledge stop you from beginning.
Most errors are easily fixed and become valuable learning opportunities. The key is maintaining momentum over days and weeks. Consistent effort, even in small time blocks, leads to completion.
Documenting your progress through video or photos serves multiple purposes. It creates a troubleshooting record and captures your achievement. This approach helped one guy create a viral video with millions of views.
Key Takeaways from Graeme Jenvey’s Journey
Graeme started with basic skills but learned through hands-on experience. His biggest lesson was the importance of planning. A simple sketch led to avoidable headaches.
He emphasizes asking questions throughout the process. Local suppliers and online communities provide timely answers. This approach addresses challenges as they arise.
Half the battle is simply starting and maintaining progress. Don’t wait for perfect conditions. If this regular guy could complete his log home project over a year, you can too with determination.
Creative Touches to Enhance Cabin Living Space
Transforming a simple structure into a comfortable retreat requires thoughtful design choices that maximize both function and comfort. The interior layout determines how well your space serves daily needs.
Designing Functional Interior Layouts
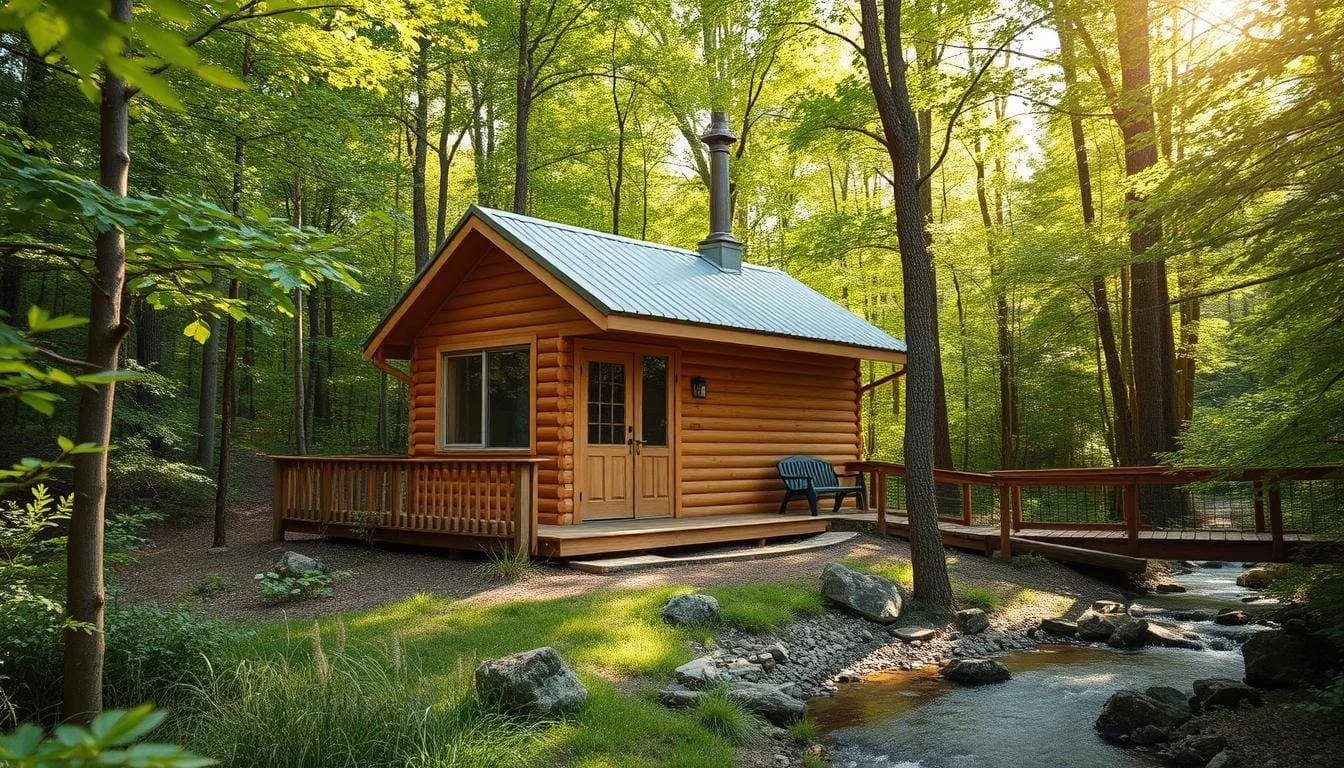
Graeme’s 240 square foot structure demonstrates smart space planning. It serves as extra living space for reading, evening relaxation, and a home office. This compact footprint shows how intentional design creates multi-purpose areas.
Creating distinct zones within open layouts helps smaller structures feel organized. Thoughtful window placement brings in natural light and connects indoor and outdoor spaces. Multi-functional furniture prevents areas from feeling cramped.

Adding Porches and Extra Features for Comfort
Exterior features like porches extend usable area without increasing the enclosed footprint. Graeme added a 4-foot porch to preserve full interior floor space. This approach provides covered outdoor living while maintaining architectural interest.
Many successful projects embrace a gap between traditional home amenities and rustic simplicity. Graeme plans future off-grid features like a composting toilet and shower. Learning how to construct a simple porch can enhance your project’s functionality.
Future-proofing your design allows for later additions as needs evolve. These creative touches turn basic shelters into personalized retreats that reflect your lifestyle.
Bringing It All Together: Your Cabin Build Journey
As you stand at the threshold of your building adventure, remember that countless ordinary people have successfully completed extraordinary projects. The path from dreaming about a log home to actually completing one requires commitment, but the rewards extend far beyond the finished structure.
Graeme Jenvey’s final advice resonates deeply: “Do it. Seriously. If I can, you can.” Consider volunteering or job shadowing with people doing similar work. Historic re-enactment villages and museums offer valuable cross-over skills. Your local area may provide unexpected resources and mentorship opportunities.
Your completed retreat becomes more than shelter—it represents proof of your capability and a legacy built by your own hands. The principles you learn about wood, tools, and construction will serve you throughout life. Stop waiting for perfect conditions and trust that you’ll learn what you need along the way.


