You’ve found the perfect spot for your dream cabin, but there’s one challenge—the land isn’t flat. Don’t let that discourage you. Thousands of stunning mountain homes sit comfortably on steep terrain, and yours can too.
Building on slopes might feel intimidating if you’re used to flat ground. But here’s the truth: sloped sites often create better opportunities than level lots. You’ll gain incredible views, natural privacy, and unique architectural possibilities that flat land simply can’t offer.
This guide walks you through everything about hillside construction. You’ll learn how to assess your terrain, choose the right foundation, and manage water runoff. Whether you’re dealing with a gentle incline or steep land, we’ll cover the practical steps you need.
Success comes from working with your property’s natural features. Yes, you’ll need careful planning. And yes, cutting corners leads to expensive repairs later. But with the right approach, you’ll create a solid foundation for years of mountain living.
Understanding Your Sloped Site: Initial Assessment and Survey
Every hillside property has its own story, with unique slopes, soils, and water flow. Before starting your dream cabin, you must understand your terrain’s challenges and opportunities. This initial phase is key to a successful project, avoiding costly mistakes.
Assessing your land is like getting to know a new friend. You wouldn’t make big decisions without knowing them well. Proper site preparation for mountain cabins starts with simple assessment techniques that give you clear answers.
Whether you hire a surveyor or do it yourself, this section guides you. We’ll cover the three main things to know about your sloped building site.
Measuring the Slope Grade and Elevation Changes
First, figure out how steep your land is. A topographic survey gives the most accurate data, showing every rise and fall. These surveys cost between $500 and $2,000, depending on your property’s size and terrain.
You can start with basic tools. Use a transit level, string lines, and a measuring tape for preliminary measurements. Measure the horizontal distance and vertical height between two points.
To calculate the slope percentage, divide the vertical rise by the horizontal run, then multiply by 100. For example, a 6-foot drop over 30 feet is a 20% slope. Knowing this affects construction difficulty and costs.
Real-world terrain is rarely consistent. For instance, a building spot might have a 6-foot elevation difference. Behind it, steeper sections could have a 10-foot difference over 27 feet, while other areas might be gentler.
Different slope percentages mean different construction challenges:
- 0-10% slopes: Easy to work with, minimal grading needed
- 10-25% slopes: Moderate challenge, standard techniques work well
- 25-40% slopes: Significant grading required, retaining walls often needed
- 40%+ slopes: Steep terrain requiring specialized designs and extensive site work
Document your measurements with photos from different angles. Mark key elevation points with stakes and flags. These visual records are invaluable when discussing your project with contractors and engineers.
Identifying Soil Type and Drainage Patterns
The ground beneath your feet is the foundation of your cabin. Different soils behave differently during excavation, compaction, and water management. Knowing your soil prevents expensive surprises during construction.
Clay soils hold water and can expand and contract with moisture. They’re stable when dry but slippery when wet. Sandy soils drain quickly but may need more compaction. Rocky terrain provides excellent bearing capacity but increases excavation costs.
You can assess your soil yourself. Dig test holes at different elevations across your building area, going down at least 2-3 feet. Examine the soil composition and note any changes as you dig deeper.
The simple jar test reveals soil composition: fill a clear jar one-third full with soil, add water, shake, then let it settle for 24 hours. Sand settles first, silt in the middle, and clay on top. The proportions tell you what you’re dealing with.
Water behavior is just as important as soil type. Observe natural drainage patterns during and after rain. Where does water collect? Which direction does it flow? Are there springs or consistently wet areas?
These observations impact your site preparation for mountain cabin planning. Water flowing toward your building site means you’ll need robust drainage solutions. Saturated areas indicate high water tables or underground springs that could complicate foundation work.
Look for these drainage warning signs:
- Erosion channels showing concentrated water flow
- Vegetation changes indicating wet zones versus dry areas
- Standing water that persists days after rain
- Soil discoloration suggesting seasonal saturation
Professional soil tests provide detailed information about bearing capacity, permeability, and composition. While they add upfront cost, they prevent foundation failures and drainage problems that cost far more to fix after construction.
Evaluating Access Points and Equipment Requirements
Even the best building site becomes problematic if heavy equipment can’t reach it. Access considerations affect every aspect of grading hillside property work, from initial excavation costs to material delivery expenses throughout construction.
Start by mapping all possible routes from public roads to your building site. Can a loaded dump truck navigate the path? What about an excavator on a trailer? Steep access roads, tight turns, and narrow gates all limit which equipment can reach your property.
Measure critical access dimensions including road width, turn radiuses, overhead clearance under tree branches or power lines, and maximum approach grades. Standard construction equipment requires surprisingly generous clearances—a typical excavator on a trailer needs at least 12 feet of width and 14 feet of overhead clearance.
Existing roads or driveways might need improvements before heavy equipment can safely travel them. Soft or muddy conditions require temporary gravel bases. Weak culverts might need reinforcement or replacement to handle loaded trucks.
Equipment access directly affects project costs in these ways:
- Distance impacts hourly rates: Operators charge more when equipment must travel longer distances on-site
- Difficult access requires smaller equipment: Compact machines work slower and may need more time to complete the same work
- Road improvements add expenses: Building temporary access roads or reinforcing existing ones costs money
- Material delivery becomes complicated: Concrete trucks, lumber deliveries, and other materials need reliable access throughout construction
Consider where equipment will stage during work. Grading projects require space for excavators, dump trucks, and material stockpiles. A flat staging area near your building site reduces equipment movement time and costs.
Winter weather and seasonal conditions also matter. Many hillside properties become inaccessible during wet seasons when roads turn to mud. Planning your construction timeline around weather patterns prevents delays and stuck equipment.
A professional topographic survey often includes access route evaluation as part of the assessment. Surveyors can identify problems and suggest solutions before you commit to specific equipment or construction schedules.
Investing time in thorough site assessment now pays dividends throughout your entire cabin project. The knowledge you gain about slopes, soils, drainage, and access shapes every subsequent decision about leveling methods, foundation types, and construction approaches. With this foundation of understanding, you’re ready to navigate the legal requirements and permit processes that govern hillside construction.
Legal Requirements and Permit Considerations for Hillside Construction
Getting building permits for slopes is key to making your cabin dream come true. Building on hills is more closely watched due to erosion risks and environmental needs. Knowing these rules early saves you from costly delays and changes later.
Think of permits as a safety net for your project. They protect your investment, neighbors, and nature. Learning about hillside building rules early helps you plan your cabin’s timeline and budget.
Understanding Building Codes and Zoning Restrictions
Your local area has specific rules for building on slopes that go beyond regular building codes. These rules tackle the unique challenges of building on hills. Most places need detailed engineering plans for slopes over 15-20% grade.
Building codes for hills often require a safe distance from slopes to prevent erosion. You’ll need to keep at least 10-15 feet from steep edges, though this can vary. Engineered retaining walls are needed for heights over 4 feet, needing plans from a licensed engineer.

Soil reports are also needed for steep areas. A geotechnical engineer will check your soil’s stability and strength. This report affects your foundation and drainage, preventing costly failures.
Zoning rules for mountain construction might limit your building height or lot development. Some areas ban basements on steep slopes or require specific foundations. Height limits help keep views and the area’s look.
If you’re in a homeowners association, architect-designed standards may guide your project. These standards cover looks, materials, and landscaping to fit the hillside.
Environmental Impact Assessments and Setback Rules
Environmental rules are critical for building on slopes. Many places require environmental assessments for steep slopes, more so near water or sensitive areas. This ensures your project doesn’t harm the environment.
Tree preservation laws can affect your clearing plans. Many areas protect certain trees or species. You might need permits for tree removal and must plant new trees at specific rates. Some trees are off-limits.
Building near endangered species habitats adds complexity. Your project might face seasonal construction limits or habitat mitigation. A biological survey might be needed before permits are issued.
Stormwater management rules are strict. Your project might need a plan to control erosion and sediment during construction. Permanent drainage solutions must meet specific standards to prevent flooding or erosion.
Setback rules set required distances from property lines, roads, septic systems, and wells. These distances are longer on hills than flat land. Typical setbacks include 50-100 feet from waterways, 15-30 feet from property lines, and 100+ feet from wells and septic systems on hillsides.
| Permit Requirement | Typical Trigger | Review Timeline | Approximate Cost |
|---|---|---|---|
| Grading Permit | Moving more than 50 cubic yards of soil | 2-4 weeks | $500-$2,000 |
| Building Permit | All structural construction | 4-8 weeks | $1,500-$5,000 |
| Environmental Assessment | Slopes over 25% or sensitive areas | 6-12 weeks | $3,000-$15,000 |
| Geotechnical Report | Slopes over 15-20% | 2-3 weeks | $2,500-$8,000 |
| Tree Removal Permit | Protected trees or quantities over threshold | 1-3 weeks | $100-$500 |
Building consultants can guide you through options during planning. They know local rules and can spot issues early. This helps you decide if to buy the property.
Start your permit process early. Hillside projects take 2-3 times longer to permit than flat-land ones. Plan this into your project schedule. Proper compliance avoids costly delays, fines, and removing completed work.
Choosing the Right Leveling Method for Your Terrain
Not every sloped site needs to be completely flat. Understanding your options can lead to creative and cost-effective solutions. Your hillside doesn’t have to be perfectly level for a beautiful, stable cabin.
The method you choose depends on several factors. These include the slope’s steepness, your budget, soil conditions, and your vision for the cabin’s integration with the landscape. Some lots clearly show where a structure should go, while others require creative problem-solving.
Traditional Earth Movement Techniques
Cut and fill grading methods are the most common way to create level areas on sloped land. This technique involves excavating soil from higher elevations and relocating it to lower areas. It redistributes earth to create flat or gently sloping surfaces.
This method is efficient because you’re not hauling dirt off-site or importing fill material. When done right, the soil cut from high spots roughly equals the fill needed for low areas. This keeps costs manageable.
Cut and fill works best on moderate slopes where cut and fill volumes can be balanced. For gentle slopes (10-15 degrees), this method can create a substantial building pad without massive earth movement. The excavated material becomes your fill, maximizing resources on your property.
But, fill areas need proper compaction to prevent settling. You can’t just pile dirt and expect it to stay stable under your cabin’s weight. Professional compaction, done in layers, ensures your fill areas will support structures just as reliably as undisturbed ground.
Creating Multiple Level Platforms
Terracing is an elegant solution for steeper slopes where creating one large flat area would require excessive earth movement. Instead of fighting the hillside, terracing creates multiple platforms at different elevations.
Think of terracing as working with gravity. Each terrace can serve different purposes. One level for the main cabin, another for outdoor living space, and a third for a garden or shed. This approach reduces total excavation compared to bulldozing the entire slope flat.
Terracing works well on properties with dramatic elevation changes. It creates interesting architectural opportunities that flat lots can’t offer. You might have a main floor entry on the uphill side and a walkout lower level facing the valley view below.
Each terrace requires retaining structures to hold back the earth. These can be incorporated into your design aesthetic. Stone walls, timber retaining systems, or even living walls with vegetation all serve the structural purpose while adding character to your property.
Balancing Site Preparation With Natural Topography
Choosing between partial and full site preparation is key. This choice shapes your project’s cost, timeline, and final appearance. Full leveling creates maximum flat space but is often the most expensive and invasive option.
Partial leveling strategies are worth considering, if you’re budget-conscious or environmentally minded. Instead of creating extensive flat areas, you might level just enough space for the cabin’s footprint. This allows the surrounding land to maintain its natural contours.
This approach connects your cabin to the land. Four architectural strategies offer different relationships with sloped terrain:
- Sitting on the ground requires minimal excavation by placing the cabin on the natural surface with posts or piers adjusting for slope
- Embedding into the hillside increases excavation costs but creates excellent insulation and wind protection while integrating the structure with the landscape
- Floating above the ground uses stilts or posts to minimize site disturbance, preserving vegetation and natural drainage patterns
- Cantilevering over the slope extends living space beyond the building pad, creating dramatic architecture with minimal earth movement
The “sitting on ground” method minimizes cost and environmental impact. Your cabin rests lightly on the hillside with foundation elements that accommodate the slope. This approach often proves most economical because you’re not paying for extensive grading equipment time or material handling.
Embedding requires more excavation but offers benefits like lower heating costs and protection from wind. You’re tucking part of your cabin into the hillside, which means more dirt work but potentially lower long-term energy expenses.
The key insight is simple but powerful: you don’t always need to level everything. Sometimes the smartest solution involves choosing a foundation system that works with the existing grade. A pier and beam foundation on a gentle slope might cost half what full site leveling would require.
Consider your priorities honestly. Do you need extensive flat outdoor space, or would decks at different levels serve your purposes? Is your budget limited, suggesting you should minimize earthwork? Does your lot have environmental sensitivities that favor lighter-touch approaches?
The right leveling method reveals itself when you match your site’s characteristics with your project goals and budget realities. There’s no universal “best” approach—only the best approach for your specific situation. Taking time to evaluate all these hillside excavation approaches before committing to one can save significant money while potentially creating a more interesting final result than simply flattening everything in sight.
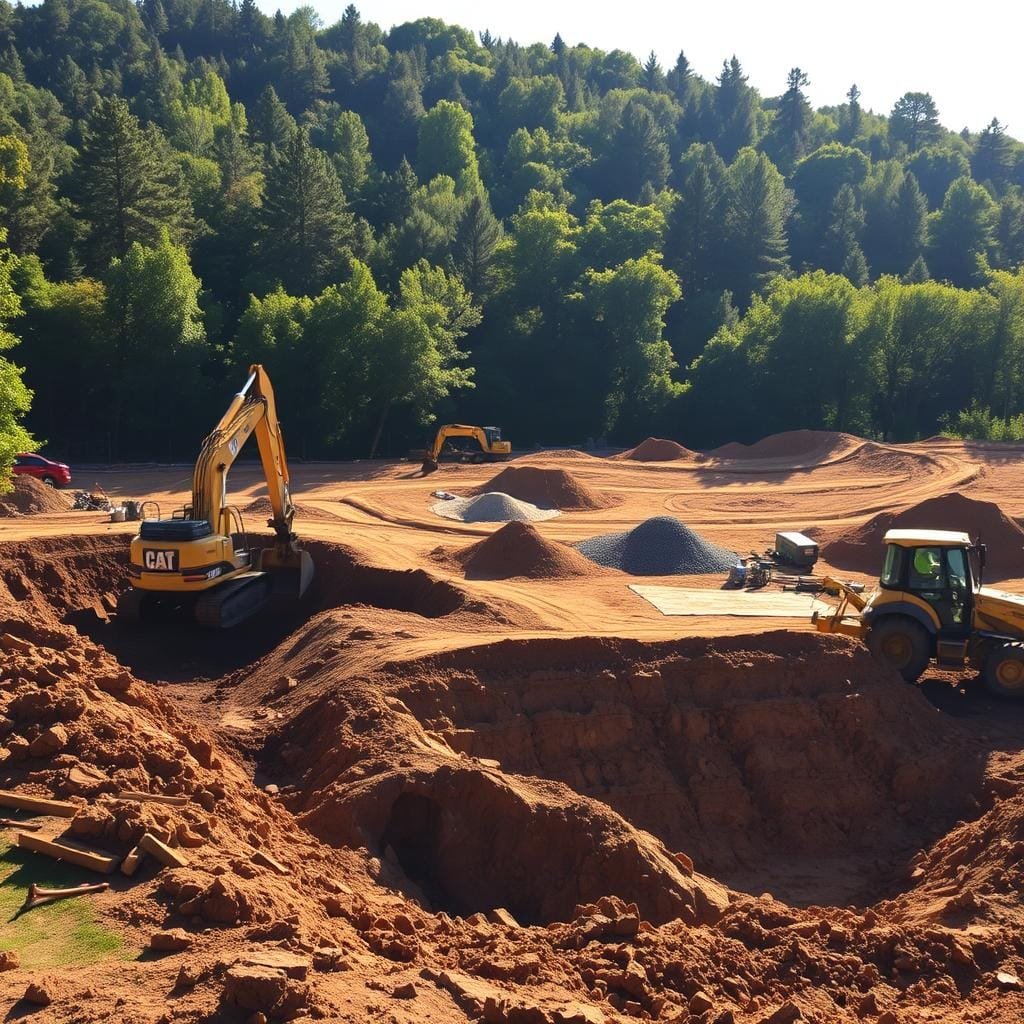
Essential Equipment and Tools for Leveling a Sloped Site for a Cabin
Before starting your hillside cabin project, knowing the right tools is key. The right equipment can turn a tough slope into a ready building site. But, figuring out what you need and who should use it depends on your terrain and budget.
The tools needed vary with the slope’s steepness, soil, and access. A gentle slope might need basic machines, while steep terrain requires heavy-duty gear and experts. Knowing these tools helps you talk to contractors and make smart project choices.
Heavy Machinery for Hillside Grading
Excavators are essential for hillside grading. They’re great at digging, trenching, and moving earth on slopes. Their rotating cabs and hydraulic arms help operators work safely on uneven ground.
Most projects use mid-sized excavators, 10,000 to 20,000 pounds. These machines have enough power for serious work without being too big. Mini excavators are good for small cabins or tight spaces, but they move earth slower.
Bulldozers are best for moving lots of earth fast. They push soil around your site, perfect for rough grading. On slopes, track-type bulldozers are better because they have more traction and stability.

Choosing the right bulldozer size depends on your project. Smaller dozers are good for small sites, while bigger ones are faster for large projects. The width and weight of the tracks are important on slopes to avoid soil damage.
Skid steers are versatile for fine grading and detailed work. They fit in tight spaces and can quickly change attachments. They’re not for big earth moving but are great for final touches and cleanup.
Track-mounted skid steers are more stable on slopes than wheeled ones. They can safely work on steep areas where wheeled machines might slip. Contractors often use skid steers for the detailed work after bulldozers have done the heavy lifting.
Surveying and Measurement Tools
Accurate measurements are critical for a successful grading project. Professional surveyors use tools like total stations and GPS to get exact elevations and grades. These tools ensure your site meets all requirements.
For top-notch work, transit levels and theodolites measure angles and elevations precisely. Modern total stations combine electronic distance measurement with angle readings for quick site mapping. GPS surveying gives even faster results on big sites.
DIY builders can get good results with simpler tools. A quality laser level helps check grades. String lines and line levels show slopes and verify levelness. Measuring wheels track distances accurately on uneven ground.
Even if you hire pros, knowing these concepts helps you track progress and spot issues early. Ask your contractor about their grading methods and references.
When to Rent vs. Hire Professional Operators
The choice between renting or hiring pros depends on cost, expertise, and liability. Renting might seem cheaper at first, but the total cost, including learning and mistakes, is higher.
Rental rates vary by region and machine size. Expect to pay $300-$500 daily for a mid-sized excavator, $400-$700 for a bulldozer, and $200-$350 for a skid steer. Weekly rates are better for longer projects. But, these costs don’t include fuel, transport, or insurance.
| Consideration | DIY Equipment Rental | Hiring Professional Operators |
|---|---|---|
| Typical Cost Range | $2,000-$5,000 for equipment only | $8,000-$30,000+ depending on scope |
| Expertise Required | Steep learning curve, safety risks | Experienced operators, efficient work |
| Timeline | 2-3x longer for inexperienced operators | Professional speed and efficiency |
| Liability Coverage | Your homeowner’s insurance at risk | Contractor carries insurance |
Professional operators bring invaluable experience to hillside projects. They know how to handle soil, spot drainage issues, and work efficiently to save costs. Real examples show big cost differences based on site access and difficulty.
Site accessibility greatly affects DIY vs. hiring pros. If equipment can’t reach your site, delivery costs might outweigh rental savings. Steep slopes also pose safety risks, requiring years of experience to operate grading equipment safely.
Consider hiring pros for slopes over 15 degrees, poor soil, limited access, nearby structures, or tall retaining walls. The quality and peace of mind are worth the extra cost.
For small projects on gentle slopes with easy access, renting a skid steer for finish grading might be cost-effective. Start with smaller tasks to build confidence before tackling big earth movement.
Site Preparation: Clearing Vegetation and Removing Obstacles
Turning a wooded slope into a construction site needs careful planning. You must clear trees and brush while keeping the natural beauty. Site preparation for mountain cabin construction involves removing trees, brush, and natural obstacles while protecting the landscape features you want to keep. This phase sets the foundation for all the grading work ahead, and thoughtful decisions now can save you money while maintaining the character of your land.
The clearing process demands environmental sensitivity alongside practical construction requirements. You’ll face decisions about which trees must go and which can stay, how to handle large boulders, and what equipment will cause the least damage to areas you want to preserve. Many property owners struggle with the emotional aspect of land clearing for construction, but strategic planning helps minimize the impact.
Working with experienced operators who understand conservation principles makes a significant difference. They can identify efficient clearing paths that spare valuable vegetation and incorporate natural features into your final design. This preparation stage also reveals hidden challenges like underground boulders or poor soil conditions that might affect your construction timeline and budget.
Protecting Trees While Creating Your Building Site
Evaluating which trees to remove requires considering your building footprint, access roads, utility corridors, and safety zones around the construction area. Tree removal for building sites goes beyond just the cabin’s foundation—you need clearance for equipment operation, material staging, and temporary roads. Preserving desirable trees enhances your property value and maintains the natural setting that makes mountain living special.
Tree root systems extend far beyond the visible canopy, often reaching one and a half to three times the width of the branches above. Heavy machinery compacts soil and damages these roots even without directly striking the trunk. Compacted soil prevents oxygen and water from reaching roots, which can kill seemingly untouched trees months or years after construction ends.

Establish tree protection zones using highly visible fencing at least as far out as the tree’s drip line. Mark these boundaries before any equipment arrives on site. Communicate clearly with equipment operators about which trees you’re protecting, and consider hiring an arborist to assess the health and viability of trees near your construction zone.
Some trees won’t survive the disturbance regardless of protective measures. Trees with shallow root systems, those already stressed by disease or age, or specimens too close to necessary excavation areas may decline after construction. An arborist can help identify which trees have the best survival chances and which should be removed proactively.
Consider milling valuable trees into lumber for your cabin construction. Species like oak, walnut, cherry, or cedar can become beautiful interior elements with personal meaning. Local sawmill operators can evaluate whether your trees have sufficient size and quality for milling. This approach transforms a necessary removal into a sustainable building resource.
Stump grinding versus complete stump removal depends on your grading plans and future land use. Grinding stumps 8-12 inches below grade works well for areas that will be covered with fill dirt or landscaping. Complete removal becomes necessary when stumps occupy your building pad, septic system location, or areas requiring deep excavation. Removal costs more but eliminates settling issues that ground stumps can cause years later.
Plan to replant native trees and shrubs after grading completes. Young saplings establish quickly and help restore the landscape while preventing erosion. This long-term perspective helps ease the emotional difficulty of removing mature trees during obstacle removal on slopes.
Tackling Boulders and Bedrock Challenges
Large rocks and boulders present both obstacles and opportunities during site preparation. Small to medium boulders can be relocated to create natural landscaping features, form retaining wall elements, or mark property boundaries. This creative reuse saves disposal costs while adding character to your property.
Moving large boulders requires specialized equipment like excavators with thumb attachments or hydraulic thumbs that grip irregular shapes. Operators can roll, lift, or drag boulders to new locations. Boulders too large to move economically can be broken using hydraulic rock breakers attached to excavator arms—these powerful tools fracture stone into manageable pieces without explosives.
Unexpected bedrock encounters complicate grading significantly. When solid rock layers appear where your building pad or foundation needs to go, you face difficult decisions. Shallow bedrock might require only minimal removal to reach proper foundation depth. Extensive bedrock could force foundation design changes, such as switching from a full basement to a crawl space or pier foundation.
Rock excavation costs substantially more than moving dirt. Contractors charge premium rates for rock work because it requires specialized equipment, proceeds slowly, and causes excessive wear on machinery. Some situations demand blasting by licensed professionals, adding permitting requirements, safety protocols, and significant expense.
Before extensive rock removal, consult with your foundation engineer. Sometimes building on or around bedrock offers advantages—solid rock provides excellent bearing capacity and eliminates settling concerns. Your design might adapt to work with the rock instead of fighting to remove it.
Document all rock and boulder locations during initial site assessment. This information helps contractors provide accurate bids and prevents costly surprises during excavation. Some property owners discover that strategic tree removal for building sites combined with thoughtful boulder placement creates stunning natural features that define their mountain cabin’s character.
The clearing phase tests your patience but reveals your land’s true site preparation for mountain cabin construction. Each removed obstacle brings you closer to breaking ground on your cabin. Approach this work with flexibility—nature often suggests design solutions you hadn’t considered, and working with the land’s natural features typically produces better results than forcing it to conform to predetermined plans.
Cut and Fill Grading: Balancing Earth Movement
Cut and fill grading shapes your hillside property by balancing excavation and placement. It involves cutting soil from higher areas and filling lower ones. This method creates a stable platform for your cabin while saving on soil hauling costs.
Understanding this balance saves money. Hauling costs can quickly add up if you need to remove or import soil. Smart planning ensures cut and fill volumes match closely.
The quality of your foundation depends on proper grading. Taking shortcuts can lead to costly problems later. It’s better to do the work right from the start.
Calculating Cut and Fill Volumes
Accurate volume calculations are key to successful cut and fill grading. For simple slopes, use basic formulas to estimate volumes. More complex terrain may need specialized software or surveying for precision.
Soil volume changes during excavation and placement. When you dig up compacted soil, it expands by 20-30%. This is called the “swell factor” and must be considered in calculations.
When placing excavated material as fill, it must be compacted to 90-95% of its original density. This means fill areas will hold less material than cut areas. Understanding these factors prevents running short on fill material.

Professional grading contractors follow a specific calculation sequence:
- Survey the existing terrain to establish baseline elevations
- Design the final grade elevations for your building site
- Calculate cut volumes with swell factors applied
- Calculate fill volumes with compaction factors applied
- Compare totals to determine if import or export is needed
Balancing these volumes saves money by reducing truck trips. Even small projects benefit from this planning approach.
Creating Building Pads on Hillside Properties
Your building pad is where construction happens. It needs more than just a flat surface. It must be the right size, have proper drainage, and connect well with access routes.
Size your pad to include your cabin’s footprint and extra space around it. Contractors need room to work. A good rule of thumb is to add 10-15 feet beyond your cabin’s dimensions on all sides.
The pad surface should have a gentle slope. A 1-2% slope away from your cabin ensures water drains off. This protects your foundation from water damage.
Make sure your building pad connects smoothly to driveways and access roads. Avoid steep transitions that can be a problem for trucks and equipment.
| Pad Aspect | Recommended Specification | Common Mistake to Avoid |
|---|---|---|
| Surface Slope | 1-2% grade away from building | Creating perfectly flat surface that pools water |
| Working Space | 10-15 feet beyond foundation | Cutting pad too small for construction access |
| Pad Elevation | Minimum 12 inches above finish grade | Setting pad at natural grade level |
| Access Integration | Smooth transitions under 10% grade | Creating steep drop-offs at pad edges |
Professional earth moving for cabin sites considers these factors during planning. Making changes after grading starts costs more than getting it right from the start.
Compaction Requirements for Fill Areas
Compaction is critical for fill work that amateur builders often overlook. Loose fill soil will settle, causing foundation cracks and structural damage. Meeting soil compaction standards is essential for stability.
Most building codes require fill areas to achieve 90-95% of maximum dry density. This ensures the fill acts like undisturbed native soil. Anything less is unstable.
Poor compaction leads to settlement over time. By the time problems appear, repairs are expensive and disruptive.
Proper Compaction Techniques and Testing
Different equipment is needed for compaction. Plate compactors are good for small areas and tight spaces. They vibrate to densify soil in confined areas.
Larger areas need vibratory rollers or sheepsfoot rollers. The choice depends on soil type and area size. Clay soils work best with sheepsfoot rollers, while sandy soils respond to vibratory equipment.
Soil moisture affects compaction. Soil that’s too dry or too wet won’t compact properly. The optimal moisture content is usually 2-3% of the soil type’s “optimum moisture.”
Testing confirms compaction meets standards. Nuclear density gauges give instant readings. Sand cone tests are a lower-tech alternative accepted by inspectors.
Multiple passes with compaction equipment are necessary. The first pass compacts the surface, and subsequent passes work deeper. Three to five passes usually achieve proper density, confirmed by testing.
Layering Fill Material Effectively
Place fill in thin layers for thorough compaction. Each layer should be 6-8 inches of loose material before compaction. Thicker layers prevent deep compaction.
This methodical approach requires patience. Spread a layer, compact it, test the density, and then add the next layer. Rushing this process leads to weak spots in your building pad.
Quality fill material makes compaction more effective. Clean soil without debris compacts uniformly. Organic materials decompose, creating voids that lead to settlement.
This layered approach takes more time than just pushing soil into place. But the investment in proper technique pays off in foundation stability. Your cabin’s longevity depends on the ground beneath it.
Remember, skimping on foundation preparation and drainage will only cost you down the road. Proper compaction prevents years of structural problems. Professional grading contractors know this and build it into their work.
Retaining Wall Solutions for Slope Stabilization
Retaining walls are key for hillside construction, holding back earth and creating stable spaces. They prevent soil erosion and manage earth pressure. This makes your mountain retreat functional and safe.
The right retaining wall is a long-lasting feature that protects your investment. It’s important to choose wisely, considering your site’s needs. Proper engineering and drainage are critical for a wall’s longevity.
Types of Retaining Walls for Cabin Sites
Choosing the right wall depends on several factors. These include wall height, soil conditions, budget, and aesthetics. Each type has its own benefits, making it suitable for different sites.
The following comparison table shows the key differences between common hillside retaining walls. It helps you decide which approach fits your project best.
| Wall Type | Best Height Range | Typical Lifespan | Installation Complexity | Cost Range |
|---|---|---|---|---|
| Concrete Block Systems | 2-6 feet | 50-75 years | Moderate (DIY possible) | $20-$35 per sq ft |
| Timber Retaining Walls | 2-4 feet | 15-30 years | Low to Moderate | $15-$25 per sq ft |
| Poured Concrete | 4-12+ feet | 75-100+ years | High (requires professional) | $40-$75 per sq ft |
| Steel Sheet Piling | 6-20+ feet | 50-100 years | High (specialized equipment) | $50-$90 per sq ft |
Gravity Walls and Concrete Block Systems
Segmental retaining walls (SRWs) use interlocking concrete blocks. They rely on their mass and friction to resist soil pressure. These systems are popular for their strength and attractive appearance.
They work well for walls up to six feet high. The blocks create a setback angle that adds stability. Many manufacturers offer blocks in various colors and textures that mimic natural stone, letting you achieve an upscale look without the expense of custom masonry.
Installation requires a level gravel base, proper backfill material, and geogrid reinforcement for taller walls. The beauty of concrete block systems lies in their flexibility—you can create curves, corners, and terraced levels relatively easily. Most homeowners with basic construction skills can tackle walls under three feet, though taller structures benefit from professional installation.

Timber retaining walls complement a rustic cabin aesthetic. Large timbers create substantial walls that feel right at home in mountain environments. The natural appearance makes them appealing for those who want their site work to look organic.
You’ll want to use pressure-treated lumber rated for ground contact, or naturally rot-resistant species like cedar, redwood, or black locust. Railroad ties offer another option, though newer composite railroad ties work better than older creosote-treated versions. Proper construction includes deadman anchors that tie back into the hillside, distributing load and preventing the wall from tipping forward.
The trade-off with timber walls is their finite lifespan compared to concrete or stone options. In wet mountain climates, you might see 15-20 years of service, while drier regions could extend that to 30 years or more. For many cabin builders, this limitation is acceptable given the lower initial cost and natural appearance that improves the property’s character.
Engineered Steel and Poured Concrete Solutions
When your site demands walls taller than six feet or involves challenging soil conditions, engineered slope stabilization structures become necessary. Cantilevered concrete walls use an L-shaped design where the horizontal footing extends under the retained soil, using that weight to resist overturning. These walls can reach impressive heights while maintaining a relatively thin vertical profile.
Steel sheet piling involves driving interlocking steel sections deep into the ground, creating a continuous wall that resists both lateral pressure and water infiltration. This method works well in areas with high water tables or unstable soils. Soil nail walls represent another advanced technique where steel bars are drilled into the hillside at angles, effectively stitching the slope together.
These engineered systems require professional structural engineering calculations, permit approval, and specialized installation crews. The investment is substantial, but the results provide unmatched strength and longevity. For steep mountain properties or sites with significant elevation changes, these solutions often represent the only viable path forward.
Installing Proper Drainage Behind Retaining Structures
The most critical factor in retaining wall longevity isn’t the wall itself—it’s the drainage system. Hydrostatic pressure from saturated soil can exert thousands of pounds of force that even well-built walls cannot withstand. More retaining walls fail from poor drainage than from structural inadequacy.
Every retaining wall needs a drainage system that includes perforated pipe placed at the base of the wall, surrounded by clean gravel backfill. This pipe collects water and channels it to outlets at the ends of the wall or through the wall face. The gravel backfill should extend at least 12 inches behind the wall and rise to within six inches of the top, creating a free-draining zone.
Weep holes provide another drainage mechanism, allowing water to escape through the wall face. Space these holes every four to six feet horizontally, typically using three-inch PVC pipe inserted through the wall with a slight downward angle. Cover the interior end with filter fabric to prevent soil from clogging the opening.
Surface drainage matters just as much as subsurface systems. Direct water away from the top of the wall using swales, berms, or gutters that prevent runoff from flowing down and saturating the retained soil. This becomes essential during spring snowmelt or heavy rain events common in mountain environments. For more on managing water on sloped terrain, you can learn more about how to prevent erosion on sloped cabin.
The backfill material itself plays a key role in drainage performance. Use free-draining gravel or crushed stone instead of native clay soil directly against the wall. This creates a permeable zone where water moves easily to your drainage pipes instead of creating pressure. Invest in quality drainage materials—they cost a fraction of what wall replacement would require.
Don’t forget to include filter fabric between the gravel and native soil to prevent fine particles from migrating into your drainage zone and clogging it over time. This geotextile barrier maintains the integrity of your drainage system for decades, ensuring that water continues flowing to where you want it instead of pushing against your retaining wall.
Managing Water Runoff on Sloped Lots
Mountain and hillside areas get a lot of rain. This makes water control for cabin sites very important. Without good drainage, water can damage foundations and wash away soil. But, the right strategies can use your property’s slope to your advantage.
Dealing with water runoff on sloped lots needs a detailed plan. It must handle both surface and underground water. Your drainage system should also consider your cabin, neighbors, roads, and waterways. Slope drainage systems use gravity to safely move water away from buildings and prevent erosion.
Success comes from creating multiple layers of protection. No single method works for every situation. So, builders use several techniques together. This way, if one part fails during heavy rain, others keep your property safe.
Installing French Drains and Drainage Swales
French drains and drainage swales are key for hillside drainage solutions. They work together to handle different types of water flow. French drains tackle underground water, while swales manage surface runoff.
A French drain has a trench filled with gravel and a pipe that catches groundwater. It uses gravity to move water to a safe place downslope. Trenches need to be 18 to 24 inches deep with a slope of at least 1% grade.
The trench bottom gets a filter fabric to prevent clogging. The pipe sits in the gravel, with holes facing down to collect water. This setup is essential for effective water management.
Important things to remember for French drains include:
- Use 4-inch diameter perforated pipe for homes
- Keep a minimum 1% slope throughout
- Wrap the pipe in filter fabric for extra protection
- Put in cleanouts every 50 feet on long runs
- Make sure the outlet is safe and won’t cause erosion
Drainage swales handle surface water during storms. They are shallow ditches with gentle sides that guide water. Unlike concrete channels, swales blend into the landscape.
Vegetated swales slow water with grass or plants. Rock-lined swales handle faster water in steeper areas. The bottom should slope between 2% and 5% to move water without causing erosion.
Directing Water Away from Foundation Areas
Your cabin’s foundation is the most critical area to protect. Even a little water can cause damage over time. Water control for cabin sites must include several strategies to keep moisture away.
The area around your cabin should slope away from the foundation at least 6 inches over 10 feet. This slope directs water away before it pools near the building. This simple step prevents more foundation problems than any other.
Gutters and downspouts collect roof runoff and keep it away from the foundation. But, downspouts should discharge at least 10 feet from the building. They should go to a swale or underground pipe.
A curtain drain installed upslope from your cabin catches groundwater before it reaches your cabin. It runs parallel to the uphill side of your foundation, 10 to 20 feet away. It redirects subsurface water around your building to safe discharge points.
Working with the natural slope of your land is beneficial. Designing drainage systems that follow natural water flow patterns reduces maintenance. Water naturally flows downhill—your job is to guide it.
Erosion Control Measures During and After Construction
Construction disturbs soil and vegetation, making your property vulnerable to erosion. Managing water runoff on sloped lots requires temporary controls during construction and permanent solutions later.
Silt fencing acts as a barrier during construction. It lets water pass through while trapping sediment. These fences should be installed downslope from disturbed areas before grading starts. Stakes every 6 feet provide support.
Erosion control blankets protect steep slopes. These biodegradable mats hold soil in place while plants grow through. They break down as roots establish and take over the stabilization role.
Temporary erosion control measures include:
- Silt fencing along property boundaries and downslope areas
- Straw wattles or fiber rolls to slow water on slopes
- Temporary diversion berms to direct water away from work zones
- Sediment traps in low areas where water collects
- Daily watering of exposed soil to prevent dust and wind erosion
Permanent erosion control focuses on establishing vegetation. Native grasses and groundcovers provide long-term protection. Seeding or sodding should happen as soon as final grading is complete, ideally during the growing season.
Areas with concentrated water flow need more protection than plants alone. Rock riprap dissipates water energy and prevents erosion. Choose rock sizes based on water velocity, with larger stones for steeper channels.
Check dams slow water velocity and trap sediment. These barriers made from rock, logs, or fiber rolls create a stepped profile in the channel. Space them 20 to 50 feet apart, depending on slope steepness.
Erosion control is not just about protecting your property. It’s also about being a responsible neighbor and environmental steward. Sediment washing onto neighboring properties damages vegetation and water quality. In many places, allowing sediment to leave your site violates environmental laws and can result in fines.
The best erosion control strategy combines various techniques for different areas. Vegetated areas need little intervention, while steep banks require more aggressive protection. Regular inspections and maintenance ensure these systems work well year after year.
Foundation Options for Inclined Land
Your foundation work on inclined land is key to your cabin’s success. It affects stability, cost, design, and water management. Knowing the hillside foundation types helps you choose the right one for your land, budget, and design.
Don’t skimp on foundation quality. Saving money now can cost more later in repairs or water damage. The right foundation works with your slope, creating a stable base for your cabin.
Let’s look at three foundation systems for sloped terrain. Each has its own benefits based on your site conditions.
Pier and Beam Foundations for Hillsides
Pier and beam foundations are flexible and cost-effective for hills. They use large piers and beams to span the slope. This system adapts to various terrains.
The piers can be placed irregularly to avoid obstacles. This flexibility is great for steep slopes where excavation is costly.
Water control is a big plus of this system. The structure’s elevation prevents moisture problems common in hillside homes.
Here are the key benefits of pier and beam foundations for sloped sites:
- Endless design possibilities with piers configured to match your specific terrain and cabin layout
- Cost savings on extreme slopes where cut and fill operations would be prohibitively expensive
- Minimal site disturbance preserving natural drainage patterns and vegetation
- Easy access to utilities running beneath the structure for future maintenance or modifications
- Natural ventilation under the floor deck reducing moisture and mold concerns
Considerations for this system include skirting for aesthetics and insulation for comfort. Plumbing lines need protection from freezing in cold climates.
The footings must extend deep to reach stable soil and sit below the frost line. Your engineer will determine the exact depth based on pier loads and soil conditions.
Daylight Basement Foundations
Basement foundations on hills create desirable living spaces. They embed one side into the slope and leave the other exposed. This design turns dark storage into bright, functional rooms.
This construction involves a concrete stem wall foundation that acts as a retaining wall and slab. One side holds back earth, while the other opens to grade level. The main floor sits above, opening to the upper grade level, giving you two floors with ground-level entries.
Proper construction technique is essential for long-term performance. The footings must be dug to undisturbed soil, typically 18-24 inches deep, and always below your area’s frost line. Cutting corners on footing depth invites settling, cracking, and structural problems that are expensive to fix once the cabin is complete.
Waterproofing and drainage behind basement walls deserve special attention on basement foundations on hills. The uphill side constantly faces hydrostatic pressure from groundwater, so you’ll need:
- Quality waterproofing membrane on all below-grade walls
- Perforated drain pipes at the footing level to collect water
- Drainage aggregate backfill allowing water to reach the drain pipes
- Proper grading directing surface water away from the foundation
This foundation type works well when your site has moderate slope and you want to maximize usable square footage. The basement level provides excellent storage, workshop space, or additional living areas. Many homeowners find the basement their favorite space because it stays cooler in summer and offers direct access to lower yard areas.
The stem wall can accommodate variations in height around the perimeter, allowing you to follow the slope’s contour somewhat while creating level floor surfaces inside. You can also incorporate insulated basement walls for year-round comfort or create a crawl space instead of full-height basement if that better suits your needs.
Stepped Footing Foundations
Stepped footing foundations follow your slope’s natural contour by creating level foundation sections that step down the hillside in increments. This approach minimizes excavation compared to creating a fully level building pad while providing stable support for your cabin.
The foundation literally steps down the slope, with each level section properly reinforced at the step locations. The vertical steps between level sections must be carefully engineered to transfer loads properly and prevent cracking at the transitions. Your foundation contractor will use steel reinforcement bars extending through the steps to tie everything together structurally.
This foundation type works best for homes designed to follow the slope instead of fighting against it. Split-level floor plans complement stepped footings naturally, with different sections of the home at different elevations matching the foundation steps underneath.
The key advantage is reducing the amount of cut and fill required. Instead of carving a large flat pad into your hillside, you’re working with the existing grades more sympathetically. This saves money on excavation while preserving more of the natural terrain.
Proper step dimensions matter for structural integrity. Most building codes require steps no taller than 24 inches with minimum horizontal runs between steps. Your engineer will design the step pattern to match your specific slope and cabin design while meeting all code requirements.
| Foundation Type | Best Slope Conditions | Key Advantages | Primary Considerations |
|---|---|---|---|
| Pier and Beam | Steep slopes, irregular terrain, rocky ground | Maximum flexibility, excellent drainage, cost-effective on extreme slopes | Floor insulation, skirting required, plumbing freeze protection |
| Daylight Basement | Moderate to steep slopes with space for excavation | Additional living space, natural light in basement, two ground-level entries | Waterproofing critical, drainage systems required, higher initial cost |
| Stepped Footing | Gradual to moderate slopes with consistent grade | Reduced excavation, follows natural contour, works with split-level designs | Reinforcement at steps essential, limits design flexibility somewhat |
Each of these hillside foundation types has proven successful in thousands of cabin builds across varied terrain. Your specific choice depends on your slope steepness, soil conditions, budget, and design preferences. Work closely with a qualified engineer who understands foundation work on inclined land to select and design the system that best matches your unique situation.
Remember that your foundation investment pays dividends for the entire life of your cabin. Choose quality over shortcuts, and your hillside retreat will stand solid for generations to come.
Terracing Techniques for Multi-Level Cabin Designs
Using terracing for cabin construction on a hillside is more than solving a construction problem. It’s a chance to create something special. By carving out multiple levels, you make the most of the slope, like wide steps leading up the hill.
This method has many benefits. It reduces the amount of earth moved compared to a single level. Each level becomes a unique area with its own purpose.
Drainage improves naturally with terracing. Rainwater is broken up, preventing it from rushing down the slope. This protects your cabin and the landscape.
Perhaps the most exciting part is the architectural and landscaping possibilities. The vertical space becomes usable, adding depth and interest to your property.
Designing Outdoor Living Areas at Different Elevations
Hillside outdoor spaces come alive when each level has its own purpose. Think of your slope as a neighborhood with different areas.
The top level is usually where the main cabin and outdoor living area are. Place it for the best views and sun for entertaining.
Mid-level terraces are great for gardens, play areas, or workshops. They’re close enough to be accessible but far enough for privacy.
Lower terraces are perfect for fire pits, outdoor kitchens, or parking. They’re away from the cabin, making them ideal for activities that need space or vehicle access.
Each level adds to your usable space. Unlike flat land, you use the vertical space. A half-acre hillside can have more space than a full acre of flat land.
Size each terrace based on its purpose. A patio needs 200-300 square feet. Garden terraces can be narrower, 4 to 6 feet deep. Fire pit areas should be circular, 15-20 feet in diameter.
Consider the sun when planning terrace uses. Morning sun is good for breakfast areas and gardens. Afternoon shade is perfect for summer gatherings.
| Terrace Level | Best Uses | Typical Size | Design Priority |
|---|---|---|---|
| Upper Level | Main deck, primary patio, cabin entrance | 300-500 sq ft | Views and main cabin access |
| Mid Level | Gardens, play areas, seating nooks | 150-300 sq ft | Functional separation and privacy |
| Lower Level | Fire pits, outdoor kitchens, parking | 200-400 sq ft | Activity buffering and accessibility |
Building terraces requires careful planning. Retaining walls should be 3 to 4 feet high. They need drainage systems to prevent water buildup.
Choose materials that fit your surroundings. Stone walls work well with forested hillsides. Timber suits rustic cabins. Concrete block is good for terraces with plants.
Integrate terraces with your cabin design. Use massing strategies to create seamless transitions. This makes your outdoor spaces feel like part of your home.
Building Pathways and Stairs Between Levels
Connecting your terraces makes them more than just platforms. The paths and stairs become part of your cabin’s charm. They’re not just for getting from one level to another but for enjoying the journey.
Outdoor stairs are different from indoor ones. They should have broader treads and shorter risers for comfort and safety. Aim for 14-16 inch treads and 5-6 inch rises.
Use natural materials for stairs and paths. Stone steps look permanent and age well. Timber stairs fit woodland settings. Gravel paths are affordable and drain well.
Meandering paths are better than straight ones. A winding stone path turns a simple descent into a scenic journey. You’ll see more of your surroundings.
Here are some pathway material options:
- Flagstone stepping stones: Great for gentle slopes with grass or groundcover
- Crushed gravel paths: Good drainage and easy to maintain
- Timber step systems: Natural look fits wooded areas and provides traction
- Concrete pavers: Durable and stable for busy areas
- Railroad tie stairs: Rustic and controls erosion
Make sure your paths are accessible. Use gentle switchbacks for wheelchair access. Include at least one accessible route between main levels.
Lighting is key for evening use. Low-voltage LED lights are safe and don’t pollute the light. Solar lights eliminate wiring issues.
Integrating terraces with your cabin creates something special. When interior and exterior levels match, the outdoors feels like an extension of your home.
This multi-level approach makes your property more interesting than flat lots. It becomes a three-dimensional experience with surprises around every corner. Slopes are opportunities, not limitations.
Slope Stabilization and Erosion Prevention
After digging, you need to keep the soil in place. Freshly graded slopes are at risk of erosion until they’re protected. The first big rain can wash away soil, create gullies, and ruin your hard work.
Hillside erosion control is key to protect your property and the environment. Construction sites can harm ecosystems and break laws if they don’t control sediment runoff. So, slope stabilization is both a technical and environmental must for every cabin builder.
There are many slope stabilization techniques to keep your hillside safe. Using plants, temporary barriers, and permanent structures is the best way. It’s important to use these methods at the right time in your building process.
Nature’s Anchors: Using Plants for Long-Term Stability
Planting trees and shrubs after grading is a great way to protect slopes. Vegetation for slope stability works by holding soil together with roots. Different plants offer different benefits based on their roots and growth.
Grasses and groundcovers grow fast, protecting the surface right away. Their shallow roots keep the top 6-12 inches of soil in place. Species like native fescue, clover, or creeping juniper spread quickly to cover bare ground.
Shrubs provide deeper stabilization with roots going 2-4 feet into the soil. They also slow down rainwater running down slopes. Native shrubs need less care and help local wildlife.
Trees have the deepest roots, anchoring slopes 6-15 feet below the surface. These roots prevent big slope failures and landslides. But, trees take longer to grow, so they’re part of a layered approach.
Choosing the right plants is key. Consider your site’s climate, slope aspect, soil type, and root depth. This ensures plants grow well and help stabilize the slope.
- Local climate and hardiness zone: Native plants survive better and need less care
- Slope aspect and sun exposure: South-facing slopes get more sun and dry out faster
- Soil type and drainage: Some plants like well-drained soils, others wet conditions
- Root depth and spread: Match root characteristics to the depth of stabilization needed
- Growth rate: Fast-growing species provide quick coverage but may need more management
Heavy machinery used during grading can compact soil. This makes it hard for roots to grow deep. Before planting, loosen compacted areas to help roots develop properly.
Proper planting techniques improve survival rates on slopes. Create small terraces or basins around each plant to catch water. Plant in staggered rows to disrupt water flow. Water regularly during the first year to help plants establish strong roots.
Temporary Protection: Blankets and Matting Systems
While waiting for plants to grow, your slope needs immediate protection. Erosion control blankets and matting provide this critical bridge. These products come in various types, each suited for different conditions and timeframes.
Biodegradable erosion control blankets made from straw, coconut fiber, or wood excelsior protect soil for 6-24 months. They hold seeds and soil in place while plants germinate and grow. As vegetation becomes established, the blanket naturally decomposes, leaving no waste behind. These work well on moderate slopes where vegetation will establish within one or two growing seasons.
Erosion control mats incorporate synthetic or natural netting for added strength. They provide longer-term protection, lasting 2-3 years on the slope. The netting gives additional reinforcement during the vulnerable establishment period. Use these on steeper slopes or in areas with higher erosion risk.
Turf reinforcement mats represent the most durable option for permanent erosion prevention on hillsides. These non-degradable mats stay in place permanently, with vegetation growing through and becoming reinforced by the synthetic matrix. They’re essential in high-stress areas like drainage channels, steep embankments, or slopes subject to concentrated water flow.
| Product Type | Longevity | Best Applications | Approximate Cost |
|---|---|---|---|
| Straw Blankets | 6-12 months | Gentle to moderate slopes with quick vegetation establishment | $0.50-$1.50 per sq yard |
| Coconut Fiber Mats | 2-3 years | Steeper slopes needing longer protection period | $2-$4 per sq yard |
| Turf Reinforcement Mats | Permanent | High-flow channels, very steep slopes, permanent reinforcement | $4-$8 per sq yard |
| Erosion Control Netting | 1-2 years | Seed and mulch stabilization on moderate slopes | $0.75-$2 per sq yard |
Proper installation is key to success with these products. Always install blankets and mats lengthwise down the slope, not horizontally across it. This allows water to flow under the material without lifting it. Overlap edges by at least 4-6 inches and secure with staples or stakes every 2-3 feet.
Start at the top of the slope by digging a small anchor trench 6-8 inches deep. Bury the top edge of the material in this trench to prevent water from flowing underneath. Work your way down the slope, keeping the material in direct contact with the soil surface without wrinkles or air gaps.
Rock Solutions: Riprap and Gabion Installations
Some slope situations need more than plants can offer. Areas with a lot of water flow, very steep slopes, or poor soil need rock solutions. These engineered solutions provide immediate, permanent protection that complements vegetative stabilization.
Rock riprap consists of loose angular stones placed on slopes or in channels to resist erosion. The size and weight of the rocks prevent them from being moved by flowing water. Riprap works well along the toe of slopes, in drainage swales, or anywhere water concentrates during storms.
Selecting the right riprap size depends on the water velocity and slope steepness you’re protecting against. Generally, rocks should range from 4-12 inches in diameter for most cabin site applications. Larger stones provide more protection but cost more and require heavier equipment to place.
Always install filter fabric underneath riprap to prevent soil from washing through the spaces between rocks. This geotextile layer allows water to pass while holding soil in place. Without it, soil gradually migrates through the rock layer, creating voids and eventual failure.
Proper riprap installation involves these key steps:
- Prepare the slope surface: Remove loose soil and create a firm, uniform base
- Install filter fabric: Lay geotextile filter fabric with 12-inch overlaps at seams
- Place toe stones first: Install larger anchor stones at the bottom to prevent riprap from sliding
- Fill with riprap: Place stones to the specified depth, typically 12-18 inches thick
- Interlock stones: Fit stones together tightly with minimal voids
Gabions offer a more structured approach to hillside erosion control using rock. These wire mesh baskets or cages get filled with stones on-site, creating modular retaining structures. Gabions combine the strength of rock with the flexibility of a woven structure, making them ideal for slopes and channels.
The open structure of gabions allows water to pass through while retaining soil. This drainage capability prevents hydrostatic pressure from building up behind the structure, reducing failure risk. Vegetation can even grow through and over gabions, eventually creating a living wall that blends with the landscape.
Common gabion applications include slope facing, channel lining, and small retaining walls up to 6-8 feet high. They work well in areas where traditional concrete retaining walls would be too expensive or visually intrusive. The modular nature makes them adaptable to irregular terrain and easier to install without heavy equipment.
For best results with gabions, use angular rock that interlocks within the basket. Fill baskets uniformly and compact stones periodically during filling to eliminate voids. Connect adjacent baskets securely with wire ties to create a unified structure.
The most successful hillside developments combine multiple erosion prevention on hillsides strategies. Use vegetation where slopes are moderate and soils are suitable. Apply blankets and mats to protect areas during the establishment period. Reserve rock solutions for high-stress areas where other methods aren’t sufficient.
Remember, erosion control is an ongoing process. Monitor your slopes after heavy rains during the first year. Look for signs of erosion like rills, gullies, or exposed roots. Address problems early before they become major failures requiring expensive repairs.
Think of slope stabilization as a system that matures and strengthens over time. Your initial installations protect the site immediately, but the real strength develops as plant roots grow deeper and vegetation becomes established. Within two to three years, a well-designed stabilization system requires minimal maintenance while providing permanent protection for your cabin investment.
Cost Considerations and Budget Planning
Building a cabin on a hill can surprise you with extra costs. But, planning your budget well can help manage these expenses. Building on hills costs 30-50% more than on flat land. This is because of the need for more excavation, drainage, and stabilization.
Knowing these costs helps you decide where to spend and save. This way, you can keep your project affordable without sacrificing quality.
The location of your cabin site greatly affects your budget. Planning carefully helps balance your dream with what you can afford. This ensures your cabin stays safe and strong for years.
Estimating Excavation and Grading Costs
Excavation is a big part of hillside cabin costs. A real example shows how costs can jump up. One owner got a quote of $13,000 for a driveway and septic at a lower spot. But, the same work at a higher spot would cost $30,000.
This big difference shows why choosing the right site is key. The owner picked the cheaper option, saving money for other needs and paying off the mortgage faster.
Several things affect your grading hillside property costs:
- Site accessibility: Can heavy equipment easily reach your site, or do you need to build roads first?
- Total earth movement volume: This measures how much digging and moving is needed
- Haul distance: Moving soil off-site or bringing in fill adds to costs
- Rock conditions: Finding ledge rock can triple excavation costs
- Equipment mobilization: Getting machines to remote sites can include extra fees
Excavation costs vary by region and site conditions. Here are some general ranges:
- Clearing and grubbing vegetation: $1,500-$5,000 per acre
- Rough grading and earthwork: $50-$200 per cubic yard moved
- Finish grading: $2,000-$5,000 for a standard building pad
- Rock removal without blasting: $80-$150 per cubic yard
- Rock removal with blasting: $200-$500+ per cubic yard
Projects with balanced cut and fill are cheaper. Moving material on-site is less expensive than hauling it away. But, when you need to haul a lot, costs can go up, sometimes by $20-$40 per cubic yard.
Retaining Wall and Drainage System Expenses
Many builders underestimate the cost of retaining walls and drainage. These are key for stability but add up quickly. They need careful budgeting.
Retaining wall costs vary by type and height:
| Retaining Wall Type | Cost Per Square Foot | Best Applications |
|---|---|---|
| Segmental Block Walls | $15-$40 | Heights under 4 feet, residential projects |
| Timber Walls | $10-$25 | Temporary or rustic applications, lower slopes |
| Engineered Concrete/Steel | $50-$100+ | Tall walls, heavy loads, critical structures |
Wall height greatly affects cost. Taller walls need stronger construction and more planning. A 3-foot wall might cost $15 per square foot, while a 10-foot wall could be $75 per square foot.
Drainage system costs include:
- French drain installation: $20-$50 per linear foot, including excavation, pipe, and gravel
- Surface drainage swales: $5-$15 per linear foot for shaping
- Foundation drainage systems: $10-$30 per linear foot around the building
- Catch basins and outlets: $300-$800 each installed
These drainage investments seem pricey but save a lot on repairs later. Proper drainage during site preparation protects your foundation, prevents erosion, and keeps retaining walls strong for decades.
Hidden Costs and Contingency Planning
Hidden expenses can surprise many builders, adding 20-30% to budgets. Planning for these surprises helps avoid delays and financial stress.
Common hidden costs include:
- Unsuitable soil conditions: Finding clay, organic material, or unstable soil needing removal and replacement
- Environmental mitigation: Wetland buffers, endangered species protection, or stormwater management upgrades
- Utility extensions: Well drilling, electrical service upgrades, or septic system modifications
- Erosion control requirements: Silt fencing, sediment basins, and stabilization during construction
- Engineering and permit fees: Structural calculations, geotechnical reports, and regulatory approval costs
- Access road maintenance: Repairing damage from heavy equipment and material deliveries
The key to hillside construction budget planning is to never cut corners on foundation, drainage, or driveway. Saving money here can cost more in repairs later.
Quality should always be more important than saving money in structural and drainage work. A foundation failure or major water problem can cost tens of thousands to fix, much more than any initial savings.
Appropriate contingency percentages for your budget include:
- Hillside projects: 15-20% contingency fund
- Remote or difficult access sites: 20-25% contingency fund
- Flat-land construction: 10-15% contingency fund (for comparison)
Smart financial planning might mean choosing a less dramatic but more affordable site. The owner who picked the $13,000 option over the $30,000 one saved $17,000. This money went toward other priorities, faster mortgage payoff, and future planning flexibility.
This shows that the best financial choice isn’t always the most spectacular location. Phased construction or choosing accessible sites can offer better financial outcomes while achieving your cabin dreams.
When comparing contractor bids, make sure you understand what’s included. Ask for itemized proposals showing costs for excavation, grading, retaining walls, drainage, and access improvements. This clarity helps compare costs and find where to save.
Your grading hillside property costs are big investments. They protect your property value and ensure decades of trouble-free cabin enjoyment. Realistic budgeting with enough contingencies ensures your project goes smoothly without financial surprises.
Building Your Dream Cabin on a Leveled Slope
Your sloped property is full of possibilities that flat lots can’t offer. By leveling a sloped site for a cabin, you unlock stunning views and creative designs. Your cabin will blend seamlessly into the landscape, not just sit on it.
Every lot has its own special spot for a cabin. Take time to explore your property in different seasons and weather. You’ll find the best spots for light, natural drainage, and how the land wants to be used. This helps make better choices during your mountain cabin project.
Building on a slope is a smart move. It leads to a stable, beautiful, and connected home. The extra effort in planning ensures strong foundations that last, manage water well, and support your cabin for years.
Don’t skimp on water management, foundation quality, or erosion control. These are key to protecting your investment. Work with experts in mountain construction. They turn challenges into chances and avoid costly errors.
Your slope is not a problem but a chance to create something amazing. Use what you’ve learned, gather your team, and start building your dream retreat. The journey will take patience and investment, but the outcome will be worth it.


