Your cabin sits on beautiful sloped terrain, and you’re ready to expand your outdoor living space. The good news? That challenging hillside can become your greatest asset.
Building a deck on a slope opens up exciting possibilities for multi-level outdoor spaces with breathtaking views. Yes, the terrain presents unique obstacles, but with proper planning and the right approach, you’ll create something truly spectacular.
This guide walks you through every step of your project. You’ll learn about site assessment, foundation techniques that work for uneven ground, material selection, and navigating permits and codes.
Whether you’re tackling this as a DIY weekend warrior or you’re a contractor seeking best practices, we’ve got you covered. Sloped sites shouldn’t limit your outdoor dreams—they should inspire creative solutions.
Let’s transform that challenging hillside into the sturdy, long-lasting deck your cabin deserves.
Understanding the Unique Challenges of Sloped Terrain
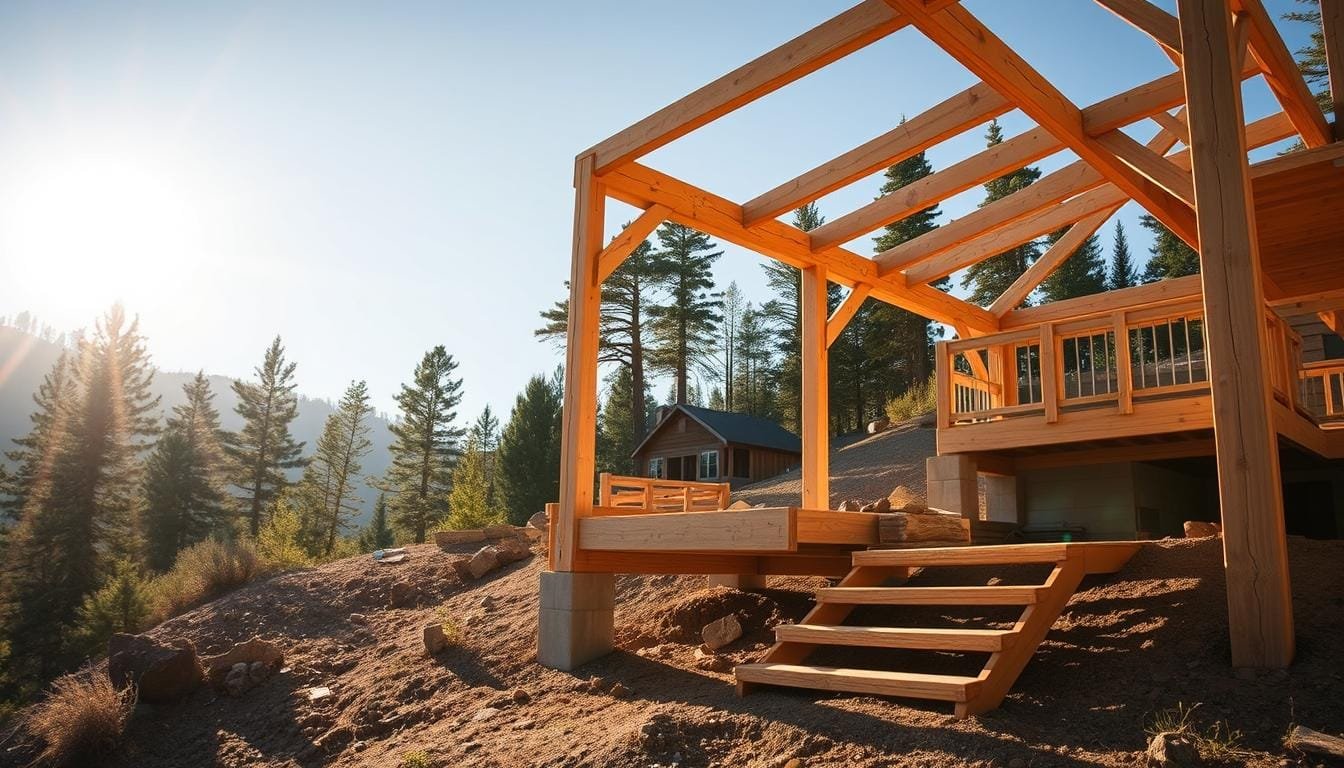
Planning a deck on a hillside means gravity is a big challenge. The ground makes things harder than on flat lots. Every detail, from measurements to support posts, gets more complicated.
Varying post heights are a big challenge. On flat ground, posts are the same length. But on a slope, some posts are short, while others are very tall.
These tall posts often go beyond what building codes cover. You might need to talk to an engineer to make sure your deck is safe.
Getting a level and square layout is tough on uneven ground. This makes every step of building harder. You can’t just measure from one corner to another because they’re at different heights.
Water drainage adds to the complexity. Rain flows downhill, and if not planned for, can pool under your deck. This can cause erosion and even make your deck unsafe.
Soil stability changes a lot on slopes. The top may have shallow soil, while the bottom has deeper, softer soil. This means your foundation needs to be different in each area.
| Challenge Factor | Flat Ground Impact | Sloped Terrain Impact |
|---|---|---|
| Post Heights | Uniform lengths, typically under 8 feet | Varying lengths, often 10-14+ feet requiring engineering |
| Water Management | Minimal drainage concerns | Critical erosion and runoff control needed |
| Foundation Depth | Consistent depth across all footings | Variable depths to reach stable soil and frost lines |
| Material Access | Easy equipment and delivery access | Limited access requiring manual transport |
Frost heave is different on slopes than on flat ground. Soil and moisture levels change, so your footings need to be deeper in some places. What works at the top might not be enough at the bottom.
Getting materials to your site is also harder. Trucks can’t always get close, so you might have to carry lumber up the hill. This can be dangerous and tricky.
These challenges mean you can’t just use flat-ground deck plans for slopes. You need special approaches to make sure your deck is safe and stable for years.
Assessing Your Cabin Site’s Slope and Soil Conditions
Every hillside site has its own story, told through its slope and soil. Understanding this story is key to a deck’s stability. A proper site assessment prevents costly mistakes and ensures a solid foundation for years.
This step is taken before buying materials or starting construction. It gives you the info needed for smart design and construction choices for your sloped yard decking project.

Measuring the Grade and Elevation Changes
Accurate slope measurements are the foundation of your deck plan. Start by marking your deck’s corners with rebar stakes driven firmly into the ground. These markers are used throughout the planning phase.
Use a string line and level to set up horizontal lines between stakes. Measure the vertical distance from each string to the ground at several points. This gives you the elevation drop across your deck.
To find the slope percentage, divide the elevation change by the horizontal distance, then multiply by 100. For example, a 6-foot drop over 20 feet is a 30% grade. Check your measurements in all directions to ensure your layout is square within a half-inch tolerance.
Be careful around trees, rocks, and existing structures that might affect your design. Small errors at this stage can lead to major alignment problems during construction. Double-check everything before moving forward with your plans.
Conducting Soil Tests for Foundation Stability
Soil composition is critical when building on slopes. It determines the best foundation system. Different soils behave differently, making drainage and erosion challenges on hillsides. Professional engineers, like those at Techno Metal Post, assess soil and slope angles before recommending solutions.
Start with basic DIY testing to understand your soil. Dig test holes at several locations where posts will go, noting soil type changes at different depths. Squeeze moist soil in your hand—clay forms a tight ball, sand falls apart, and loam holds shape but crumbles with light pressure.
Test drainage by filling holes with water and timing how quickly it absorbs. Poor drainage indicates clay-heavy soil that may shift during freeze-thaw cycles. Rocky soil provides excellent bearing capacity but makes digging difficult.
For a formal assessment, hire a geotechnical engineer to conduct soil bearing capacity tests. This is essential for large decks, steep slopes, or questionable soil conditions. Professional testing reveals the load-bearing capacity at specific depths, helping you choose the right footings and their depth for a stable foundation.
Planning Your Hillside Deck Construction Project
Before starting, careful planning is key to avoid costly mistakes. It ensures your deck fits perfectly with your hillside cabin. A well-thought-out design saves time, money, and frustration later.
Your deck layout should match your cabin’s style and the natural slope. This way, it won’t fight against the terrain.
The planning phase shapes your project’s every detail. From design styles to location, each choice matters. Taking time to imagine your deck’s final look and function is worth it.
Choosing Between Single and Multi-Tiered Layouts
Single-level decks are great for moderate slopes and smaller areas. They offer a continuous platform supported by posts of varying heights. For example, a 16-foot by 20-foot deck might need support posts over 13 feet tall on the lower side.
Single-level decks have a simple framing system. This means easier joist layouts and fewer connection points. But, taller support posts on steep slopes can create stability challenges and need extra bracing.
Multi-level decks follow your property’s natural contours more closely. They create different zones at various elevations, connected by stairs or short steps. Each level is closer to the ground, reducing post heights and adding visual interest.
Multi-tiered designs offer more than looks. They divide your outdoor space into functional areas like dining and lounging spots. The lower post heights make installation simpler and improve wind resistance. You can enjoy different views from each level.
Building a multi-level deck is more complex. You’ll have to build separate frames, install more stairs, and manage elevation changes. The choice between beauty and building time depends on your skills and budget.
Selecting the Right Size and Location
Deck size depends on how you’ll use the space and your terrain. A small 13-foot by 9-foot deck is perfect for a breakfast nook. Larger decks, around 12 feet by 16 feet, are better for entertaining.
Door locations from your cabin guide deck placement. Make sure there’s enough clearance for door swings and easy transitions. Think about which rooms will access the deck and how that affects use.
Sun exposure affects comfort. Morning sun is great for breakfast spots, while western exposure offers stunning sunsets but intense heat. Wind direction, privacy, and scenic views also influence deck placement.
Imagine your deck from inside and outside your cabin. Walk the slope and mark your deck’s outline with stakes or string. This approach helps spot issues before you start building.
Building a Deck on a Slope: Foundation Options Explained
Your deck’s foundation is key to keeping it stable. It must handle gravity, soil movement, and weather. Hillside deck construction adds extra challenges because of the slope. You need foundations that can handle uneven ground and different soil types.
Modern elevated deck installation offers several foundation systems. Each is designed for different slopes and soils. Knowing your options helps you choose the best one for your deck.

Pier and Post Foundation Systems for Steep Terrain
Concrete piers and post bases are a common choice for decks on slopes. They use precast or poured concrete piers and metal brackets. This system is adjustable and has a proven track record.
On slopes, it’s important to keep piers plumb. A slight tilt can cause problems. Piers can extend up to 12 inches above grade, managing uneven post heights.
Proper pier sizing and spacing is more critical on slopes. Your building inspector will check if they meet local codes.
Concrete Footings and Tube Forms
Tube forms like Sonotube are a cost-effective way to create uniform footings. They simplify digging holes to the right depth. The tubes also keep concrete clean and separate from soil.
The success of tube forms on slopes depends on placing them on solid soil or gravel. Never pour footings on loose soil. Dig holes to reach stable soil or bedrock.
For steep slopes, consider pouring concrete in stages. This prevents the wet concrete from shifting. Allow the bottom to cure before adding the top section.
Helical Piles for Challenging Soil Conditions
Helical piles are a modern solution for difficult hillside conditions. They work like giant earth anchors, gripping deep into stable soil. Companies like Techno Metal Post make specialized equipment for tight spaces.
Helical piles handle complex forces like lateral loads and compression. They require no digging, avoiding property damage. The equipment drills the piles into place with precision.
While helical piles cost more, they’re great for challenging soil. Rocky terrain and steep slopes are ideal. They come with engineering services and certifications.
Designing the Right Support Structure for Elevated Deck Installation
Building a stable elevated deck is more than just solid footings. The support structure between foundation and frame is key. It prevents problems like sagging and bouncing that can harm your deck’s safety and life.
On sloped terrain, support components face tougher forces than flat decks. The slope causes uneven weight and more pressure, making each connection point critical for stability.

Post Bases That Adjust to Your Needs
Connecting posts to concrete piers is essential. You have options like J-bolts cast into wet concrete or epoxied anchor bolts. Each fits your project’s timeline and site conditions.
Adjustable post bases are great for uneven ground. They bolt into concrete and offer flexibility, allowing for fine-tuning post placement even after curing.
This flexibility is key on sloped sites where exact measurements are hard. You can adjust without redoing concrete or delaying your project.
Choose hot-dipped galvanized or stainless steel components for best corrosion resistance. Moisture builds up around post bases, more so on sloped decks. Cheap hardware rusts fast, weakening your deck’s connections.
Proper installation means centering posts on piers and ensuring full contact. While codes don’t require specific bracing, these two points must be solid to prevent movement.
Calculating Beam Spans on Uneven Terrain
Slope changes load distribution across your deck frame. This affects beam sizes. Standard tables assume level ground, but hillside decks need adjusted calculations for gravity’s pull.
Determine the tributary area each post supports at different elevations. Downhill posts carry more weight, so they often need larger beams or shorter spans.
Beam size and span follow simple rules. Larger beams span farther. A doubled 2×10 beam spans 10 feet, while a doubled 2×12 spans 12-13 feet. For longer spans or heavier loads, you might need engineered lumber or steel.
Focus on bearing requirements where beams sit on posts. Each beam needs enough surface contact to transfer weight without crushing wood. On sloped decks, angled cuts or custom brackets might be needed for proper bearing.
Consult an engineer for slopes over 20 degrees or large decks. Professional calculations prevent costly mistakes and ensure your deck meets safety standards for years of use.
Selecting the Best Materials for Sloped Yard Decking
Choosing the right decking materials is key for sloped yards. These areas face harsher weather and more stress on the deck. The right materials can save you money and trouble later.
It’s not just about looks. You need materials that perform well in tough conditions. The height of your posts can vary, affecting how they handle weather.
Wood and Composite Options for Hillside Applications
Pressure-treated lumber is a top pick for sloped yard decks. It’s affordable and protects against rot and insects. It’s great for the deck’s skeleton.
It’s widely available and meets building codes. But, it needs regular maintenance and can warp or crack. You’ll need to seal it yearly and watch for moisture damage.

Cedar is a good middle choice. It looks nice and resists decay without chemicals. It’s a favorite for decking boards and railings.
Cedar costs more than treated wood but less than composites. It needs sealing every two to three years. On slopes with good drainage, cedar works well.
Composite decking is low-maintenance and looks great. It’s made from wood fibers and plastic. It’s perfect for hard-to-reach areas after installation.
It’s more expensive upfront but saves on maintenance. Composites handle moisture better than wood. Installation requires specific techniques and allows for expansion.
Hardware and Connection Systems for Slope Projects
Quality fasteners and connectors are vital on uneven terrain. Your deck’s connections face more stress. The right hardware keeps them secure for years.
Joist hangers rated for your lumber dimensions are key. Always fill nail holes in these connectors. For sloped decks, you might need angled hangers.
Use galvanized or stainless steel hardware to resist corrosion. Regular steel fasteners rust quickly in moist environments. The extra cost of corrosion-resistant hardware is worth it.
Structural screws are better than nails for many deck parts. They hold better and don’t loosen over time. They’re great for sloped decks where movement is more common.
Hidden fastener systems make decking look cleaner and safer. They attach to joist sides and grip board edges. Post bases with adjustable brackets help set posts at different heights.
Navigating Permits and Building Code Requirements
Before starting your deck project, knowing about permits is key to avoid future costs. Building codes and permits are in place to keep you safe and protect your property’s value. Hillside deck construction gets extra attention from building officials because it’s more complex and requires more safety measures.
Most places need permits for decks over 30 inches tall or 200 square feet in size. Sloped decks usually meet these criteria because of their height. You’ll need to provide site plans, structural drawings, and material details for your permit application.

The International Residential Code (IRC) Table R507.4 is key for deck post heights. It outlines maximum post heights for different lumber sizes and types, based on load and deck area. Knowing these rules helps you plan your deck design.
One big rule is the 14-foot maximum post height from pier to beam. On steep slopes, posts often go over this. In such cases, you’ll need a structural engineer to design extra support.
Other important code rules include railing heights, stair sizes, and how to attach the ledger. Your local building inspector can help, not hinder, your project. Talk to them early to avoid costly changes and build a good working relationship.
Step 1: Site Preparation and Layout on Sloped Ground
Site prep might not be exciting, but it’s key when building a deck on a slope. Spending time on groundwork avoids problems later, like finding hidden obstacles or a crooked layout. Good prep makes each step easier and more precise.
Think of site prep as laying the invisible foundation of your deck. On sloped ground, it needs extra care because of gravity and uneven surfaces. Skipping it leads to constant adjustments and frustrating do-overs.
Clearing Vegetation and Creating Access
Begin by removing all plants from your deck area and a few feet beyond. This includes trees, shrubs, grass, and ground cover that could get in the way. You’ll need this space for safe and comfortable work on sloped ground.
Be careful about what you remove. Some plants help prevent erosion, so clear only what’s necessary. Mark plants you want to keep and work around them when you can.
Creating safe access paths across your yard is vital for moving materials and tools. Here are some steps to follow:
- Build temporary steps or ramps if the slope is steep
- Designate a flat area for storing lumber and supplies
- Create pathways wide enough for two people carrying long boards
- Remove tripping hazards like rocks, roots, and debris
- Mark utility lines before digging any access routes
Professional installers use special equipment to avoid damaging landscaping. DIY builders need clear paths. Plan your access before materials arrive to avoid scrambling.
Establishing Level Reference Lines
Creating accurate reference lines is key to a square, level deck on uneven ground. These lines guide you throughout construction, keeping everything aligned despite the slope.
Begin by marking the four corners of your deck with rebar stakes or sturdy wooden stakes. Then, check and recheck your measurements. Measure horizontally, vertically, and diagonally between corners.
Your goal is to match measurements within 1/2 inch. When diagonal measurements are equal, your layout is square. This might take several adjustments, but it’s worth it to avoid crooked railings and awkward cuts later.
Use string lines between stakes to create visual planes. Add a line level or water level to these strings for horizontal references. These lines show how much each post needs to extend above ground for a flat deck surface.
Double-check everything before marking post locations. Measure twice, mark once is more than a cliché—it’s survival advice. If measurements don’t match, troubleshoot systematically. Getting this foundation right makes every step afterward flow smoothly.
Step 2: Installing Footings and Support Posts
Your deck’s footings and support posts are the foundation that holds everything up. They resist forces and ensure your deck stays stable for years. Getting this step right is key to avoiding costly issues later.
The slope of your land makes foundation work more complex. But, with the right techniques, it’s manageable. Your hard work now will make your deck strong for seasons to come.
Digging Footing Holes at Varying Depths
Mark the footing locations using lines from site preparation. Each hole must be dug to the right depth to go below the frost line. Check your local building code for the frost depth, which varies by climate.
Dig holes that are two to three times the post width, usually 12 to 18 inches. Make the bottom wider to increase bearing capacity and resist frost heave. This design spreads the load over more soil.
Working on hillsides can be tough, mainly for lower footing locations. A post-hole digger is usually enough, but a power auger might be needed for rocky soil. Remove large rocks or roots completely for a solid base.
Add 4 to 6 inches of gravel to each hole before pouring concrete. This gravel base helps with drainage and provides a stable base that won’t compress over time.
Pouring Concrete and Setting Anchor Hardware
Calculate the concrete needed for all footings, adding 10% for waste. Use pre-mixed bags for small projects or ready-mix for more. Mix the concrete to a thick, pourable consistency.
Pour concrete slowly to avoid air pockets. Use a stick or rebar to remove air bubbles. For elevated deck installation on slopes, extend concrete piers up to 12 inches above grade.
You can use post bases in wet concrete or dry-anchored bases. Wet bases need quick, accurate placement. Dry bases offer adjustment flexibility.
Use a level to keep each pier plumb while the concrete sets. Center the anchor hardware on top of each pier. Wait at least 48 hours before installing posts.
Setting Posts Plumb on Uneven Terrain
Installing posts vertically on sloped ground is a challenge. But, the right techniques make it possible. Start by placing each post in its anchor base and securing it loosely. Use a 4-foot level on two sides of the post to check for plumb.
Adjustable post bases are very helpful here. They let you make small position corrections after the concrete sets. Loosen the base, adjust the post, and check plumb again before tightening. This flexibility helps avoid the frustration of trying to force a post perfectly vertical.
Create temporary bracing for each post using scrap lumber. Nail it diagonally from the post to stakes in the ground. Install braces in two directions for maximum stability. These braces hold posts in place while you work on the frame structure.
Double-check plumb measurements before moving to the next post. A post that’s even slightly out of plumb can cause problems as you build upward. Leave the temporary bracing in place until you’ve installed the beam structure that permanently stabilizes the posts.
Step 3: Constructing the Deck Frame and Ledger Board
Building a solid deck frame is key to its long-term stability. It transfers all weight from the deck to the foundation. Every connection must be precise for a durable deck.
The frame has horizontal members that work together. The ledger board connects to your cabin. Beams and joists then reach out to the perimeter posts. This setup creates a stable base for decking and furniture.
Securing the Ledger to Your Cabin Foundation
The ledger board links your deck to the cabin. For hillside decks, it’s attached to the concrete foundation, not wood siding. A 2×8 ledger board is strong enough for joist hangers and fasteners.
Use 5-inch, 1/2-inch diameter anchor bolts as needed. Most codes say to space them every 16 inches. Drill holes in the ledger first, then mark the foundation for bolts.
Set the ledger 1 to 2 inches below the cabin floor. This stops water from getting in. Apply self-adhesive flashing tape to the ledger’s back for moisture protection.
Different foundations need different attachment methods:
- Concrete foundations: Use wedge anchors or expansion bolts set into pre-drilled holes
- Block foundations: Drill through the block into cells filled with concrete and rebar
- Wood-framed walls: Lag screws must penetrate into rim joists or solid blocking, never just siding
Make sure the ledger is perfectly level. Small errors can cause noticeable deck slopes. Double-check alignment before tightening all fasteners.
Building the Joist Framework
With the ledger in place, start installing floor joists. Begin from one end, not randomly. The first joist hanger goes on the ledger’s far left side.
Cut the first joist to about 9 feet, a common length for hillside decks. Place it in the hanger, ensuring it’s square and level. Use this joist to set the outer beam and 4×4 posts.
Repeat the process at the other end. Measure the diagonal distances between opposite corners. If they’re equal, your frame is square. Adjust if necessary.
Install the rest of the joists at 16 inches on center:
- Mark joist locations on the ledger board
- Attach joist hangers at each marked location
- Cut joists to length and install them in the hangers
- Secure the opposite end to the outer beam with appropriate hardware
Add blocking between joists for decks over 8 feet. This prevents joist twisting and adds frame rigidity. Stagger the blocking for easy nailing.
Always check that the frame is level and square. Small errors can add up, so fix them right away.
Step 4: Laying Decking Boards and Building Railings
Now, your deck project is almost done. You’ll add decking boards and protective railings. These steps are important for a professional look and durability. They help avoid problems like cupping and splitting.
When building a deck on a slope, details are key. Measuring and spacing correctly makes a big difference. These parts are used a lot, so they need to be done well.
Proper Spacing and Fastening Techniques
Spacing between decking boards is more than just looks. It lets water drain and wood expand. Without enough space, moisture can cause rot and warping.
Use spacers like 16-penny nails for even gaps. This makes the deck look clean. For composite materials, follow the manufacturer’s guidelines.
There are different ways to fasten boards. Face screws are strong but visible. Hidden fastener systems are better for materials like cedar or composite.
Fasten two screws per joist per board. Drill holes at the ends to avoid splitting. Check that boards are straight before fastening.
Installing Code-Compliant Railings and Stairs
Railings are important for safety and look. They must be at least 36 inches high if the deck is over 30 inches up. Balusters should be no more than 4 inches apart.
Railing posts need extra support on sloped decks. Space them 6 feet apart. The railing system must hold 200 pounds.
Stairs need careful planning for safety. Risers should be 4 to 7.75 inches high. Treads should be at least 10 inches deep. Risers should be the same height for safety.
On sloped sites, stairs must be measured carefully. The transition must be natural and meet code. Install handrails on stairs with four or more risers.
Implementing Drainage Solutions for Hillside Decks
Drainage solutions make hillside decks last longer and are easier to maintain. Water flows downhill, which can harm your deck’s foundation. Without good drainage, your deck may become unstable and wear out faster.
Water flows more intensely on hills than on flat ground. This makes managing water key for slope-friendly deck ideas. Good water control protects your deck and can make space dry under elevated decks.
Catching and Channeling Water Flow
Under-deck drainage systems attach to your joists. They turn a wet, muddy area into a usable space. These systems use panels or channels to keep water out.
For water to flow well, the deck needs a slight slope. Water then goes to gutters and downspouts, keeping your foundation dry. This setup helps your deck last longer and makes space below dry and usable.
The cost of these systems varies. Vinyl systems cost $5-8 per square foot. Aluminum systems can cost $12-15 per square foot. The cost is worth it for a longer-lasting deck.
Protecting the Ground Below
Grading the soil around your deck keeps water away from supports. A gentle slope helps water flow away. This prevents damage to your deck’s foundation.
Using landscape fabric and mulch helps keep the soil stable. This makes your deck area look better. For visible slopes, plants like ornamental grasses help hold the soil in place.
Features like French drains and swales manage water flow. These slope-friendly deck ideas protect your deck and improve your property’s function.
| Drainage Solution | Best Application | Cost Range | Primary Benefit |
|---|---|---|---|
| Under-Deck Panels | Creating dry space below elevated decks | $5-15 per sq ft | Maximizes usable area and protects structure |
| Perimeter Grading | All hillside deck installations | $200-600 labor | Prevents water pooling at foundations |
| French Drains | Areas with concentrated water flow | $10-25 per linear ft | Intercepts and redirects problematic runoff |
| Erosion Control Plantings | Exposed slopes and visible areas | $3-12 per plant | Stabilizes soil while enriching aesthetics |
Combining under-deck systems with proper grading creates a comprehensive water management strategy. This protects your deck, prevents costly repairs, and turns sloped land into a dry, functional outdoor space.
Safety Best Practices for Steep Terrain Deck Building
Building a deck on steep terrain is not worth risking your safety. Steep terrain deck building comes with unique dangers. You’ll be working on slopes at heights, making safety a top priority.
First, choose the right personal protective equipment for hillside work. Hard hats are key when working at different heights to avoid falling objects. Safety glasses protect your eyes, and gloves improve your grip on tools.
Wear sturdy boots with good tread. This extra grip is vital on sloped surfaces all day.
Fall protection requirements kick in at certain heights. Check local laws, but usually, harnesses and anchors are needed above six feet. It’s a must, even if it seems too much.
Ladder safety is critical on uneven ground. Use blocks to level ladder bases on slopes. Always keep the ladder at the right angle and never overreach.
Clear your work area of tripping hazards. Tools and materials can slide down slopes, posing dangers. Make sure paths are safe and follow them.
Weather impacts sloped sites more than flat ones. Wet or icy conditions are extremely dangerous. Always delay work when it’s not safe, as pros know weather delays are part of the job.
Work with a partner whenever you can. Tasks like setting posts and handling long lumber are safer with help. Your partner can watch out for hazards you might miss.
Know your limits and when to call in pros. If a task seems too hard or makes you uneasy, get experienced contractors. They have the skills and gear for steep terrain.
Maintaining Your Slope-Friendly Deck for Years to Come
A deck on a sloped yard needs regular care to stay safe and look good for years. Decks on hills face special challenges like more moisture, heavier loads on posts, and soil movement. These factors can harm the deck’s structure.
Regular checks and maintenance stop small issues from becoming big problems. The effort you put into building your deck is worth protecting. Careful attention to the deck’s needs is key.
Twice-Yearly Inspection Schedule
Check your deck in spring and fall to catch problems early. These checks take about an hour but offer peace of mind.
Focus on parts of the deck that get stressed the most:
- Structural connections like ledger boards, post-to-beam joints, and joist hangers, looking for looseness or rust
- Post alignment using a level to ensure posts stay straight, as soil can shift them
- Wood condition at ground level and in wet areas, checking for rot, bugs, or cracks
- Drainage systems to make sure gutters and channels are clear and water flows away
- Railing stability by pushing on posts and checking for loose connections
- Decking board gaps that might have grown too wide due to wood movement
Keep a maintenance log to track any issues and repairs. This helps spot patterns and is useful for professional advice.
Protection Strategies for Longevity
Moisture is the biggest enemy of decks on slopes. Set up a cleaning and sealing schedule to protect against water and UV damage.
Wood decks need sealers every 2-3 years to keep moisture out. Composite decks need less frequent treatment but also benefit from mold preventers.
Watch for settling warning signs like concrete cracks, posts that are no longer straight, or gaps at ledger boards. If you see several signs, get a structural engineer’s advice before things get worse.
Keep drainage clear around footings by removing debris and ensuring erosion control works. The tips in building a deck on a slope include grading to keep water away.
With the right care, your deck can last for decades, providing a great outdoor space.
Enjoying Your Custom Hillside Deck Retreat
Your hillside deck project turned a tough slope into a beautiful outdoor space. It offers views and character that flat areas can’t match. This special place is where your family can make memories together.
Paul Lafrance says decks should feel like an extension of your home. They should make you feel as good as your indoor spaces. Your deck will be perfect for morning coffee, dinner, and weekend fun.
Think about how to make your deck comfy and useful. Multi-level designs help create areas for grilling, dining, and relaxing. String lights add a cozy feel and make it safer at night. Built-in planters bring plants that soften the deck and connect it to nature.
The slope that was once a problem is now a big plus. Elevated deck installations make your deck feel like it’s floating among trees. Your deck ideas have come to life, showing off your thoughtful design.
Show off your deck to friends and neighbors. Your success might encourage others with similar challenges. With care and quick fixes, your deck will be a joy for years to come. It proves that good planning adds lasting value to hillside living.


