Owning a remote retreat like a hunting cabin or a seasonal getaway is a dream for many people. A major hurdle, however, can be managing essential utilities without spending a fortune. Professional installation for waste management on a distant property can easily run into thousands of dollars.
The good news is that you have a powerful and affordable alternative. By tackling the project yourself, you can achieve significant savings. We are talking about a materials cost of around $150 compared to a professional quote of $5,500 or more.
This approach is perfectly suited for a low-usage home. If your property sees limited activity, under 125 gallons of water per day, a simple, functional solution is within reach. This guide is designed to walk you through the entire process.
You will learn the fundamentals of how these systems operate. We cover everything from selecting the right materials to proper installation techniques for your land. Our goal is to empower you to create a reliable, environmentally sound waste management solution that protects your investment for years to come.
Understanding Septic System Basics
Before digging into the installation process, it’s crucial to grasp the fundamental principles of underground wastewater treatment. This knowledge will help you build a more effective and long-lasting solution for your property.
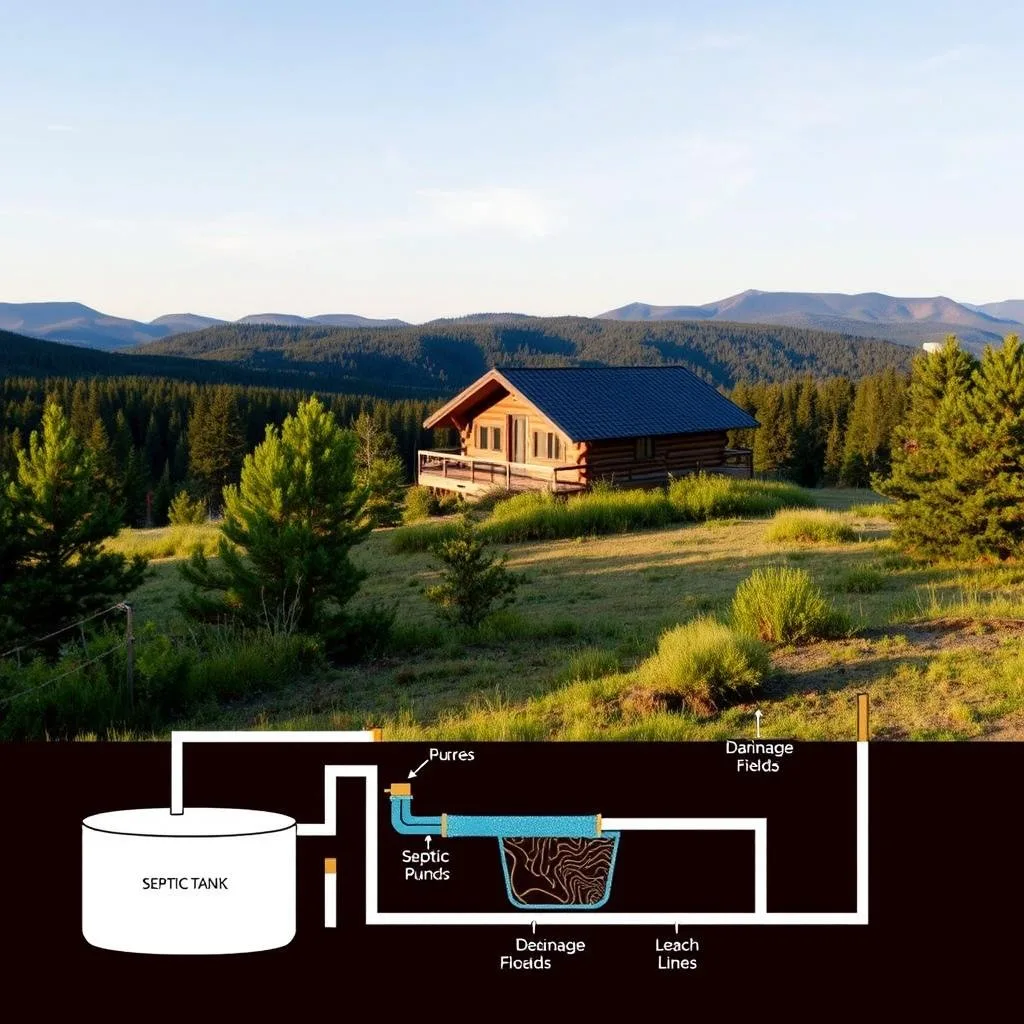
What Is a Septic System and How It Works
A septic system handles all the wastewater from your retreat’s plumbing without needing municipal sewer connections. The process begins when waste enters a holding tank where gravity separates the materials.
Heavier solids settle to the bottom while lighter materials float to the top. The middle liquid layer then flows out to a drain field where natural soil bacteria break down contaminants before the water returns to the groundwater supply.
Benefits of a Septic System for Cabins
For remote property owners, this approach offers significant advantages. You gain the comfort of modern plumbing while maintaining complete independence from city infrastructure that may be unavailable.
The system operates with minimal ongoing costs beyond occasional maintenance. Unlike monthly sewer fees, your self-contained solution can last for decades with proper care, making it an ideal choice for seasonal use.
Local Regulations and Permitting Essentials
The legal landscape surrounding waste management installations varies significantly by location. Your first step should always involve researching local requirements before any physical work begins.
Navigating Permit Requirements and Codes
Many jurisdictions mandate specific permits for wastewater treatment installations. Contacting your county health department provides clarity on local policy.
Regulated areas often require professional inspections and soil testing. This ensures your installation meets environmental safety standards.
The table below outlines key differences between regulated and unregulated locations:
| Requirement | Regulated Areas | Unregulated Areas |
|---|---|---|
| Permit Needed | Mandatory | Optional |
| Setback Distances | Strictly enforced | Recommended only |
| Consequences | Fines and removal | Environmental risk |
Even in unregulated zones, following best practices protects groundwater. Always make sure to maintain proper distances from water sources.
Understanding local policy prevents costly mistakes. Proper planning ensures your investment remains compliant and functional.
DIY Septic System for Cabin: Essential Planning Considerations
Before you start digging, consider how your retreat will actually be used. Honest assessment of your patterns prevents oversizing or undersizing your wastewater solution.

For seasonal properties with minimal occupancy, a small septic system designed for low usage works perfectly. Think about how many people will visit and how often they’ll use facilities.
Consider what fixtures you’ll connect beyond the toilet. Each additional fixture like sinks or showers increases wastewater volume. This affects your capacity needs.
Timing your project during dry weather makes excavation easier. You can properly assess soil drainage without seasonal water interference.
Gathering help transforms labor-intensive tasks into manageable work. Many homeowners complete installations quickly with family assistance.
- Assess your actual usage patterns throughout the year
- Plan for proper access for future maintenance needs
- Consider winter protection if the cabin isn’t heated
- Have backup plans for potential problems during peak use
The beauty of this approach is customization to your exact situation. You create a solution that matches your real needs rather than standard requirements.
Choosing the Right Materials and Tools
The success of your project hinges on selecting materials that balance affordability with durability. Smart shopping decisions can keep your total cost around $150 while ensuring long-term reliability.
Start by creating a detailed shopping list based on your specific design. This prevents last-minute store runs and budget overruns.
Key Tools for DIY Installation
Essential equipment makes the construction process smooth and accurate. You’ll need a quality level for checking slopes and a saber saw for cutting openings in containers.
A hacksaw handles pipe cutting while wood stakes with string help mark your layout. Proper tools ensure precise measurements and clean installations.
Selecting Quality Materials on a Budget
Focus on core components that impact performance and longevity. Two food-grade plastic containers serve as your primary tanks.
For piping, choose 4-inch diameter ABS or PVC materials. Various fittings and approximately 40 feet of perforated pipe complete the flow system.
The drain field requires crushed rock and landscape fabric. Shopping at local hardware stores and farm supply outlets can yield significant savings.
| Component | Purpose | Approximate Quantity |
|---|---|---|
| Plastic Drums | Primary treatment tanks | 2 units (55-gallon) |
| Crushed Rock | Drain field foundation | 9 cubic yards |
| Landscape Fabric | Soil separation barrier | 80 square feet |
| PVC/ABS Piping | Wastewater transport | 40-50 feet total |
Don’t compromise on critical items like proper sealants and adequate gravel. These components directly affect your installation’s performance and durability.
Evaluating Drum and Tank Options
Your container selection will significantly impact both the initial installation and long-term maintenance requirements. Choosing the right vessels involves balancing cost, capacity, and durability for your specific needs.

Standard plastic drums offer an affordable starting point. These containers work well for properties with minimal usage throughout the year.
Modifying Drums for Flange Installation
Precision cutting ensures proper flange installation. Measure your toilet flange’s outer diameter carefully before making any cuts.
Use a saber saw or hole saw to create clean openings in the drum tops. The first container needs an additional side opening about four inches from the top.
The second drum requires two side holes at forty-five degree angles. Proper sealing with epoxy prevents leaks that could compromise your setup.
Comparing Tank Sizes and Durability
Larger containers extend maintenance intervals significantly. A three-hundred-gallon option can last five to ten years between services.
Commercial tanks feature reinforced construction and built-in baffles. While more expensive initially, they offer superior longevity for frequent use.
Consider your actual usage patterns when selecting capacity. Oversized containers provide peace of mind but require more excavation work.
Designing Your Septic Layout and Drain Field
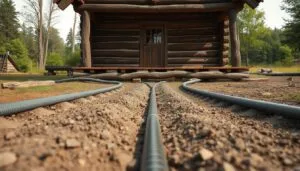
Gravity becomes your best friend when designing proper wastewater flow. Your entire setup relies on natural downward movement from start to finish. Careful planning ensures everything works harmoniously for years.
Smart positioning makes maintenance easier and prevents future headaches. Always place your dispersal area downhill from the treatment containers. Keep it away from water sources and areas with vehicle traffic.
Optimal Layout for Efficient Flow
Think about how water will move through your complete setup. The leach field needs enough space for proper soil absorption. Two twenty-foot lines usually work well for limited usage.
Consider existing trees and natural ground slopes during planning. Roots can damage pipes over time, so maintain safe distances. Mark everything with stakes and string before digging begins.
Ensuring Correct Pipe Slope for Drainage
The magic number for proper flow is 1/4 inch drop per foot. This gentle slope keeps water moving without rushing solids through too quickly. It’s the perfect balance for effective treatment.
Use a simple tool setup to maintain consistent grade throughout your trench. A four-foot level with a one-inch block taped to one end works wonderfully. This technique helps create uniform slope across the entire length.
Remember that perforated pipe holes should face downward. This allows wastewater to disperse evenly into the gravel bed below. Proper installation prevents pooling and ensures optimal performance.
Excavation and Site Preparation
Getting your hands dirty with the excavation phase marks a significant milestone in your wastewater management project. This stage transforms your plans into physical reality.
Proper ground preparation ensures everything functions correctly for years. The physical work requires careful attention to detail from the start.

Techniques for Accurate Trench Digging
Your main trench needs specific dimensions: 4 feet wide by 26 feet long by 3 feet deep. You can tackle this hole manually with shovels or rent equipment for faster results.
Manual digging works well in firm soil and provides great exercise. Renting machinery saves time, especially in challenging ground conditions. Either way, strategic soil placement makes later stages easier.
Keep excavated dirt clean on one trench side for backfilling. Maintain a clear working area on the opposite side. This organization saves effort during assembly.
The first container sits level in the trench with its top several inches below surface grade. The second unit requires a deeper hole—about one foot lower—to create proper flow between tanks.
Use gravel to fine-tune the deeper hole’s level instead of perfect soil excavation. This technique offers better drainage around your containers and simplifies adjustments.
Check depths frequently as you dig. Discovering incorrect measurements after placing heavy tanks creates unnecessary work. A little extra checking now prevents headaches later.
Building the Physical Septic Structure
The assembly phase brings your carefully planned layout to life. This is where your preparation pays off in creating a functional wastewater management solution.

Careful positioning ensures everything works together smoothly. Your entire setup depends on proper alignment between components.
Assembling the Drums Securely
Start by placing your first container in the trench. Check that it sits level in all directions using your level tool.
The top should rest 4-6 inches below ground level. This provides adequate frost protection for your setup.
Position the second drum in its deeper section. Confirm proper alignment so connections will fit without stress. Your containers must work together as a complete treatment tank system.
Proper Piping Connections
Clean connections are essential for watertight seals. Wipe all surfaces free of dirt before applying cement.
Cut your ABS pipe into 3.5-inch and 2.5-inch nipples. Attach these to a 90-degree bend using PVC glue. The shorter piece connects to the first drum’s side opening.
Work efficiently since cement sets quickly. Dry-fit everything first to verify alignment. This test run prevents mistakes during permanent assembly.
For the second container, install a Y-bend with 45-degree angles. This creates two separate drain lines for even distribution. Make sure all pipe connections point perpendicular to the trench bottom.
Your careful work now creates a reliable structure. Proper assembly ensures years of trouble-free operation for your remote property.
Plumbing Integration and Connections
Proper plumbing integration transforms your standalone containers into a complete wastewater treatment network. This crucial step ensures everything works together seamlessly.
The connection strategy depends on your fixture setup. Consider these options for optimal performance:
| Connection Approach | Best For | Maintenance Impact |
|---|---|---|
| All fixtures to septic | Regular use properties | More frequent servicing |
| Toilet only to septic | Minimal usage retreats | Extended time between pumpings |
| Grey water separation | Water conservation focus | Simplified waste management |

Run your main waste line with consistent slope. Use 3-inch or 4-inch rigid pipe from fixtures to the first container. Maintain 1/4 inch drop per foot throughout.
Avoid low spots where waste could accumulate. These areas often cause frustrating blockages over time.
For minimal-use properties, route sink and shower water separately. This preserves your primary treatment capacity. Only connect the toilet directly to the tanks.
Install a cleanout plug at the connection point. This provides future access if clogs occur. It saves significant effort down the road.
Bury pipes below your region’s frost line. This prevents freezing during colder months. Typical depths range from 18 to 48 inches.
Test all connections thoroughly before finalizing your work. Run water through each fixture and check for leaks. Verify proper drainage without backups.
This careful testing prevents the nightmare of re-excavating later. Catch issues early while everything remains accessible.
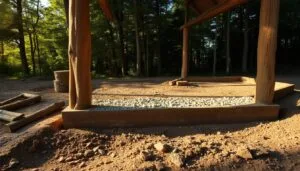
Creating a Stable Drain Field with Gravel and Fabric
The stability of your entire wastewater treatment setup depends heavily on proper drain field construction. This phase ensures treated water disperses evenly into the ground without pooling or backing up.

Creating Consistent Slope with Gravel Layers
Begin by driving stakes along your drain field route. Space them approximately 3 feet 10 inches apart. Each new stake should sit 1 inch lower than the previous one.
Use your 4-foot level with a 1-inch block taped to one end. Place the blocked end on each new stake and the plain end on the previous one. Drive the stake down until the level reads perfectly horizontal.
This technique creates the crucial 1/4-inch-per-foot slope. Once all stakes are positioned correctly, start adding gravel. Use 3/4 to 1.5-inch crushed rock for optimal performance.
Add material gradually, raking it level with the top of each stake. The gravel provides stable support for pipes and creates void spaces for temporary water storage. It also prevents soil from clogging pipe openings.
After placing your pipes, cover them with 2-3 inches of additional gravel. This protective layer maintains excellent drainage characteristics.
The final step involves laying landscape fabric over the entire gravel bed. This permeable barrier allows water to pass through while preventing soil particles from migrating downward. This protection ensures your system functions effectively for years to come.
Installing Perforated Drain Pipes Properly
Proper pipe orientation separates effective wastewater dispersal from problematic pooling. This step completes your drain field construction and determines long-term performance.

Connect your 20-foot sections to the 45-degree bends on the second container. You’ll create two parallel lines that distribute effluent across a wider area.
Verifying Drainpipe Alignment and Slope
The most critical detail involves positioning the perforations downward. Face the holes toward the 4 and 8 o’clock positions. This prevents surface saturation and potential odor issues.
Check the entire length with your level tool. Maintain that crucial 1/4-inch per foot slope consistently. Any dips or humps can create water accumulation points.
Adjust gravel underneath to correct uneven sections. The pipes should rest firmly without shifting. Take time to perfect this alignment before proceeding.
Mark the endpoints with permanent stakes. This helps you locate the drain field for future maintenance. Avoid planting deep-rooted vegetation in these areas.
Your careful work here ensures even distribution throughout the soil. Proper installation prevents the need for costly corrections later.
Quality Sealing and Waterproofing Techniques
The integrity of your wastewater treatment depends entirely on meticulous sealing at every connection point. Even tiny leaks can compromise environmental safety and defeat your setup’s purpose.
Choose the right sealant for each application. Different materials work better for various conditions and connection types.
| Sealant Type | Best Application | Curing Time | Flexibility |
|---|---|---|---|
| Two-Part Epoxy | Permanent rigid connections | 24 hours | Low |
| Silicone Caulk | Flexible joints | 6-12 hours | High |
| PVC Cement | Pipe structural bonds | 15 minutes | None |

Clean all surfaces thoroughly before applying any sealant. Use a cloth to remove dirt and moisture. Lightly sand smooth plastic for better adhesion.
Apply generous beads of sealant around each pipe penetration. Smooth the material into a continuous fillet without gaps. Check both interior and exterior connections.
Fill both containers with water before backfilling. This prevents collapse under gravel weight. It also lets you test for leaks immediately.
Consider flexible couplings at key connection points. They accommodate ground movement without cracking. This simple precaution prevents major failures.
Watch for several hours after filling. Look for any weeping or seepage at sealed joints. Address problems before proceeding with soil replacement.
Implementing Safety and Inspection Measures
Your hard work deserves protection through proper safety and inspection protocols. These final steps ensure your setup functions safely for years to come.
Safety extends beyond installation techniques. It includes protecting yourself during construction and safeguarding the setup’s long-term integrity.

DIY Versus Professional Inspection Advice
The inspection decision depends on your confidence level and local requirements. Professionals spot subtle issues inexperienced builders might miss.
Consider spending $100-200 for expert verification before backfilling. This investment provides peace of mind and catches potential problems.
Document everything with photos at each construction stage. These records prove invaluable for future troubleshooting and demonstrate compliance.
| Safety Aspect | During Construction | After Completion |
|---|---|---|
| Personal Protection | Never enter deep trenches alone | Mark tank locations clearly |
| Environmental Safety | Keep soil away from trench edges | Prevent vehicle traffic over area |
| System Integrity | Check for proper slopes and seals | Recognize capacity limitations |
Always follow basic construction safety during excavation. Work with at least one other person present in case of emergencies.
Clearly mark your setup location with permanent markers. This prevents accidental damage from future landscaping or construction.
Honestly recognize this setup’s limitations. It’s designed for minimal use by one or two people, not continuous residential occupancy.
Managing Waste, Solid Removal, and Maintenance
Keeping your wastewater solution running smoothly requires consistent attention to a few key maintenance practices. With proper care, your installation should only need pumping about twice within a five-year period.
For light usage retreats, you might service the first container once per year. The key to maximizing longevity is controlling what enters the setup. Only human waste, toilet paper, and water should go into your tanks.
Avoid flushing feminine products, wipes, or harsh chemicals. These items can clog pipes and harm the natural treatment process. Regular use of septic-safe treatments helps break down solids more efficiently.
Plan for pump truck access during installation. Keep the clean-out port accessible for monitoring accumulation levels. Check the Y-bend connection periodically to gauge when service is needed.
Maintain a simple logbook with pumping dates and observations. This record helps predict future needs and adds value to your property. Consistent care ensures reliable performance for many years.
Adapting the System for Low Usage Cabins
Seasonal retreats demand wastewater solutions that match their intermittent usage patterns. Your setup works perfectly for properties occupied only weeks or months annually rather than continuously.
Hunting lodges and fishing getaways represent ideal applications. The reduced wastewater volume allows simpler designs with less frequent maintenance.
Seasonal System Adjustments for Easy Maintenance
Calculate your expected usage realistically. One person generates approximately 40-50 gallons daily with typical toilet, shower, and sink use.
A weekend property hosting four people for two days monthly produces only about 400 gallons monthly. This fits well within a modest two-drum setup.
Seasonal adjustments matter significantly in freezing climates. Before winter closure, thoroughly flush the setup with clean water. Consider pumping tanks if they’re nearly full.
Spring startup requires minimal effort. Simply resume normal use. You might add a bacterial starter treatment to re-establish microbial populations after dormancy.
| Usage Scenario | Annual Flushes | Recommended Tank Size | Maintenance Frequency |
|---|---|---|---|
| Weekend Retreat | 100-150 | 55-110 gallons | Every 2-3 years |
| Monthly Vacation | 200-300 | 110-300 gallons | Annual inspection |
| Seasonal Residence | 400-600 | 300-500 gallons | Twice yearly |
Consider your long-term plans when sizing components. Building slightly larger capacity now provides flexibility for future needs without complete replacement.
Final Tips for a Successful Septic Setup
Completing your own waste management project brings a special sense of accomplishment that professional installations can’t match. You’ve created essential infrastructure while saving thousands compared to hiring contractors.
Take your time during critical steps like checking slopes and testing seals. Rushing can lead to costly mistakes that require re-excavation. Choose favorable weather when soil is workable but not saturated.
Enlist help from family or friends for heavy tasks. Teamwork makes positioning tanks and backfilling much easier. Document your installation with photos and measurements for future reference.
Remember this investment protects both your comfort and the environment. Share your success with fellow property owners facing similar challenges. Your experience can help others build reliable solutions.