Imagine sitting in your cozy cabin, sipping coffee, and enjoying the rustic charm. But, something’s missing – a sturdy, handcrafted table. Why not build one yourself? Making a DIY wooden table for your cabin is rewarding and can save money.
A designer table like the Studio McGee Iva dining table costs $4,200. But, you can make a similar one from maple wood for just $200. This shows how affordable and fulfilling this project can be.
Imagine having family and friends gather around a table you built. This project is great for beginners, needing only a drill and a saw. In just an afternoon, you can turn 12 pieces of lumber into a beautiful table. With lumber costing under $50, this project is both budget-friendly and rewarding.
Are you ready to start this exciting project? Let’s make a stunning 92-5/8 inch long table that will be the heart of your cabin. We’ll guide you from choosing the right wood to applying the final stain. Get ready to show off your crafting skills and add a personal touch to your cabin’s decor!
Introduction
Making your own furniture adds a special touch to your cabin. It’s not just about saving money. It’s also a way to make pieces that fit your needs and show off your creativity. Let’s look at why building a rustic wooden table is a great idea for your cabin.
Benefits of DIY Furniture
DIY furniture has many perks. You get to design it exactly how you want, making sure it fits your space perfectly. You can save a lot of money, too, on high-quality items. And, there’s nothing quite like the pride of using furniture you made yourself.
- Customization to fit your space
- Significant cost savings
- Personal satisfaction and pride
- Quality control over materials and construction
Why Choose a Rustic Style
Rustic style is perfect for cabins. It’s timeless and always in fashion. Tables made from reclaimed wood add warmth and character to any room. They bring a natural feel that makes the space feel softer.
Choosing rustic for your table means it will match your cabin’s natural look. It’s a smart choice that keeps your cabin stylish and cozy.
Selecting the Right Materials
Choosing the right materials is key for a sturdy cabin table. We’ll look at the best durable wood types and essential tools for your project.
Types of Wood for Durability
When picking wood for your rustic table, consider these options:
- Pine: Affordable and easy to work with
- Oak: Strong and resistant to wear
- Cedar: Naturally resistant to decay
- Reclaimed wood: Adds character and eco-friendly
For a DIY farmhouse dining table, you’ll need different lumber sizes. A typical project uses 4×4, 2×4, and 2×10 boards. The table top often requires 5 pieces of 2×10 lumber, making it about 46 1/4 inches wide by 87 1/2 inches long.
Tools You’ll Need
Here are the essential woodworking tools:
- Circular saw or table saw
- Drill and drill bits
- Kreg Jig for pocket holes
- Sander and sandpaper (120 and 220 grit)
- Measuring tape and square
- Clamps
Remember to get the right screws. You’ll need about 40 6-inch Torq screws for attaching 4×4’s, 20 4.5-inch Torq screws for top braces, and 20 2.5-inch Torq screws for 2×4 top braces. Set your Kreg Jig to 1 1/2 inches for proper stock thickness.
Designing Your Table
Creating a table for your cabin requires smart design. We’ll look at table design ideas and space measurement tips. This will help your table fit perfectly in your rustic retreat.
Measuring Your Space
First, measure your cabin’s dining area. Think about how people will move around. Aim for 29 inches of elbow room per person. For corner seats, you can use less space.

Common Table Dimensions
Dining tables are usually 28 to 30 inches tall. They should be 36 to 42 inches deep. The length depends on how many seats you need.
A table for four might be 48 inches long. A table for six could be 72 inches. Coffee tables are shorter, between 16 to 18 inches high.
Using the Golden Mean ratio (1:1.618) in your design can make your furniture look better. For example, if your table is 30 inches wide, make it 48.5 inches long for a nice look.
| Table Type | Height (inches) | Width (inches) | Length (inches) |
|---|---|---|---|
| Dining (4 people) | 28-30 | 36-42 | 48 |
| Dining (6 people) | 28-30 | 36-42 | 72 |
| Coffee Table | 16-18 | 24-36 | 36-48 |
These are just guidelines. Your cabin might need custom sizes. Always double-check your measurements before cutting to ensure a perfect fit.
Preparing Your Wood
Wood preparation is key to making a sturdy and attractive rustic table. The right sanding and treating methods help your table last long. Let’s explore the important steps for preparing your wood.
Sanding Techniques
Begin with coarse-grit sandpaper (60 or 80) to remove rough spots. Move to finer grits (100 or 120) for a smooth finish. Use a belt sander for efficiency, then go up to 400 grit for an ultra-smooth surface. Always sand with the grain to avoid scratches.

For an aged look, use a circular bit on a multi-tool to weather down edges. Then, round them off with an orbital sander. This adds character to your rustic table.
Treating Wood
After sanding, protect your wood. Use a wood filler for gaps or knots, but it might not stain like natural wood. For a durable finish, consider Minwax Satin Polycrylic or Varathane Matte Soft Touch Polyurethane.
| Finishing Product | Application Method | Drying Time |
|---|---|---|
| Minwax Satin Polycrylic | Brush on, sand between coats | 2-3 hours |
| Varathane Matte Soft Touch | Spray or brush, light sanding | 1-2 hours |
Apply multiple coats, sanding with 400 grit between each layer. This ensures a smooth, long-lasting finish. It enhances the wood’s natural beauty and protects it from moisture and wear.
Assembling the Table Frame
Now that you’ve got your materials ready, it’s time to start building the table frame. This step is key to making a sturdy and lasting piece for your cabin. We’ll go through each step, focusing on how to build the legs and connect the frame.
Constructing the Table Legs
Begin by cutting four 2×4 cedar boards to the length you want for your table legs. For a standard dining table, legs should be about 29 inches tall. Sand each leg well, focusing on the ends. To make them more stable, cut a slight angle at the bottom of each leg.
- Cut legs to 29 inches
- Sand thoroughly
- Angle bottom edges for stability
Connecting the Frame
Now, let’s connect the legs to form the frame. Use pocket-hole joinery for a strong, hidden bond. Set your pocket-hole jig for 1-1/2 inch thick stock and use 2-1/2 inch screws. Clamp each part tightly before screwing to ensure it’s aligned right.
Build a rectangular frame by attaching aprons between the legs. Cut the aprons from the same 2×4 cedar, fitting your table size. Remember to include the leg thickness in your measurements. Use the pocket-hole method to attach the aprons to the legs, checking for square as you attach.
To add more strength, think about adding corner braces or stretchers between the legs. This extra support will make your table more stable and last longer, perfect for a rustic cabin.
Building the Tabletop
The tabletop is the heart of your DIY table project. It must be both durable and beautiful. Let’s explore how to make a strong and attractive tabletop for your cabin.
Choosing Tabletop Thickness
The tabletop’s thickness is key for its stability and look. A 1.5-inch thick top is perfect for a rustic cabin table. It’s strong and stylish, fitting well for tables that are 71 inches long and 42 inches wide.
Attaching the Tabletop
Aligning wood planks is essential for a smooth tabletop. Begin by laying out your 1×4 premium pine or poplar boards side by side. Use pocket holes every 6 to 8 inches along the apron rails to hold the planks in place. Drill two pocket holes at each end of the rails for the best fit.
After assembling the tabletop, place it in the center of the base. Use 4.5-inch screws to attach the 4×4 legs to the top. For the 2×4 horizontal boards, 2 to 2.5-inch screws are best. This method ensures a strong bond between the top and base.
| Component | Screw Size | Spacing |
|---|---|---|
| Apron Rails | 2″ pocket hole screws | Every 6-8 inches |
| Legs to Top | 4.5″ screws | At each leg |
| Horizontal Boards to Top | 2-2.5″ screws | Along each board |
For extra support, add a 2×4 board in the table base’s center. This helps prevent the tabletop from sagging, making your DIY table last longer.
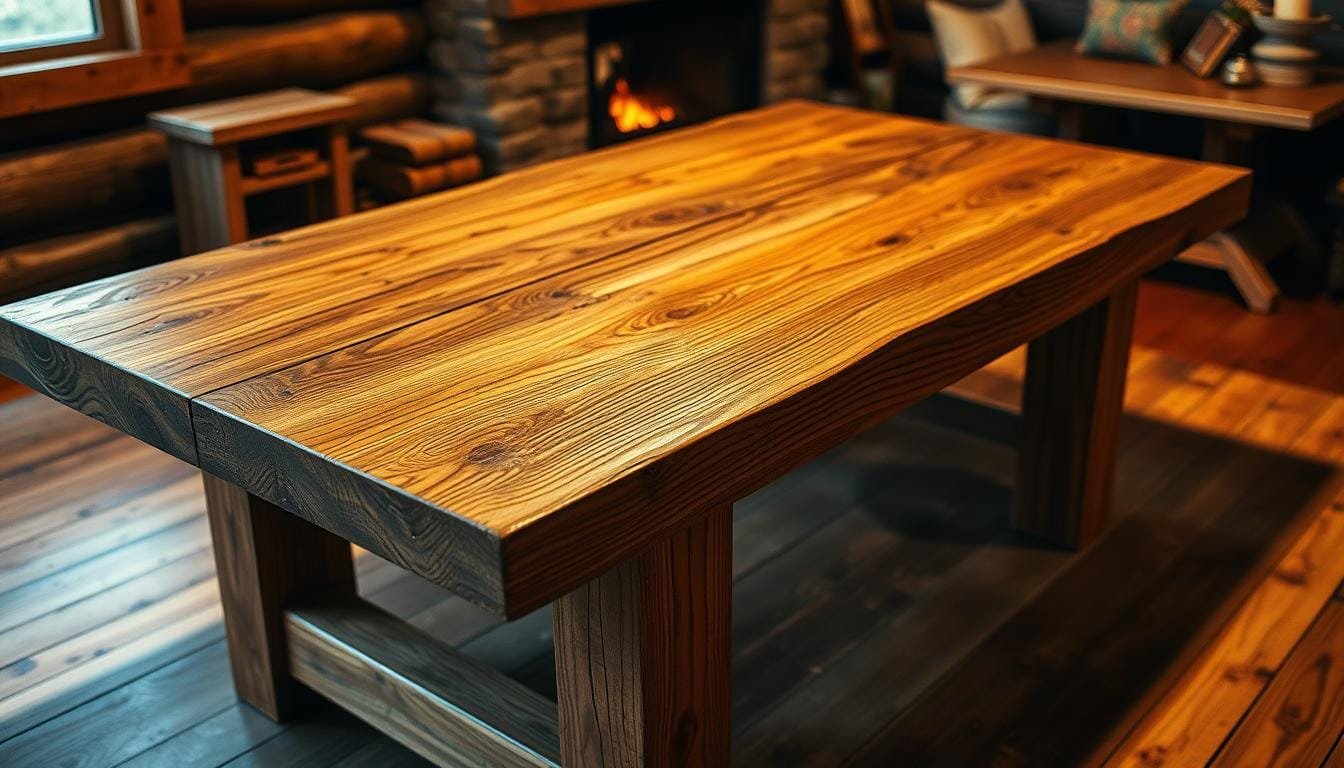
Finishing Touches
Now that your cabin table is built, it’s time for the final touches. The right finish can make your rustic piece stand out. Let’s look at wood staining methods and rustic finish techniques to highlight your table’s natural beauty.
Selecting a Stain
Choosing the perfect stain is key for your cabin table. Most cabin owners, 85%, prefer rustic style. So, pick a stain that brings out the wood’s grain. Brown shades, found in 70% of cabins, are popular.
Consider a warm honey or rich walnut color to match your cabin’s look. The stain you choose will define your table’s final appearance.
Application Techniques
Learning rustic finish techniques is essential for that cabin look. Begin by sanding your table, moving from coarse to fine grits. Apply your stain evenly, following the wood grain.
For extra protection and shine, apply three coats of oil-based polyurethane. Sand lightly between coats. This not only protects but also enhances the wood’s honey color, making your table warm and inviting for years of memories.


