Dreaming of energy independence for your remote cabin? You’re in the right place. This guide breaks down the entire process of creating your own electrical system. We cover everything from initial planning to the final switch-on.
Building a self-sufficient power source might seem like a big project. But we make it manageable. We’ll walk you through each phase with clear, simple instructions.
You will learn about all the essential parts. This includes solar panels, batteries, and inverters. We explain how these components create a reliable energy system that works completely off the grid.
Safety is our top priority throughout this guide. Proper techniques prevent hazards and ensure your equipment lasts for years. Whether it’s a weekend getaway or a full-time home, this approach helps you succeed.
By the end, you’ll feel confident making decisions about your off-grid solar setup. You’ll know what you can do yourself and when to call a pro. Let’s get started on your path to energy freedom.
System Planning and Load Calculations
Getting your energy plan right is the most important step for a reliable system. A precise calculation of your daily energy needs ensures you build a setup that works perfectly for your lifestyle.
Assessing Your Cabin’s Power Needs
Begin by listing every device that will use electricity. Think about lights, a refrigerator, a water pump, and any electronics. For each appliance, estimate the number of hours it runs each day.
Check the wattage rating on each product’s label. This number, multiplied by the hours of use, gives you the Watt Hours for that item. Adding all these values together reveals your total daily energy load.
Calculating Daily Energy Consumption
This simple math prevents big mistakes. An undersized system leads to frustration, while an oversized one wastes money. The table below shows examples for a small home.
| Appliance | Wattage | Hours Used/Day | Daily Watt Hours |
|---|---|---|---|
| LED Light Bulb | 10W | 5 | 50 Wh |
| Mini Refrigerator | 60W | 8 | 480 Wh |
| Water Pump | 100W | 1 | 100 Wh |
| Total Daily Load | 630 Wh (0.63 kWh) | ||
Remember to add a 20% buffer for efficiency losses and future needs. For more detailed planning strategies, check out our a comprehensive guide.
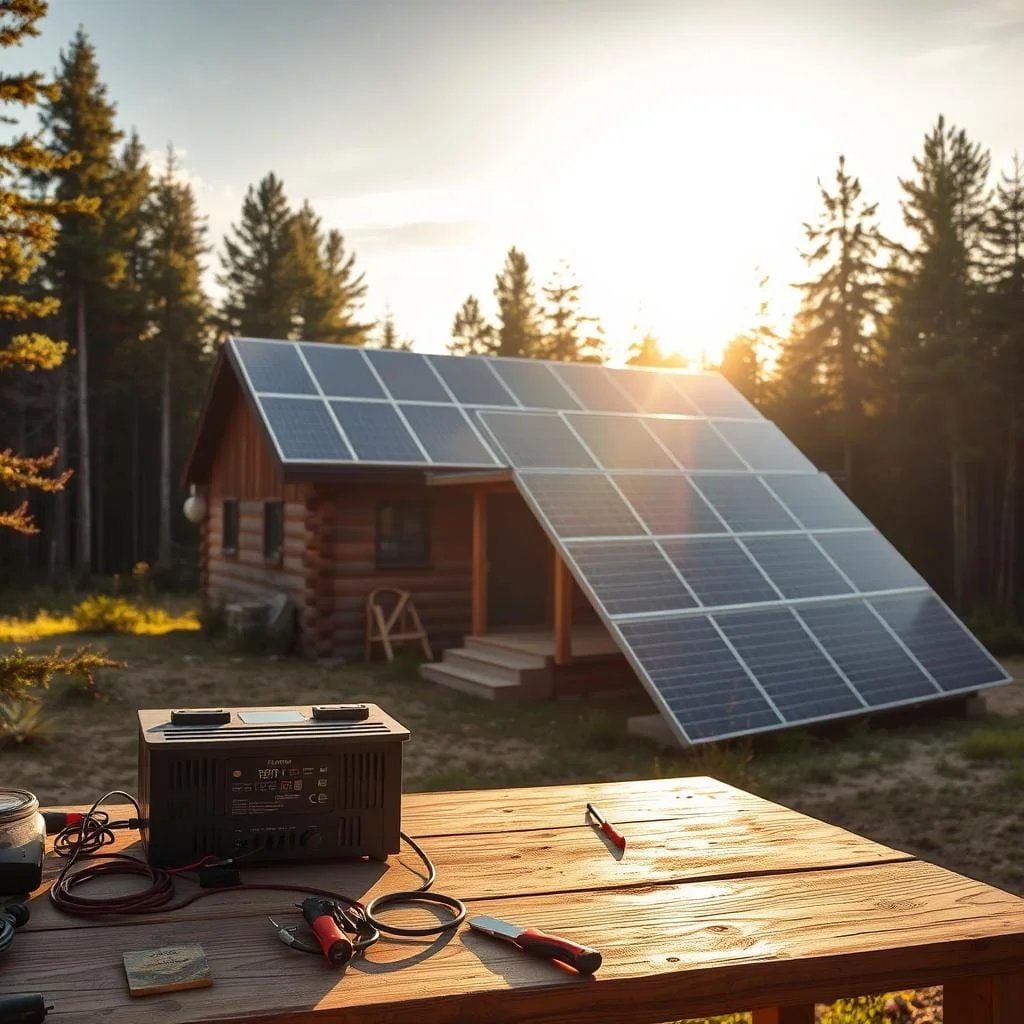
How to install off-grid power for cabin
The heart of any self-sufficient setup is its core components. Choosing the right parts ensures your entire solar system runs smoothly and safely.

Every basic off-grid solar system relies on four main components working together.
- Solar Panels: Capture sunlight and generate electricity.
- Battery Bank: Stores energy for use when the sun isn’t shining.
- Charge Controller: Protects your battery from overcharging.
- Inverter: Converts stored DC power into AC power for standard appliances and lights.
Selecting the Right Off-Grid Solar Components
Each piece must be properly sized for your energy needs. Mismatched parts can lead to poor performance or damage.
Pre-packaged kits are a great starting point. They bundle compatible solar panels, controllers, and batteries. This simplifies the selection process for a small home or retreat.
You will also need wiring, connectors, fuses, and mounting hardware. These supporting materials are crucial for a safe installation.
Understanding Component Compatibility for Your Cabin
Voltage compatibility is key. Most small setups use 12V or 24V system voltages. Larger installations often benefit from a 48V system.
The initial cost for a basic setup can range from a few thousand dollars. Understanding these components helps you manage your budget and build a reliable off-grid solar solution.
Choosing and Sizing Solar Panels and Batteries
Your geographic location plays a huge role in determining the size of the solar array needed to keep your batteries charged. Getting this match right is essential for a system that works all year.
Determining Your Solar Panel Array Size
Sizing your solar panels depends directly on your battery bank capacity and local sunlight. A good rule is 200 watts of solar array to recharge a battery storing 1 kWh in one day with five hours of sun.
This works well in summer. Northern areas might only get three hours of winter sun. You may need a larger array or to reduce usage on cloudy days.
Adjusting the tilt angle of your solar panel setup also boosts production. An angle equal to your latitude offers the best year-round performance.
Battery Bank Considerations and Safety
Your choice of batteries is a major decision. Never use standard car batteries; they fail quickly. Use deep-cycle types like 12V RV/marine or 6V golf-cart units.
Each typically stores about 1 kWh. Your battery bank should hold enough capacity for one to two days of use. In cold climates, insulate them since performance drops below 35°F.
For a deeper dive into component selection, our comprehensive guide to choosing solar panels and has detailed comparisons.
| Battery Type | Initial Cost | Maintenance | Lifespan & Safety |
|---|---|---|---|
| Flooded Lead-Acid | Lowest | Regular watering needed | Shorter lifespan, vents gases |
| Sealed AGM/GEL | ~40% Higher | Maintenance-free | Safer, no ventilation required |
| Lithium Iron Phosphate | Highest | Zero maintenance | Longest lifespan, safest operation |
Lithium options like LiFePO4 offer the best performance but at a higher cost. They handle deeper discharges and colder weather much better.
Charge Controllers, Inverters, and Wiring Safety
Choosing the right control and conversion equipment protects your investment and prevents hazards. These components manage energy flow between your panels and batteries.

The solar charge controller regulates voltage and current from your panels. It prevents overcharging while maximizing efficiency.
Exploring MPPT vs. PWM Charge Controllers
You have three main types of charge controller options. Basic ON/OFF units offer the least efficiency.
PWM controllers provide good performance at reasonable cost. MPPT models extract maximum power but cost more.
MPPT units are 20-30% more efficient than PWM. They work best when panel voltage exceeds battery voltage significantly.
Your decision should match your battery type. Sealed AGM or GEL batteries need specific charge settings.
Proper Inverter Selection and Voltage Management
The inverter converts DC power to AC for standard appliances. Pure sine wave units work with all devices safely.
Size your inverter for maximum load plus 25-30% extra capacity. This handles startup surges from refrigerators or tools.
DC wires must be larger than typical household wiring. Low voltage systems draw much higher current.
Always use properly sized fuses or DC-rated breakers. This prevents overheating and ensures safe operation.
Mounting Your Solar Array and Ensuring Safety
Where and how you position your photovoltaic modules determines their daily output capacity. Proper placement maximizes exposure to available sunlight throughout the year.
Optimal Mounting Strategies for Roof, Pole, or Ground
Your solar array offers flexible placement options. Roof installations work well for most cabins. Pole mounts provide excellent height advantages. Ground-level racks allow easy maintenance access.
Wind resistance represents the primary structural concern. Solar panels are lightweight but present significant surface area. Always secure mounting hardware directly to structural supports.
| Mounting Type | Installation Difficulty | Maintenance Access | Wind Resistance | Relative Cost |
|---|---|---|---|---|
| Roof Mount | Moderate | Difficult | Good | Medium |
| Pole Mount | High | Excellent | Very Good | High |
| Ground Mount | Low | Excellent | Good | Low |
| Shed Mount | Low-Moderate | Good | Good | Low-Medium |
Orientation significantly impacts energy production. Face your solar panel array toward true south for optimal sun exposure. Adjust slightly southwest if morning fog frequently occurs in your area.
Safety grounding prevents electrical hazards. Each panel features a designated grounding point. Connect all modules using bare copper wire to a proper ground rod.
Proper installation ensures your system withstands decades of weather exposure. These techniques protect both your equipment and your property.
Step-by-Step Installation Process
Bringing your components together requires a careful sequence of steps. Following this order ensures your equipment stays safe and functions correctly from the start.

Connecting and Wiring Components Securely
Begin by linking the solar charge controller to your battery bank. This allows the controller to calibrate. Always attach the negative wire first, then the positive.
Correct connections will light up the controller’s status LEDs. Next, prepare to link the solar panel. Cover the panel or point it away from the sun to prevent a voltage surge.
Use MC4 connectors for weatherproof connections. Connect positive to positive and negative to negative. Using red and black wires prevents dangerous mistakes.
Make sure to install fuses on the positive wires. Place one between the solar array and controller, and another between the controller and battery.
Testing, Adjustments, and Safety Checks
Safety checks are non-negotiable. Before any final connections, use a volt-ohm meter on each wire. Verify there are no shorts and that polarity is correct.
Test your solar panel in full sun. A typical 12V module should read 17-21 volts. A reading over 21 volts signals a problem.
Once verified, power up your system gradually. Turn on devices one at a time, monitoring performance. This careful approach protects all your components.
Maintenance and Performance Optimization
Proper upkeep ensures your solar investment continues delivering reliable power year after year. Regular maintenance keeps everything running at peak efficiency with minimal effort.
Routine Inspection and Cleaning of Panels
Dirt and debris can significantly reduce your panel efficiency. Clean surfaces every few months using a soft brush or gentle hose spray.
Check all connections for wear or corrosion during cleaning. Tighten any loose terminals to maintain optimal energy flow.

Battery monitoring is crucial for system longevity. Check voltage levels and charge patterns regularly.
Even maintenance-free lithium batteries benefit from periodic inspections. Watch for swelling or unusual readings that signal problems.
| Maintenance Task | Frequency | Key Actions | Expected Outcome |
|---|---|---|---|
| Panel Cleaning | Every 3-6 months | Remove debris, check connections | Maintains 95%+ efficiency |
| Battery Inspection | Monthly | Check voltage, terminals, swelling | Prevents premature failure |
| System Performance Check | Seasonally | Monitor energy output, error codes | Identifies efficiency drops |
| Connection Tightening | Twice yearly | Secure all electrical connections | Prevents power loss hazards |
Modern systems often include monitoring apps for real-time tracking. These tools help identify issues before they affect your energy supply.
Seasonal checks in harsh climates ensure your system withstands weather challenges. Regular maintenance transforms your setup into a long-term asset.
Empowering Your Cabin with Off-Grid Energy
Achieving electrical self-reliance transforms your remote property into a modern retreat. Your off-grid solar system provides clean energy independence, freeing you from utility bills and grid outages.
The initial cost for quality solar panels and components typically ranges from $3,000 to $7,000. This investment pays dividends for 25-30 years through reliable power and environmental benefits.
Your completed installation brings modern comforts to locations beyond traditional utility reach. For deeper planning strategies, explore our comprehensive guide to off-grid cabin energy.
This solar system represents more than technology—it’s a sustainable lifestyle choice. You now possess the knowledge to maintain and expand your off-grid solar setup as needs evolve.


