Living in a remote area is free and connects you with nature. But, you need proper planning for basic needs.
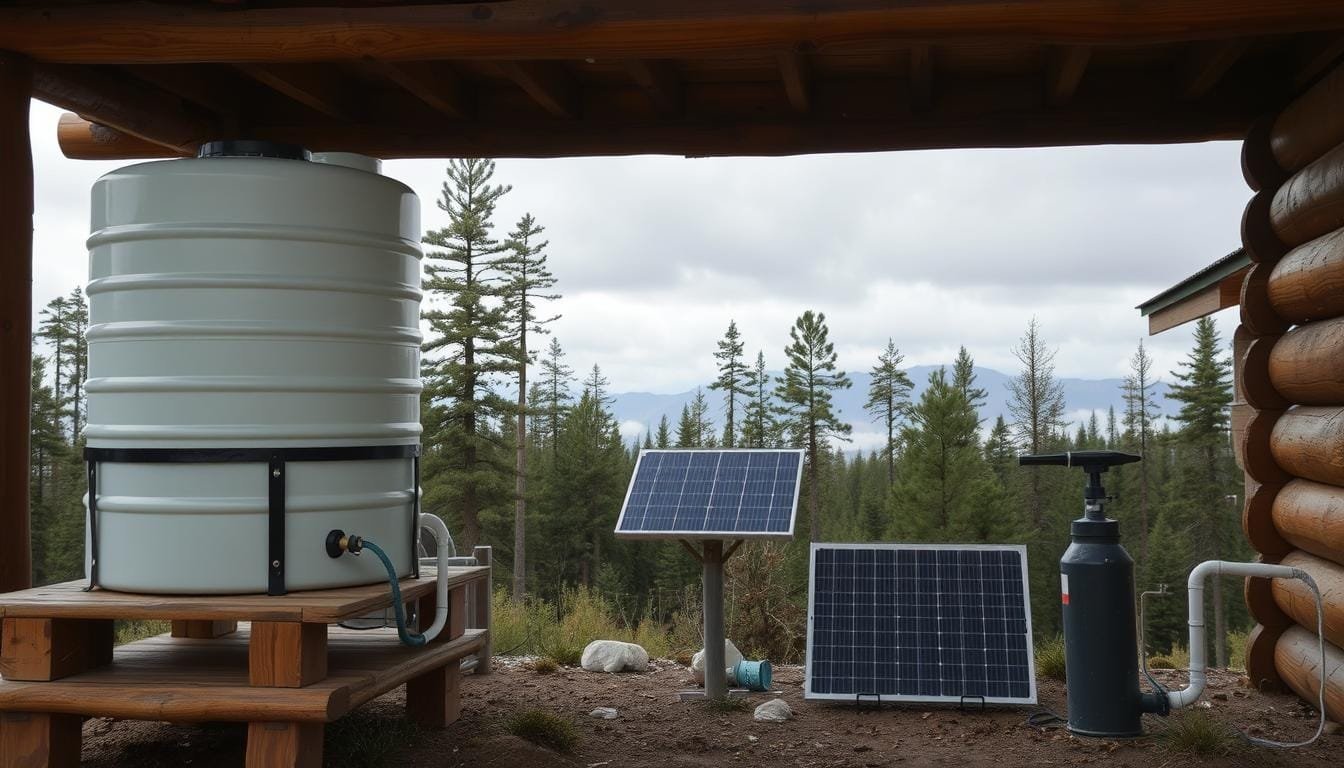
Having a good cabin water supply is key. Unlike city homes, your cabin needs its own system.
An off-grid water system can use wells, nearby water, or rainwater. Each choice has its own benefits based on your land and local rules.
This guide will show you how to set up a cabin water storage system. You’ll learn about choosing the right gear, knowing your water needs, and installing it right. This way, you’ll have water all year.
Setting up a water tank for your cabin is easier than you think. With the right info and steps, you’ll have a system that makes you feel safe and free.
Understanding Your Cabin’s Water Needs
Before buying a water tank, figure out how much water your cabin needs every day. Getting this right means you won’t run out of water or waste money. A typical family uses about 400 gallons per day.
Your cabin might use more or less water, depending on how often you visit and what you do there.
You don’t need a huge well for a storage tank system. A well that produces half a gallon per minute can be enough. This is because your tank stores water when you don’t use it, and gives it to you when you do.
Calculating Daily Water Consumption
To figure out how much water you’ll use, add up the water used by each activity at your cabin. This will give you a good idea of how much water you need.
Here’s how different activities use water:
- Showers: Most showerheads flow at 2.5 gallons per minute, so a 10-minute shower uses 25 gallons
- Toilet flushes: Modern low-flow toilets use about 1.6 gallons per flush
- Cooking and drinking: Plan for 2-3 gallons per person each day
- Dishwashing: Hand washing dishes can use 8-27 gallons, while a dishwasher uses 4-6 gallons per cycle
- Laundry: Standard washing machines use 15-30 gallons per load
To find your total, multiply each activity by how often it happens daily. Then, multiply by the number of people using the cabin. Add everything together for your total water use.
| Activity | Water Usage | Frequency (per person/day) | Daily Total (gallons) |
|---|---|---|---|
| Morning shower | 25 gallons | 1 time | 25 |
| Toilet flushes | 1.6 gallons | 5 times | 8 |
| Cooking and drinking | 2.5 gallons | Throughout day | 2.5 |
| Hand washing/brushing teeth | 1 gallon | 4 times | 4 |
| Dishwashing (hand) | 20 gallons | 1 time per household | 20 |
Seasonal Usage Considerations
Water usage changes with the seasons. Knowing this helps you plan for busy times and avoid running out of water.
In summer, you’ll likely use more water for showers, watering plants, and hosting guests. Activities like filling kiddie pools and washing off sandy feet also add up.
https://www.youtube.com/watch?v=lKvcob9r2_A
Winter is different. If your cabin is empty, you won’t use much water. Even if you visit, you’ll use less because there are fewer outdoor activities.
Spring and fall are in between. Plan your tank size for the busiest times, not the average. This way, you have enough water for holidays and summer vacations.
Number of Occupants and Activities
The number of people at your cabin affects water usage. A couple using the cabin for quiet weekends uses less water than a family of five with teenagers.
Start by counting how many people usually stay at your cabin. Include regular guests like grandchildren or friends. Multiply your per-person water use by this number for your baseline.
Special activities can also increase water use. Consider these:
- Hot tubs: Initial filling uses 300-500 gallons, plus regular top-offs
- Gardens or landscaping: Can require 50-100 gallons daily during growing season
- Livestock: Horses need 10-12 gallons daily, chickens need about 0.5 gallons each
- Vehicle washing: Uses 80-140 gallons per wash
- Workshop or hobby areas: Pottery, woodworking cleanup, or equipment washing adds extra demand
Be honest about your lifestyle and activities when calculating water needs. Don’t undersize your tank to save money, or you’ll face problems. Add a 20-30% buffer to your needs for peace of mind and unexpected situations.
Types of Water Tanks for Cabin Use
There are four main types of water tanks for cabins. Each has its own benefits. Your choice depends on your budget, how you want to install it, and how long you’ll keep your cabin. Let’s look at why each option is good for your off-grid water system.
The right tank material makes installation easier and your system more reliable. Each material fits different cabin needs and climates.
Polyethylene Plastic Tanks
Plastic water tanks are the most popular choice for cabins. They’re affordable, light, and very durable if handled right.
These tanks are made from food-grade material. They meet FDA, NSF, and CSA standards. This means they’re safe for drinking water without chemical worries.

The material has UV inhibitors to slow down hardening from sunlight. Darker tanks resist UV damage better and stop algae growth.
These tanks come with an eight-year warranty for above-ground use. Underground tanks have a ten-year warranty. In the ground, they last almost forever with the right support.
They’re tough during careful handling. But, be careful in very cold weather when they get brittle. You can move them with a standard truck or trailer easily.
Fiberglass Tanks
Fiberglass tanks offer great performance between plastic and metal. They cost more than plastic but last longer.
Temperature extremes don’t affect fiberglass like other materials. They stay strong in cold and handle stress well all year.
The material naturally resists corrosion. This means no rust or degradation over time. Fiberglass tanks are good for both above-ground and underground use, if you want something stronger than plastic.
Steel and Stainless Steel Tanks
Steel tanks are for heavy-duty water storage. They’re strong and good for large needs or extra weight.
Regular steel tanks are strong but can rust without care. Make sure the inside coating stays good to keep water clean.
Stainless steel lasts longer and costs more. It naturally resists corrosion and keeps water quality. They’re great for permanent setups where you want a tank to last decades.
The big drawback is their weight. Steel tanks need strong foundations and special equipment for installation. They’re not easy for hard-to-reach places or temporary setups.
Concrete Tanks
Concrete tanks are the most permanent option. They’re best for underground use where you need lots of water and long-lasting storage.
These tanks can hold a lot of water and last for generations with proper installation. They stay cool underground, keeping water temperature and quality good all year.
Professional installation is needed for concrete tanks because of their weight and complexity. They’re best for permanent cabins, not for places you might sell later.
The cost is high, including materials and installation. But, if you’re building a forever cabin, concrete tanks offer unmatched durability.
| Tank Material | Best For | Average Lifespan | Installation Difficulty |
|---|---|---|---|
| Polyethylene Plastic | Budget-conscious cabin owners, easy DIY installation | 20-30 years above ground, indefinite underground | Easy |
| Fiberglass | Extreme climates, balanced durability and cost | 30-40 years | Moderate |
| Steel/Stainless Steel | Large capacity needs, structural strength requirements | 15-25 years (steel), 50+ years (stainless) | Difficult |
| Concrete | Permanent installations, maximum capacity | 50+ years | Professional Required |
Your choice of water tank materials depends on your cabin’s needs. Think about your budget, installation skills, climate, and how long you’ll use the cabin before deciding.
Choosing the Right Tank Size and Capacity
Finding the right water tank size is key. It affects how well you live in your cabin and if you’ll run out of water. Getting it right saves money and stress.
Storage tanks help with slow wells. A family using 400 gallons a day needs a well that produces just that much. This way, the tank handles high demand, not the well.
This means you can enjoy long showers and do laundry without stressing the well. The tank collects water all day and night. Your well works at its own pace, and you get normal water pressure.
Standard Tank Sizes for Cabins
The right tank size depends on how often you visit and how many people stay. Weekend cabins need smaller tanks, while full-time homes need more. Knowing the standard sizes helps match your needs.
Small cabins for 1-2 people do well with 250 to 500-gallon tanks. These sizes cover basic needs like cooking and showering. They’re also easy to place and don’t need much support.
Medium cabins for 3-4 people should have 500 to 1,000-gallon tanks. This size handles multiple showers and laundry without worry. It gives you room for busy weekends.
Larger cabins or full-time homes need 1,000 to 1,500-gallon tanks or more. These tanks provide enough water for daily needs and unexpected guests. They’re essential for reliable water supply.
Experts say to have at least 2-3 days of water usage in your tank. This ensures you don’t run out during repairs or slow well periods. For example, a 100-gallon daily use calls for a 300 to 500-gallon tank.
Remember to plan for guests and events. Extra water means no stress during visits or gatherings. While it costs more upfront, it’s worth it for peace of mind.
Above-Ground vs. Below-Ground Capacity Needs
The tank’s location affects its size. Above-ground and underground tanks have different needs based on space and climate. Your site determines the best choice.
Above-ground tanks work for 250 to 750-gallon capacities in most cabins. They’re easy to place and don’t block views. Smaller tanks also fit well with the cabin’s look.
Larger above-ground tanks are hard to manage. A 1,000-gallon tank is over 8,300 pounds when full. They’re big and may not fit your cabin’s look.
Underground tanks are best for 1,000 to 3,000-gallon capacities or more. They hide the tank and keep your view clear. The earth keeps the water from freezing, saving on winterization costs.
The table below compares key capacity considerations for both installation types:
| Factor | Above-Ground Tanks | Below-Ground Tanks |
|---|---|---|
| Practical Size Range | 250-750 gallons | 1,000-3,000+ gallons |
| Foundation Requirements | Simple gravel or concrete pad | Excavation and bedding material |
| Freeze Protection | Requires insulation or heating | Naturally insulated by earth |
| Maintenance Access | Easy inspection and cleaning | Access through manhole only |
| Visual Impact | Visible structure on property | Completely hidden from view |
Above-ground tanks are easy to check and maintain. You can see the tank and clean it without special tools. They’re great for seasonal cabins where you can drain and winterize the tank.
Underground tanks cost more upfront but save on freeze protection and looks. They’re perfect for full-time living where you want lots of water without changing your property’s look. The earth keeps the water warm even in cold winters.
Think about your future plans when choosing a tank size. A bigger tank now saves you from expensive upgrades later. Underground tanks are a smart choice for future growth because digging is expensive.
Selecting the Best Location for Your Water Tank
The spot you pick for your water tank affects water pressure, system efficiency, and upkeep for years. You must weigh several factors to find the best place on your land. The right spot balances technical needs with practical aspects that impact your daily life.
Let’s look at each key factor that decides where your tank should go. Knowing these will help you avoid costly errors and set up a system that works well for decades.
Elevation and Gravity-Fed Systems
Elevation is key for a reliable, electricity-free water system. A gravity-fed water system uses gravity to create pressure without pumps or power. This simple solution has powered homes and cabins for centuries.
Here’s how it works: every foot of elevation adds about 0.43 PSI of water pressure. For comfortable household pressure, 30 to 50 PSI, your tank needs to be 70 to 115 feet above your cabin’s highest water outlet.
This might seem like a lot of elevation, but many cabins have natural hillsides. You can build a simple platform on a hillside. For flatter areas, you might need to build an elevated tower or stand.

Gravity-fed systems are very reliable because they have no mechanical parts to fail. During power outages or equipment failures, your water keeps flowing. Many experienced tank placement strategies prioritize elevation for this reason.
If you don’t have enough elevation, you’ll need a pump system. We’ll talk about pump installation later.
Proximity to the Cabin
Distance is important when planning your installation. A tank too far from the cabin increases costs and complications. You’ll need more piping, which costs more. Longer pipes also lose heat in winter, risking frozen lines.
But, a tank too close has its own problems. Large tanks aren’t always pretty, and you might not want a big tank near your cabin. There are also foundation concerns with heavy tanks near buildings.
The best distance for most cabins is between 10 and 50 feet from the structure. This distance is far enough for looks and safety but close enough for plumbing. Within this range, you can insulate pipes and keep your cabin looking good.
Think about future landscaping and construction plans when deciding. You don’t want a tank where it will block a deck addition or garden you plan for next year.
Sun Exposure and Temperature Control
Sunlight affects your water tank’s performance and life. Some sun can prevent freezing, but too much is bad. UV radiation damages tank materials, and sunlight warms the water, causing algae.
In warm areas, place tanks in the shade or under trees to keep water cool. Dark tank colors also help by blocking light and reducing algae.
In cold areas, some sun is okay to prevent freezing. But, avoid full sun all day. Partial shade or dappled sunlight is best.
| Location Factor | Warm Climate Strategy | Cold Climate Strategy | Impact on System |
|---|---|---|---|
| Sun Exposure | Minimize direct sunlight, north-side placement | Allow some southern exposure for warmth | Controls algae growth and UV damage |
| Tank Color | Dark colors preferred | Consider lighter colors to absorb heat | Affects water temperature and light penetration |
| Ground Position | Partial burial (up to 20% of height) for cooling | Above ground for easier winter maintenance | Temperature stability and accessibility |
| Shelter Options | Shade structures, tree cover | Insulated enclosures with ventilation | Weather protection and temperature control |
Partial burial is an interesting option for temperature control. You can bury tanks up to 20% of their height. This keeps the temperature stable year-round. The earth insulates against heat and cold.
Remember, polyethylene tanks must always be vented to the air. They can’t handle external pressure, so complete burial isn’t possible unless you use special tanks.
Accessibility for Filling and Maintenance
Think about the practical side of tank ownership when choosing a spot. You’ll need easy access for several tasks. If you get water delivered, trucks need to reach your tank easily. Most trucks need to be close to roads and have enough room to turn.
Maintenance needs access too. You’ll need to check your tank often, clean it yearly, and monitor water levels if you don’t have automation. Positioning your tank for easy access to all connections and access points makes these tasks easier.
Also, consider winter maintenance access. If your path becomes impassable in snow or mud, you might not be able to fix issues when needed. Clear access all year keeps your investment safe and working well.
Think about future landscaping changes too. Easy access now might disappear if you plant or build nearby. Plan your tank location with your property’s future in mind to avoid access problems later.
Essential Tools and Materials You’ll Need
Having all your tools ready before starting saves trips to the store and prevents delays. A good water tank installation needs the right tools and materials. This preparation can turn a frustrating project into a smooth one.
Most cabin owners can do the job with basic tools. But, some special items make tasks easier and safer. A detailed checklist helps avoid missing pieces during the job.
Site Preparation and Positioning Tools
Ground prep needs tools for a level foundation. A shovel and rake clear and level the site. You’ll also need a carpenter’s level and a longer pipe level for checking grade.
A hand tamper or plate compactor compacts soil to prevent settling. This is key for stability. A wheelbarrow helps move gravel from the pile to the site.
For moving the tank, use come-alongs or heavy-duty straps. Concrete blocks or wooden shims help fine-tune the tank’s position. If building a wooden platform, add a circular saw, drill, and measuring tape to your list.
Plumbing Connection Tools
The plumbing phase needs tools for cutting, fitting, and sealing. Pipe wrenches in two sizes are needed for tightening fittings. Adjustable wrenches are versatile for different fittings and nuts.
For cutting pipes, use a PVC cutter or hacksaw based on the material. A deburring tool or file smooths cut edges for sealing. A drill with hole saw attachments creates openings for bulkhead fittings.
Don’t forget the materials for watertight connections. Teflon tape wraps threaded connections. PVC cement and primer bond PVC joints. A small brush applies primer and cement.
Required Plumbing Materials and Fittings
Most water tanks have 1-inch or 2-inch female threaded connections at the bottom. They also have a 16-inch access cap at the top with breather valves. Knowing these standard configurations helps you buy the right fittings.
Your list should include PVC or HDPE pipe for water lines. Use 1-inch or 1.5-inch diameter pipe for good flow. Buy 10-20% more than needed for fittings and routing.
Get bulkhead drain and outlet assemblies if not pre-installed. These fittings have reverse threads to prevent loosening. Always check these connections before filling the tank.
Ball valves are for shut-off during maintenance and emergencies. Install one between the tank and cabin. Check valves prevent backflow. For overflow, get fittings with built-in screens to keep out insects and debris.
Many prefer Fernco rubber couplings for certain connections. These flexible couplings fit slight misalignments and allow movement without breaking seals. They’re great for connecting different pipe materials.
Tanks need a minimum 2-inch diameter pipe for venting to prevent vacuum. This vent pipe should extend above the tank and include a screen cap. Proper venting is key to avoid flow problems and tank collapse.
For a complete water system, installing an off-grid water system involves tanks, pumps, and filtration. It’s a coordinated effort.
| Component Category | Specific Items | Typical Sizes | Purpose |
|---|---|---|---|
| Pipe and Tubing | PVC Schedule 40 or HDPE | 1-inch to 1.5-inch diameter | Main water distribution lines from tank to cabin |
| Connection Fittings | Bulkhead fittings, ball valves, check valves | Matching pipe diameter | Secure connections and flow control at tank interface |
| Sealing Materials | Teflon tape, PVC cement, rubber gaskets | Standard sizes | Create watertight seals preventing leaks and contamination |
| Ventilation Components | Vent pipe with screen cap | Minimum 2-inch diameter | Allows air exchange preventing vacuum and pressure issues |
| Coupling Hardware | Fernco rubber couplings, pipe straps | Various to match connections | Flexible connections and secure pipe mounting |
Personal Protective Equipment
Even simple projects need safety gear. Work gloves protect your hands from blisters and cuts. Choose gloves that are protective but also let you work well.
Safety glasses are a must when drilling or cutting. They prevent eye injuries from debris. Always wear them, not just when it seems dangerous.
Steel-toed boots protect your feet when moving heavy tanks. Tanks filled with water are very heavy. A dropped tank can hurt your feet badly.
Don’t forget sun protection for outdoor work. A wide-brimmed hat and sunscreen prevent sunburn. Drinking water is important too, even for those installing water systems.
With your toolkit and materials ready, you’re set to start. Now, prepare your site for a stable, level foundation for your water tank system.
Preparing the Installation Site
Before your water tank arrives, you need a stable, level base. This base must support thousands of pounds. Proper site preparation is key to avoiding costly repairs and system failures later.
Professional installers see this step as the foundation of success. A well-prepared site prevents settling, cracking, and structural damage. It’s like building an invisible support system for your water supply.
Clearing and Leveling the Ground
Start by marking an area 2 feet larger than your tank in all directions. Use stakes and string to outline this space. This extra space helps with support around the tank edges.
Remove all vegetation, roots, rocks, and debris from the area. Small roots can push against your tank bottom. Rocks larger than half an inch can puncture plastic tanks or create uneven pressure points that lead to cracking.
Check the ground level in multiple directions using a long straight board and carpenter’s level. Place the board across different sections of your cleared area. Even a slight slope causes water tanks to sit unevenly, putting excessive stress on one side that can lead to failure.

For sloped properties, you have two main options for achieving a level tank installation. You can terrace into the hillside to create a flat platform, or build up the low side with compacted fill material. Building up generally works better than digging into slopes because excavating can create drainage problems.
Use a tamper or plate compactor to firm up the soil after clearing. Loose soil settles over time, causing your tank to shift and tilt. Compact the entire area in layers, working from the outside edges toward the center for best results.
Building a Proper Foundation or Platform
Your water tank foundation must be continuous under the entire tank bottom with no gaps or weak spots. The base can be sand, fine gravel, clean dirt, cement, or properly supported planks. Each foundation type offers different benefits depending on your specific situation and budget.
For concrete foundations, start by excavating 4 to 6 inches deep across your prepared area. Compact the soil base thoroughly, then add a 2-inch layer of gravel for drainage. Place reinforcing wire mesh over the gravel to prevent cracking.
Pour a 3 to 4 inch reinforced concrete slab that extends at least 12 inches beyond your tank footprint. The slab must be exactly level and flat in all directions. Make sure the soil underneath is suitably compacted before pouring to prevent settling.
Concrete provides the most stable, permanent base and proves worth the investment for large tanks over 500 gallons. This foundation type handles the tremendous weight without settling or shifting. It also prevents rodents from burrowing underneath your tank.
For compacted material bases, create a 3-inch pad of compacted crusher dust or road base. This pad must be at least 24 inches larger in diameter than your water tank. Remove any pebbles larger than half an inch from your crusher dust before compacting.
Compact the material thoroughly in thin layers using a plate compactor or hand tamper. Each layer should be about 3 inches thick before compacting. The finished surface must be exactly level and flat, with no high or low spots.
Support the outside edges with retaining walls or borders to prevent erosion and material spreading. Without edge support, your tank base preparation can gradually wash away during heavy rains. Pressure-treated landscape timbers or concrete blocks work well for creating these borders.
For elevated platforms that provide gravity-fed water pressure, use pressure-treated lumber rated for ground contact. Design your platform structure to handle the full weight of your tank when completely filled. A 500-gallon tank weighs over 4,000 pounds when full.
Build the frame with 4×4 or 6×6 posts set in concrete footings below the frost line. Space support beams no more than 2 feet apart. Cover the frame with multiple layers of 3/4-inch pressure-treated plywood, ensuring all edges are fully supported.
| Foundation Type | Best For | Cost Range | Lifespan | Installation Time |
|---|---|---|---|---|
| Concrete Slab | Large permanent tanks over 500 gallons | $400-$800 | 30+ years | 2-3 days with curing |
| Compacted Gravel | Small to medium tanks under 500 gallons | $100-$300 | 10-15 years | 4-6 hours |
| Elevated Platform | Gravity-fed systems needing height | $300-$600 | 15-20 years | 1-2 days |
| Sand Base | Temporary installations or very small tanks | $50-$150 | 5-8 years | 2-3 hours |
Ensuring Adequate Drainage
Plan for water drainage around your tank site to prevent foundation problems. Even small amounts of water pooling under your tank can undermine the base over time. Surface water needs somewhere to go that’s away from your installation.
Grade the area around your foundation with a slight slope leading away from the tank. A drop of 1 inch per 10 feet provides adequate drainage without being noticeable. This gentle grade keeps rainwater and any overflow moving away from your water tank foundation.
Install a drainage channel or swale around the uphill side if your cabin sits on sloped land. This intercepts water flowing down the hillside before it reaches your tank area. You can line the channel with rocks or gravel to prevent erosion.
For below-ground or partially buried tanks, drainage becomes even more critical. Install perforated drainage pipes around and beneath the tank area. These pipes prevent water table fluctuations from causing your tank to float or shift position.
Surround underground installations with clean gravel that allows water to drain freely. The gravel should extend at least 12 inches beyond the tank on all sides. Connect your drainage pipes to a lower outlet point where water can safely discharge away from structures.
Consider adding a French drain system if your site has poor natural drainage or heavy clay soil. This involves digging trenches around your tank area, filling them with gravel, and installing perforated pipe. The system collects and redirects groundwater efficiently.
Check local building codes for any drainage requirements in your area. Some jurisdictions require specific setbacks from property lines or septic systems. Your drainage solution needs to direct water safely without causing problems for neighbors or the environment.
With your site properly cleared, leveled, and equipped with a solid foundation and drainage, you’re ready for the actual tank installation. The effort you put into tank base preparation pays dividends through years of trouble-free water storage. A well-prepared site prevents the common problems that plague rushed installations and keeps your cabin’s water supply reliable for decades.
How to Install Water Tank for Cabin: Step-by-Step Process
Installing a water tank for your cabin is easy with these tank installation steps. It’s a DIY task for anyone with basic skills. Just take your time and make sure all connections are right.
First, check your tank for damage. Look at the serial number and record it for warranty. Know where the inlet and outlet are, as their position is important.
Be careful with your tank during installation. It can crack, more so in cold weather. If it’s cold, warm the tank or wait for warmer weather.
Position the Tank on the Foundation
The first step is to place your tank in its spot. For tanks under 500 gallons, two or three people can move it. Larger tanks need machinery or more helpers.
Use a long pipe level to check if the tank is level. The outlet must be below the inlet for water to flow right. Adjust the tank with shims or gravel until it’s perfectly level.
For more help, check out professional resources on water tank installation. Make sure the tank is square on the foundation without gaps.
Secure the Tank Properly
Once in place, anchor the tank to prevent it from moving. Above-ground tanks rely on their weight, but strapping may be needed in windy or sloped areas. Use heavy-duty straps to the ground or concrete blocks.
For tanks on platforms, use wooden blocks or metal brackets. These prevent the tank from shifting. Space them evenly but avoid pressure points. Don’t over-tighten straps, as it can damage the tank.
For tanks buried, fill around them carefully. Use 12-inch layers of soil or clean fill. Don’t use clay and avoid compacting too close to the tank.
Install the Inlet Connection
Start by connecting your water source to the tank. Use teflon tape on all connections. Make sure all gaskets fit right before tightening.
Install a filter basket at the inlet to catch debris. For rainwater, connect gutters to the tank. For well water, add a ball valve for filling control.
The inlet must be higher than the outlet for water flow. Check this before finishing. Test the inlet for leaks.
Install the Outlet and Overflow Connections
The outlet delivers water to your cabin. Make sure bulkhead fittings are tight. Add a shut-off valve for easy maintenance.
The overflow outlet is near the top. Run the pipe away from the foundation to prevent damage. It should discharge at least 10 feet from the cabin.
Use 90-degree elbows at outlet fittings. This prevents stress from temperature changes. Make these connections last when the tank won’t move.
| Connection Type | Recommended Size | Key Components | Common Mistakes to Avoid |
|---|---|---|---|
| Inlet Connection | 1.5 to 2 inches | Ball valve, filter screen, teflon tape, rubber gaskets | Positioning inlet below outlet level, forgetting debris screen |
| Outlet Connection | 1 to 1.5 inches | Bulkhead fitting, shut-off valve, 90-degree elbow | Over-tightening causing cracks, using straight pipe connections |
| Overflow Connection | 2 to 3 inches | Overflow fitting, drainage pipe, splash guard | Insufficient distance from foundation, undersized pipe diameter |
| Vent Pipe | 2 inches | Vent fitting, screened cap, pipe extending above roofline | Omitting vent entirely, insufficient height, no insect screen |
Add a Vent Pipe
A vent pipe is essential for your tank. It lets the tank breathe as water levels change. Without it, the tank can collapse or water won’t flow.
Put the vent pipe at the tank’s highest point. Extend it above the roof to keep out debris. It should be at least 12 inches above the roof peak.
Use a screened vent hood to keep out rain and debris. Clean the screen seasonally to prevent blockages.
For underground tanks, install a 4-inch perforated pipe for testing. This lets you check water levels and prevent pressure on the tank.
With these steps, your tank is ready for plumbing connections. Double-check everything is secure and level before moving on.
Connecting Your Water Tank to the Cabin Plumbing
With your tank ready, connecting it to your cabin’s plumbing is key. This step ensures water flows well, at the right pressure, and stays warm. You’ll need to run water lines, install valves, add filters, and maybe a pump system.
A good connection system lets you control your water. You can shut off parts for repairs, check system health, and adjust for seasons without trouble.
Running Water Lines from Tank to Cabin
The water line from tank to cabin is the system’s backbone. The pipe material depends on if it’s underground or above ground. PVC pipes are good for above-ground and mild climates, while HDPE is better for underground due to its flexibility and freeze resistance.
How deep you bury the pipes is very important. Pipes should be 18 to 24 inches deep to avoid damage and freezing. In cold areas, they need to be 36 inches deep or more.
Follow the ground’s natural shape when digging. Make sure the pipes slope slightly toward drains for easy winterizing. Avoid digging near future gardens or building sites.

For pipes outside, use insulation and UV covers. Running them along foundations or in conduits protects them from weather and damage. This is great for seasonal cabins that drain before winter.
If you have a well and off-grid power, connect a line to the well. Use a submersible pump to push water into a pressure tank in your cabin. For lake systems, a big pipe and jet pump work the same way.
Installing Shutoff Valves and Filters
Shutoff valves give you control over your system. Put ball valves at three key spots: after the tank, before the cabin, and before any splits in the plumbing.
These valves let you quickly shut off sections for repairs. If a fixture inside needs fixing, you can turn off the flow at the entry point. This saves time and water.
A sediment filter at the tank catches particles before they reach your cabin. This helps your fixtures and appliances last longer. Choose filters with 20 to 50 micron ratings for good particle removal and maintenance.
Make sure filters are easy to replace. Add pressure gauges before and after filters to check performance. A big drop in pressure means it’s time for a new filter.
Setting Up a Pump System If Needed
Gravity-fed systems work well if your tank is high enough. But many setups need a pump for enough pressure. Knowing your pump options helps you choose the right one.
| Pump Type | Best Application | Typical Flow Rate | Key Advantage |
|---|---|---|---|
| Jet Pump | Shallow wells, tank supplies | 8-15 GPM | Easy installation and maintenance |
| Submersible Pump | Deep wells, below-ground tanks | 10-20 GPM | Quiet operation, no priming needed |
| Booster Pump | Increasing existing pressure | 5-12 GPM | Enhances low-pressure systems |
| Hand Pump | Emergency backup, off-grid | 1-3 GPM | No electricity required |
Pressure tanks work with pumps for steady pressure and less pump cycling. This makes your pump last longer and keeps water flow steady. Size your tank to hold at least three times your pump’s flow rate per minute.
Choosing the right pump size is key. Calculate your needs based on GPM for fixtures and total head pressure. Most cabins need pumps delivering 6 to 12 GPM at 40 to 60 PSI.
Think about electrical needs for your pump system. Use the right wiring size and add surge protectors. Flexible hoses help with movement and vibration.
Hand-powered systems are a reliable backup. They use a hand pump to pressurize your plumbing. This is useful during power outages or equipment failures.
Insulating Pipes for Cold Weather
Insulating your water lines keeps them from freezing. This prevents damage and ensures water access all year. There are different insulation types for various needs and temperatures.
Foam sleeves offer basic insulation for above-ground pipes in mild areas. They fit over pipes and seal with adhesive. For better insulation, use fiberglass wrap with a weatherproof jacket.
Heat tape provides active freeze protection for exposed pipes. Use reliable heating cable on supply lines to prevent freezing below 32 degrees Fahrenheit. These elements wrap around pipes and turn on when it gets cold, keeping water flowing.
Insulation alone isn’t enough for long freezes. Pipes need to be below the frost line, heated, or drained. The best solution is to bury lines and use heat tape on exposed parts.
Install drain valves at the lowest points for winterizing. Make sure pipes slope toward these points for complete drainage. This prevents ice damage during winter.
For occasional winter use, install a bypass valve. This lets you drain the cabin’s plumbing while keeping the main line to the tank safe. This approach offers flexibility without risking your water supply.
Installing a Water Filtration System
Your polyethylene tank might be safe for food, but the water needs treatment. Whether it’s rainwater or from a lake, contaminants can be a problem. A good cabin water filtration system keeps your family safe and your plumbing in good shape.
A multi-barrier system is key. Each stage removes different contaminants. This way, your water stays clean and safe for your cabin.
Most cabins need at least three stages. Start with sediment filters to protect your pipes. Then, add carbon filters for taste and chemical removal. Finish with UV to kill harmful microorganisms.
First Line of Defense Against Particles
Sediment filters are the first line of defense in any water purification system. They catch dirt and other particles before they damage your plumbing. Without them, your water could be cloudy and your pipes could get clogged.
There are many sediment filter options for cabins. Spin-down filters have cleanable screens that you can backwash. They’re great for heavy sediment loads.
Cartridge filters are the most common choice. They use replaceable elements to trap particles. They’re affordable and work well for seasonal use.

Understanding micron ratings helps choose the right filters. The micron number shows the size of particles caught. Smaller numbers mean finer filtration but slower flow.
Install filters in stages based on micron ratings. Start with a 50-micron filter after your tank. Then, add a 20-micron filter before your cabin. Use a 5-micron filter before drinking water taps for final polishing.
Proper installation is important. Mount filters securely to prevent leaks. Use shutoff valves before and after each filter housing for easy cartridge changes.
Place filters in easy-to-reach locations that stay above freezing. Basements or utility rooms are good spots. Avoid places that are hard to get to during cartridge changes.
Improving Water Quality Beyond Clarity
Sediment filters make water look clean, but carbon filters make it taste and smell good. Activated carbon filters remove chlorine and chemicals. They trap contaminants on their surface.
There are two main carbon filter types for cabins. Granular activated carbon (GAC) filters are for whole-house use. Carbon block filters are better for point-of-use locations like kitchen sinks.
Carbon filters have capacity ratings in gallons treated. A 10-inch cartridge might filter 5,000 to 10,000 gallons. Keep track of your water usage to know when to change cartridges.
Carbon filters don’t remove microorganisms. If you’re treating rainwater or surface water, you’ll need UV treatment after carbon filters. This ensures your water is safe to drink.
Replace carbon cartridges as recommended by the manufacturer. Once they’re full, they won’t remove contaminants effectively. Some systems have change indicators to remind you when it’s time to replace.
Chemical-Free Water Disinfection Technology
UV water treatment is the best way to kill bacteria and viruses without chemicals. UV light disrupts their DNA, preventing them from causing illness. It’s perfect for cabins because it doesn’t require chemicals or storage tanks.
UV systems have a stainless steel chamber with a UV lamp. Water flows through, and the UV light kills microorganisms instantly. This provides continuous disinfection without the need for storage tanks or contact time.
Installation is important. Mount the UV unit after sediment and carbon filters. Particles can block UV light, reducing effectiveness. Clean, filtered water ensures the best UV treatment.
UV systems need electricity to work. Plan for a dedicated circuit or reliable backup power. Most residential UV units use 30-60 watts, like a standard light bulb.
Flow restrictors may be needed for proper treatment. Water must flow slowly enough for complete disinfection. Check your UV system’s specifications for maximum flow rates.
The UV lamp needs to be replaced every year, even if it’s glowing. UV output decreases over time. Most systems have indicators to remind you when it’s time to replace.
| Filter Type | What It Removes | Typical Lifespan | Best Application |
|---|---|---|---|
| Sediment Filter (50-micron) | Large debris, sand, dirt, rust | 3-6 months | Primary filtration after tank |
| Sediment Filter (5-micron) | Fine particles, silt, sediment | 6-12 months | Final filtration before drinking water |
| Carbon Filter | Chlorine, chemicals, taste, odor | 5,000-10,000 gallons | Whole-house or point-of-use |
| UV Purification | Bacteria, viruses, protozoa | Lamp: 12 months, System: 5+ years | Final disinfection for drinking water |
UV treatment doesn’t provide residual disinfection after water leaves the chamber. Preventing recontamination is key. Keep plumbing between your UV unit and drinking water taps simple and short.
Regular maintenance is important for your UV system. Clean the quartz sleeve around the UV lamp every 3-6 months. Mineral deposits can block UV light and reduce effectiveness.
For cabins using rainwater, boiling is an alternative to UV treatment. But UV systems offer continuous protection without the energy costs of boiling. Clean rainwater filtered through sediment and carbon filters, then treated with UV, is safe to drink.
Remember, maintaining water quality in the tank is your responsibility. Keep your tank covered, inspect it regularly, and clean it annually. Your filtration system works best with clean water from a well-maintained tank.
Testing Your Water Tank System
After you install your water system, it’s time to test it. This step is key to making sure your cabin’s water supply works right. It helps avoid problems later on.
Think of testing as a way to protect your system from future issues. You’ll check all connections and make sure water flows as planned. This way, you catch problems early.
Filling the Tank for the First Time
Before adding water, inspect your tank carefully. Make sure all fittings are tight but not too tight. Also, check that the vent pipe is clear.
Start filling the tank slowly. Watch as the water goes in. Small particles of polyethylene may appear in new tanks from making holes for fittings.
These particles are safe. They might float to the top or settle at the bottom. You can skim them off or vacuum them later. It’s normal for new tanks.
Fill the tank only 20-30% at first. This lets you check for leaks without wasting water. After finding no leaks, fill it up.
New tanks need chlorination for water quality. Use one gallon of unscented bleach for every 1,000 gallons of tank size. Fill the tank, circulate the water, and smell for chlorine.
Let the water sit for 24 hours. Then, flush the system and refill with fresh water. This kills bacteria and contaminants. Patience during first fill prevents rushing into problems when they’re easiest to correct.
Checking for Leaks
Look for leaks at every connection point. Start with the tank inlet, then check outlets, overflow pipes, and joints. Don’t forget valve connections and filter housings.
Look for drips first, but also check for dampness or stains. Wipe each connection dry with a cloth, then watch for moisture to reappear—this technique reveals even minor seepage.
Use dry paper towels under suspect connections to catch small leaks. Minor leaks at threaded connections often stop with a bit more tightening. But avoid over-tightening, which can damage fittings or strip threads.

For leaks that won’t stop, drain the tank a bit to relieve pressure. Then, take apart the connection, apply teflon tape or thread sealant, and put it back together. Hand-tighten the threads a few turns before tightening more.
Use a pipe level to check if the tank is level. The outlet should be below the inlet for proper flow. Leveling prevents drainage issues and ensures fittings fit right.
Fixing leaks now saves you from bigger problems later. Water damage can get worse fast, so finding leaks early protects your investment.
Testing Water Pressure and Flow
Make sure your system has enough water pressure and flow. For gravity-fed systems, use a pressure gauge to check pressure at different outlets. You should see about 0.43 PSI for every foot of drop.
Test flow rates by timing how long it takes to fill a 5-gallon bucket at different faucets. Good flow rates range from 2-3 gallons per minute or more for easy water use. Lower rates might mean pipe sizing issues or elevation problems.
For pumped systems, check that the pressure tank keeps pressure between 30-50 PSI. Make sure the pump cycles on and off right, without short-cycling or running too long. Short-cycling means pressure tank or switch problems.
Test pressure under different demands to see how your system does. Try one faucet open, many faucets at once, and high-demand fixtures like showers. This shows if your system can handle peak times.
Use a pneumatic dipstick level gauge to check water levels. This tool helps track water use and ensures your tank is big enough. Knowing your system’s performance prevents unexpected dryouts.
Keep a record of your initial pressure and flow measurements. These numbers help spot changes that might mean problems. Regular testing keeps your system reliable all year.
| Testing Category | Target Range | Testing Method | Action If Outside Range |
|---|---|---|---|
| Gravity System Pressure | 0.43 PSI per foot elevation | Pressure gauge at faucet | Check for pipe restrictions or air locks |
| Flow Rate | 2-3 GPM minimum | Time filling 5-gallon bucket | Inspect for clogs or undersized pipes |
| Pumped System Pressure | 30-50 PSI | Pressure gauge monitoring | Adjust pressure switch or check pump |
| Leak Detection | Zero visible moisture | Visual inspection and paper towel test | Tighten fittings or replace gaskets |
Thorough testing gives you confidence in your water system. These steps turn your installation into a reliable utility for your cabin.
Winterizing Your Cabin Water Tank
When it gets really cold, your cabin’s water system is at risk. Pipes can burst and tanks can crack. This can lead to expensive repairs in the spring. But, proper cabin winterization can protect your investment and keep water flowing.
Supply pipes can freeze if it gets below 32 degrees F. Without heating, they’re at risk. Water in narrow pipes expands when it freezes, causing pipes to burst.
Your storage tank is more durable than pipes. A half-full tank won’t split when frozen. It starts freezing only in very cold periods, giving you time to act.
Complete Drainage for Seasonal Cabins
If your cabin is only used in summer, draining your entire water system is best. This method prevents freeze damage. It’s ideal for cabins unused in winter.
Start by shutting off the water source. Close your well valve or disconnect rainwater systems. This step is key to prevent water entry.
Next, open all faucets from top to bottom. This lets air in and helps water drain. Gravity pulls the water down through your pipes.

- Open drain valves at the lowest points in your water lines
- Drain your pressure tank completely if your system includes one
- Use an air compressor to blow residual water from pipes if available
- Add RV antifreeze to drain traps to prevent sewer gas backup
- Label all valve positions and create a shutdown checklist
You don’t need to drain your storage tank completely. The tank can handle some freezing. But, outdoor pipes must be purged of all water at season’s end to prevent splitting.
For unexpected cold snaps, have emergency plans ready. Running a trickle of water through pipes prevents freezing. You can also add temporary heat sources if you’re checking the cabin.
Insulation and Heating Cable Solutions
For year-round use, insulation and heating solutions keep your system working in winter. These methods protect your plumbing and allow water access during cold months. The key is using several protection strategies together.
Insulation slows heat loss but doesn’t warm. It buys time before freezing. Foam pipe sleeves offer basic protection for exposed pipes. They’re cheap and easy to install.
For better protection, wrap pipes or tank surfaces with fiberglass batting. This creates an insulated envelope that extends the time before freezing. Rigid foam insulation panels work well for protecting tank walls and tops from wind.
Heat tape actively warms pipes. This electric wire prevents freezing even in sustained cold. There are two main types, each with its own benefits:
| Heat Tape Type | Key Features | Best Application | Cost Consideration |
|---|---|---|---|
| Self-Regulating | Adjusts output based on temperature automatically | Long pipe runs with varying exposure | Higher upfront cost, lower operating expense |
| Constant-Wattage | Fixed heat output requiring thermostat control | Short sections with consistent conditions | Lower purchase price, needs careful monitoring |
| Parallel-Circuit | Can be cut to length without affecting function | Custom installations with odd measurements | Mid-range pricing, flexible installation |
Installing heat tape needs careful attention to guidelines. Wrap the cable in straight runs without overlaps. Secure it every 12 inches with insulation for efficiency.
Always plug heat tape into GFCI-protected outlets for safety. These systems use a lot of power. Consider your electrical capacity, as a 50-foot run uses 400-500 watts.
Tank Heating Equipment and Underground Advantages
Tank heaters keep stored water from freezing. They’re essential for year-round use. There are different heating options for various needs and power sources.
Immersion heaters warm water directly. They’re very efficient. Stock tank heaters for livestock also work well for cabins and have built-in thermostats.
Tank heating pads warm the tank surface. They’re less efficient but easier to install. They’re best for smaller tanks where heat can penetrate well.
Recirculating systems pump water through heated spaces. This method uses your cabin’s heat efficiently. It requires a pump and extra plumbing.
Underground tanks naturally stay above freezing without needing heaters. Earth temperature below the frost line is always above freezing. This keeps water cool in summer and prevents freezing in winter.
When using tank heaters, consider these factors:
- Install thermostatic controls to operate heaters only when temperatures drop dangerously low
- Calculate power requirements carefully and ensure adequate electrical supply
- Develop backup plans if power fails during severe cold weather
- Monitor energy consumption to avoid depleting off-grid battery systems
Heating large volumes of water uses a lot of energy. A 500-gallon tank might need 1,500 watts or more in extreme cold. This makes tank heaters practical for smaller tanks or intermittent use.
The best cabin winterization strategy combines several methods. Seasonal cabins benefit from complete drainage and insulation. Year-round retreats need heating solutions and insulation for energy efficiency.
Prevention is cheaper than repairs. A burst pipe or cracked fitting can cost thousands. Investing in freeze protection saves money and ensures reliable water access in winter.
Maintaining Your Water Tank System
Keeping your water tank system in good shape is key to a reliable water supply for your cabin. Water tank maintenance is simple but important. It keeps your water clean and flowing well. Think of it like car maintenance—small steps now prevent big problems later.
Most maintenance tasks are easy and don’t need special skills. With a simple schedule and checks, you can catch small issues before they become big problems. Your job in keeping water quality starts when the water goes into your tank, no matter the source.

Setting Up a Cleaning Routine
Annual tank cleaning keeps your water fresh and prevents sediment buildup. Clean your tank when it naturally runs low or during a quiet season. This makes cleaning easier and saves water.
Before cleaning, turn off power to pumps and close valves. Drain the tank completely. If needed, use a submersible pump.
Scrub the tank’s interior with a long brush and mild detergent. Never use harsh chemicals that could harm your drinking water. Pay extra attention to the bottom where sediment collects.
For small tanks, use mirrors or waterproof cameras to check hard spots. Rinse the tank well until the water is clear. Then, disinfect with a diluted bleach solution and rinse again.
Filter upkeep is also critical. Replace sediment filters every three to six months, depending on your water source. Carbon filters last six to twelve months. UV bulbs need replacing every year, even if they look fine.
Checking for Problems Early
Monthly checks can spot small issues before they become big problems. A quick system inspection takes just fifteen minutes. It can save you from costly repairs and water damage.
Look for cracks or bulges in the tank walls, which can happen after freezing. Check that all fittings are snug but not too tight. Inspect pipes for corrosion or damage from animals or weather.
Make sure overflow and vent pipes are clear of debris. Verify the tank is level on its foundation. If it’s not, fix it right away to avoid damage.
Seasonal checks are important. Before winter, check that freeze protection works. After winter, look for any damage from freezing. After storms, clean gutters and tank inlets to prevent contamination.
For pump systems, listen for odd noises or frequent cycling. This could mean pressure tank issues. Keep pump intakes clear of sediment and debris.
Ensuring Safe Drinking Water
Water quality testing is ongoing, not just a one-time thing. Water quality can change due to many factors. Regular testing ensures your water is safe for your family.
Basic testing with inexpensive test strips lets you check pH levels, chlorine, and water hardness. These DIY tests are cheap and give quick results.
But, professional lab testing at least once a year is key for drinking water. Labs check for bacteria, nitrates, and other contaminants. Contact your local water supply company or well driller for testing info.
Collecting water samples correctly is important for accurate results. Follow the lab’s instructions carefully. Most labs provide sterile bottles and detailed procedures.
If test results show problems, act fast. You might need to adjust your filtration system or install new equipment. Don’t ignore poor test results—safe water is too important.
Stopping Algae Before It Starts
Algae growth is a common problem, but preventing algae is easy when you know the cause. Algae need water, nutrients, and light to grow. They can make your water taste bad and look cloudy.
Light penetration is the main cause. Choose dark or opaque tanks to block sunlight. Place tanks in the shade when possible.
Keep tank lids sealed and access points covered. Use screens on openings to keep out debris. These materials feed algae.
Good water circulation prevents algae growth. Make sure incoming water flushes through the tank. This keeps water fresh by adding air.
Disinfecting with chlorine or other approved disinfectants controls algae. For existing algae, drain and scrub the tank, shock chlorinate, or install UV systems.
| Maintenance Task | Frequency | Time Required | Key Focus Areas |
|---|---|---|---|
| Full Tank Cleaning | Annually | 3-4 hours | Scrubbing walls, removing sediment, disinfecting interior |
| Visual Inspection | Monthly | 15 minutes | Cracks, leaks, fitting tightness, foundation stability |
| Filter Replacement | 3-12 months | 30 minutes | Sediment filters, carbon filters, UV bulbs |
| Water Quality Testing | Quarterly (basic), Annually (lab) | 10 minutes (basic), 1 hour (lab) | pH levels, bacteria, nitrates, contaminants |
With these maintenance steps, your water tank system will last for years. The small effort you put in now will save you a lot of trouble later. Most importantly, you’ll keep your family safe and enjoy the peace of mind that comes with a well-maintained water supply at your cabin.
Enjoying Reliable Water at Your Off-Grid Retreat
Your cabin water supply system is now ready for years of use. You’ve turned your retreat into a cozy home with all the comforts. This independence is truly remarkable.
Off-grid living is much better with a reliable water system. No more worries about running out of water. Your setup brings security and peace of mind.
The effort you put in is worth it every time you use water. You’ve mastered a key part of living off the grid. Your system protects you from water shortages and gives you control.
Keep your maintenance records up to date. Stay interested in new water tech. The off-grid community keeps finding better ways to filter and pump water. Share your knowledge with other cabin owners.
Your water tank is just the start of more self-sufficiency projects. Many owners use their success to try solar power, rainwater harvesting, or other green living ideas.
Welcome to a new era of cabin ownership. Your retreat is ready for great seasons with plenty of clean water whenever you need it.
FAQ
How much water storage capacity do I need for my cabin?
What’s the best material for a cabin water tank?
Can I create water pressure without electricity using gravity?
How do I protect my water tank and pipes from freezing in winter?
Do I need to filter or purify water stored in my tank?
How often should I clean my water storage tank?
What size pipe should I use for water lines between tank and cabin?
How much does it cost to install a water tank system for a cabin?
FAQ
How much water storage capacity do I need for my cabin?
The amount of water you need depends on several things. These include how many people will be there, how long they’ll stay, and what activities they’ll do. A good rule of thumb is to calculate your daily water use.
For example, showers use about 2.5 gallons per minute. Toilets use 1.6 gallons per flush. Cooking and drinking water needs are about 2-3 gallons per person daily. Then, multiply this by 2-3 days to have enough for emergencies.
For a weekend cabin with 2-4 people, a 250-500 gallon tank is usually enough. But, if you live there full-time or have a big family, you might need 1,000-1,500 gallons or more. Always get a tank that’s a bit bigger than you think you’ll need.
What’s the best material for a cabin water tank?
Polyethylene plastic tanks are the most popular choice. They’re affordable, durable, and easy to install. These tanks are food-grade safe and resist corrosion.
They’re also light enough to move with a pickup truck. You can install them above or below ground. Darker colored tanks last longer because they resist UV damage and prevent algae growth.
For extra durability in extreme temperatures, fiberglass tanks are a good option. Steel and stainless steel tanks are best for large capacities. Concrete tanks are great for underground installations that need to last a long time.
Can I create water pressure without electricity using gravity?
Yes, gravity-fed systems are a great choice for off-grid cabins. By placing your tank higher than your cabin, gravity creates pressure. This pressure is about 0.43 PSI for each foot of elevation difference.
For comfortable water pressure of 30-50 PSI, you’ll need the tank 70-115 feet above your cabin. You can place the tank on a hillside, elevated platform, or tower. Gravity-fed systems are reliable because they don’t need pumps, electricity, or moving parts.
If you can’t get the tank high enough, you’ll need to install a pump system with a pressure tank.
How do I protect my water tank and pipes from freezing in winter?
For seasonal cabins, draining the system completely is the best way to protect it from freezing. Shut off the water source and open all faucets from highest to lowest. Drain all pipes through low-point drain valves.
Consider adding RV antifreeze to drain traps. For year-round cabins, use a combination of strategies. Bury pipes below the frost line, wrap exposed pipes with foam insulation, and install self-regulating heat tape on vulnerable sections.
Insulate the tank itself with rigid foam panels. Underground tanks rarely need extra heating. Above-ground tanks may need tank heaters controlled by thermostats during extreme cold.
Do I need to filter or purify water stored in my tank?
Filtration needs depend on your water source. The tank itself is safe, but water entering it may contain contaminants. For well water from safe sources, basic sediment filtration (20-50 micron) protects plumbing and improves water clarity.
Rainwater collection systems need more extensive treatment. This includes sediment filters, carbon filters for taste and odor, and UV purification to eliminate bacteria and viruses. Surface water sources also need similar treatment.
Even with treated municipal water, sediment filtration prevents particles from damaging fixtures. Install filters in stages: primary sediment filter near the tank outlet, secondary finer filter before entering the cabin, and point-of-use filters at kitchen sinks for drinking water.
How often should I clean my water storage tank?
Plan to inspect and clean your water tank at least once a year. If you notice water quality issues, clean it more often. Clean the tank when it’s naturally low or can be drained without inconvenience.
The process involves draining the tank completely, scrubbing interior walls with a brush and mild detergent, rinsing thoroughly multiple times, inspecting for damage, and disinfecting with diluted bleach solution before refilling. Sediment naturally accumulates in tank bottoms over time and should be removed during annual cleaning.
Also, replace sediment filter cartridges every 3-6 months, carbon filters every 6-12 months, and UV bulbs annually even if they’re glowing, as UV output decreases over time.
What size pipe should I use for water lines between tank and cabin?
For most cabin installations, 1-inch or 1.5-inch diameter pipe provides enough flow for household needs. The right size depends on distance, elevation change, and flow requirements. For gravity-fed systems, larger pipe diameter reduces friction losses over distance.
Use 1.5-inch pipe for runs longer than 100 feet or when elevation difference is minimal. For pumped systems with good pressure, 1-inch pipe typically works well for runs under 100 feet. Use PVC pipe (Schedule 40) for above-ground or protected installations, or HDPE (high-density polyethylene) pipe for buried lines due to its flexibility and superior freeze resistance.
Always bury water lines at least 18-24 inches deep, or below your local frost line in cold climates, and maintain a slight downward slope toward drain points for winterizing.
How much does it cost to install a water tank system for a cabin?
Total costs vary based on tank size, material, installation complexity, and whether you’re doing it yourself or hiring professionals. For a DIY installation with a mid-sized setup: a 500-gallon polyethylene tank costs 0-800, plumbing materials and fittings run 0-400, foundation materials (concrete or compacted gravel) cost 0-300, filtration equipment ranges from 0-600, and tools you might need to purchase add 0-200.
A basic DIY system typically totals
FAQ
How much water storage capacity do I need for my cabin?
The amount of water you need depends on several things. These include how many people will be there, how long they’ll stay, and what activities they’ll do. A good rule of thumb is to calculate your daily water use.
For example, showers use about 2.5 gallons per minute. Toilets use 1.6 gallons per flush. Cooking and drinking water needs are about 2-3 gallons per person daily. Then, multiply this by 2-3 days to have enough for emergencies.
For a weekend cabin with 2-4 people, a 250-500 gallon tank is usually enough. But, if you live there full-time or have a big family, you might need 1,000-1,500 gallons or more. Always get a tank that’s a bit bigger than you think you’ll need.
What’s the best material for a cabin water tank?
Polyethylene plastic tanks are the most popular choice. They’re affordable, durable, and easy to install. These tanks are food-grade safe and resist corrosion.
They’re also light enough to move with a pickup truck. You can install them above or below ground. Darker colored tanks last longer because they resist UV damage and prevent algae growth.
For extra durability in extreme temperatures, fiberglass tanks are a good option. Steel and stainless steel tanks are best for large capacities. Concrete tanks are great for underground installations that need to last a long time.
Can I create water pressure without electricity using gravity?
Yes, gravity-fed systems are a great choice for off-grid cabins. By placing your tank higher than your cabin, gravity creates pressure. This pressure is about 0.43 PSI for each foot of elevation difference.
For comfortable water pressure of 30-50 PSI, you’ll need the tank 70-115 feet above your cabin. You can place the tank on a hillside, elevated platform, or tower. Gravity-fed systems are reliable because they don’t need pumps, electricity, or moving parts.
If you can’t get the tank high enough, you’ll need to install a pump system with a pressure tank.
How do I protect my water tank and pipes from freezing in winter?
For seasonal cabins, draining the system completely is the best way to protect it from freezing. Shut off the water source and open all faucets from highest to lowest. Drain all pipes through low-point drain valves.
Consider adding RV antifreeze to drain traps. For year-round cabins, use a combination of strategies. Bury pipes below the frost line, wrap exposed pipes with foam insulation, and install self-regulating heat tape on vulnerable sections.
Insulate the tank itself with rigid foam panels. Underground tanks rarely need extra heating. Above-ground tanks may need tank heaters controlled by thermostats during extreme cold.
Do I need to filter or purify water stored in my tank?
Filtration needs depend on your water source. The tank itself is safe, but water entering it may contain contaminants. For well water from safe sources, basic sediment filtration (20-50 micron) protects plumbing and improves water clarity.
Rainwater collection systems need more extensive treatment. This includes sediment filters, carbon filters for taste and odor, and UV purification to eliminate bacteria and viruses. Surface water sources also need similar treatment.
Even with treated municipal water, sediment filtration prevents particles from damaging fixtures. Install filters in stages: primary sediment filter near the tank outlet, secondary finer filter before entering the cabin, and point-of-use filters at kitchen sinks for drinking water.
How often should I clean my water storage tank?
Plan to inspect and clean your water tank at least once a year. If you notice water quality issues, clean it more often. Clean the tank when it’s naturally low or can be drained without inconvenience.
The process involves draining the tank completely, scrubbing interior walls with a brush and mild detergent, rinsing thoroughly multiple times, inspecting for damage, and disinfecting with diluted bleach solution before refilling. Sediment naturally accumulates in tank bottoms over time and should be removed during annual cleaning.
Also, replace sediment filter cartridges every 3-6 months, carbon filters every 6-12 months, and UV bulbs annually even if they’re glowing, as UV output decreases over time.
What size pipe should I use for water lines between tank and cabin?
For most cabin installations, 1-inch or 1.5-inch diameter pipe provides enough flow for household needs. The right size depends on distance, elevation change, and flow requirements. For gravity-fed systems, larger pipe diameter reduces friction losses over distance.
Use 1.5-inch pipe for runs longer than 100 feet or when elevation difference is minimal. For pumped systems with good pressure, 1-inch pipe typically works well for runs under 100 feet. Use PVC pipe (Schedule 40) for above-ground or protected installations, or HDPE (high-density polyethylene) pipe for buried lines due to its flexibility and superior freeze resistance.
Always bury water lines at least 18-24 inches deep, or below your local frost line in cold climates, and maintain a slight downward slope toward drain points for winterizing.
How much does it cost to install a water tank system for a cabin?
Total costs vary based on tank size, material, installation complexity, and whether you’re doing it yourself or hiring professionals. For a DIY installation with a mid-sized setup: a 500-gallon polyethylene tank costs $400-800, plumbing materials and fittings run $200-400, foundation materials (concrete or compacted gravel) cost $100-300, filtration equipment ranges from $200-600, and tools you might need to purchase add $100-200.
A basic DIY system typically totals $1,000-2,500. Adding a pump system increases costs by $500-1,500. Professional installation adds $1,000-3,000 in labor depending on complexity. Underground installation with excavation can add $2,000-5,000. Larger tanks, premium materials like stainless steel, or complete treatment systems can push total costs to $5,000-10,000 or more for complete turnkey installations.
Do I need a permit to install a water tank at my cabin?
Permit requirements vary significantly by location, so check with your local building department, county health department, and planning office before starting installation. Many rural and unincorporated areas have minimal regulations for private water storage, but some areas require permits for plumbing work, electrical installations, or structural platforms for elevated tanks.
If you’re collecting rainwater, a few states and municipalities have restrictions or requirements you’ll need to follow. Underground tank installations more commonly require permits due to excavation concerns and possible impacts on property drainage. Even if permits aren’t required, it’s wise to verify your installation meets local building codes for safety and to avoid issues when eventually selling the property.
What should I do if my water tank develops algae growth?
Algae growth occurs when light, water, and nutrients combine. While usually not harmful, algae create unpleasant taste, odor, and appearance. For existing algae problems, drain the tank completely, scrub all interior surfaces thoroughly with a brush and mild detergent, rinse multiple times, then disinfect with a chlorine solution (1 gallon of unscented household bleach per 1,000 gallons of water).
Let it stand for 24 hours, drain, and rinse again before refilling. To prevent future algae growth: choose opaque or dark-colored tanks that block light; keep lids sealed and access points covered; position tanks away from direct sunlight when possible; maintain tank screens to prevent organic matter entry; ensure good water circulation; and consider periodic disinfection treatments. Some cabin owners install UV sterilization systems that prevent algae growth while purifying water.
Can I install a water tank system myself, or should I hire a professional?
Most cabin owners with basic DIY skills and appropriate tools can successfully install a water tank system themselves, for straightforward above-ground installations with smaller tanks (under 750 gallons). The project involves manageable tasks like site preparation, positioning the tank, connecting fittings, and running pipes—nothing beyond typical homeowner capabilities if you follow instructions carefully.
Consider hiring professionals for: excavation and underground tank installation; electrical work for pump systems (unless you’re a qualified electrician); complex plumbing connections to existing systems; engineered elevated platforms for gravity-fed systems; or situations requiring equipment like backhoes or cranes. Many cabin owners take a hybrid approach—doing site prep and basic installation themselves while hiring professionals for specialized aspects like trenching, pump installation, or final connections to cabin plumbing.
How long do water storage tanks typically last?
Lifespan depends on material, installation quality, climate, and maintenance. Polyethylene plastic tanks typically last 10-20 years, with UV-resistant models lasting longer, specially when shaded or partially buried. Exposure to direct sunlight accelerates degradation, while protected installations extend life significantly.
Fiberglass tanks often last 20-30 years with proper care. Steel tanks vary widely—untreated steel may rust through in 10-15 years in humid climates, while properly coated or stainless steel tanks can last 30-50 years or more. Concrete tanks are the longest-lasting option, often functioning reliably for 50+ years when properly constructed. Underground installation generally extends tank life by protecting from UV exposure and temperature extremes.
Regular maintenance—annual cleaning, prompt repair of minor damage, and protecting from physical stress—significantly increases longevity regardless of material.
,000-2,500. Adding a pump system increases costs by 0-1,500. Professional installation adds
FAQ
How much water storage capacity do I need for my cabin?
The amount of water you need depends on several things. These include how many people will be there, how long they’ll stay, and what activities they’ll do. A good rule of thumb is to calculate your daily water use.
For example, showers use about 2.5 gallons per minute. Toilets use 1.6 gallons per flush. Cooking and drinking water needs are about 2-3 gallons per person daily. Then, multiply this by 2-3 days to have enough for emergencies.
For a weekend cabin with 2-4 people, a 250-500 gallon tank is usually enough. But, if you live there full-time or have a big family, you might need 1,000-1,500 gallons or more. Always get a tank that’s a bit bigger than you think you’ll need.
What’s the best material for a cabin water tank?
Polyethylene plastic tanks are the most popular choice. They’re affordable, durable, and easy to install. These tanks are food-grade safe and resist corrosion.
They’re also light enough to move with a pickup truck. You can install them above or below ground. Darker colored tanks last longer because they resist UV damage and prevent algae growth.
For extra durability in extreme temperatures, fiberglass tanks are a good option. Steel and stainless steel tanks are best for large capacities. Concrete tanks are great for underground installations that need to last a long time.
Can I create water pressure without electricity using gravity?
Yes, gravity-fed systems are a great choice for off-grid cabins. By placing your tank higher than your cabin, gravity creates pressure. This pressure is about 0.43 PSI for each foot of elevation difference.
For comfortable water pressure of 30-50 PSI, you’ll need the tank 70-115 feet above your cabin. You can place the tank on a hillside, elevated platform, or tower. Gravity-fed systems are reliable because they don’t need pumps, electricity, or moving parts.
If you can’t get the tank high enough, you’ll need to install a pump system with a pressure tank.
How do I protect my water tank and pipes from freezing in winter?
For seasonal cabins, draining the system completely is the best way to protect it from freezing. Shut off the water source and open all faucets from highest to lowest. Drain all pipes through low-point drain valves.
Consider adding RV antifreeze to drain traps. For year-round cabins, use a combination of strategies. Bury pipes below the frost line, wrap exposed pipes with foam insulation, and install self-regulating heat tape on vulnerable sections.
Insulate the tank itself with rigid foam panels. Underground tanks rarely need extra heating. Above-ground tanks may need tank heaters controlled by thermostats during extreme cold.
Do I need to filter or purify water stored in my tank?
Filtration needs depend on your water source. The tank itself is safe, but water entering it may contain contaminants. For well water from safe sources, basic sediment filtration (20-50 micron) protects plumbing and improves water clarity.
Rainwater collection systems need more extensive treatment. This includes sediment filters, carbon filters for taste and odor, and UV purification to eliminate bacteria and viruses. Surface water sources also need similar treatment.
Even with treated municipal water, sediment filtration prevents particles from damaging fixtures. Install filters in stages: primary sediment filter near the tank outlet, secondary finer filter before entering the cabin, and point-of-use filters at kitchen sinks for drinking water.
How often should I clean my water storage tank?
Plan to inspect and clean your water tank at least once a year. If you notice water quality issues, clean it more often. Clean the tank when it’s naturally low or can be drained without inconvenience.
The process involves draining the tank completely, scrubbing interior walls with a brush and mild detergent, rinsing thoroughly multiple times, inspecting for damage, and disinfecting with diluted bleach solution before refilling. Sediment naturally accumulates in tank bottoms over time and should be removed during annual cleaning.
Also, replace sediment filter cartridges every 3-6 months, carbon filters every 6-12 months, and UV bulbs annually even if they’re glowing, as UV output decreases over time.
What size pipe should I use for water lines between tank and cabin?
For most cabin installations, 1-inch or 1.5-inch diameter pipe provides enough flow for household needs. The right size depends on distance, elevation change, and flow requirements. For gravity-fed systems, larger pipe diameter reduces friction losses over distance.
Use 1.5-inch pipe for runs longer than 100 feet or when elevation difference is minimal. For pumped systems with good pressure, 1-inch pipe typically works well for runs under 100 feet. Use PVC pipe (Schedule 40) for above-ground or protected installations, or HDPE (high-density polyethylene) pipe for buried lines due to its flexibility and superior freeze resistance.
Always bury water lines at least 18-24 inches deep, or below your local frost line in cold climates, and maintain a slight downward slope toward drain points for winterizing.
How much does it cost to install a water tank system for a cabin?
Total costs vary based on tank size, material, installation complexity, and whether you’re doing it yourself or hiring professionals. For a DIY installation with a mid-sized setup: a 500-gallon polyethylene tank costs $400-800, plumbing materials and fittings run $200-400, foundation materials (concrete or compacted gravel) cost $100-300, filtration equipment ranges from $200-600, and tools you might need to purchase add $100-200.
A basic DIY system typically totals $1,000-2,500. Adding a pump system increases costs by $500-1,500. Professional installation adds $1,000-3,000 in labor depending on complexity. Underground installation with excavation can add $2,000-5,000. Larger tanks, premium materials like stainless steel, or complete treatment systems can push total costs to $5,000-10,000 or more for complete turnkey installations.
Do I need a permit to install a water tank at my cabin?
Permit requirements vary significantly by location, so check with your local building department, county health department, and planning office before starting installation. Many rural and unincorporated areas have minimal regulations for private water storage, but some areas require permits for plumbing work, electrical installations, or structural platforms for elevated tanks.
If you’re collecting rainwater, a few states and municipalities have restrictions or requirements you’ll need to follow. Underground tank installations more commonly require permits due to excavation concerns and possible impacts on property drainage. Even if permits aren’t required, it’s wise to verify your installation meets local building codes for safety and to avoid issues when eventually selling the property.
What should I do if my water tank develops algae growth?
Algae growth occurs when light, water, and nutrients combine. While usually not harmful, algae create unpleasant taste, odor, and appearance. For existing algae problems, drain the tank completely, scrub all interior surfaces thoroughly with a brush and mild detergent, rinse multiple times, then disinfect with a chlorine solution (1 gallon of unscented household bleach per 1,000 gallons of water).
Let it stand for 24 hours, drain, and rinse again before refilling. To prevent future algae growth: choose opaque or dark-colored tanks that block light; keep lids sealed and access points covered; position tanks away from direct sunlight when possible; maintain tank screens to prevent organic matter entry; ensure good water circulation; and consider periodic disinfection treatments. Some cabin owners install UV sterilization systems that prevent algae growth while purifying water.
Can I install a water tank system myself, or should I hire a professional?
Most cabin owners with basic DIY skills and appropriate tools can successfully install a water tank system themselves, for straightforward above-ground installations with smaller tanks (under 750 gallons). The project involves manageable tasks like site preparation, positioning the tank, connecting fittings, and running pipes—nothing beyond typical homeowner capabilities if you follow instructions carefully.
Consider hiring professionals for: excavation and underground tank installation; electrical work for pump systems (unless you’re a qualified electrician); complex plumbing connections to existing systems; engineered elevated platforms for gravity-fed systems; or situations requiring equipment like backhoes or cranes. Many cabin owners take a hybrid approach—doing site prep and basic installation themselves while hiring professionals for specialized aspects like trenching, pump installation, or final connections to cabin plumbing.
How long do water storage tanks typically last?
Lifespan depends on material, installation quality, climate, and maintenance. Polyethylene plastic tanks typically last 10-20 years, with UV-resistant models lasting longer, specially when shaded or partially buried. Exposure to direct sunlight accelerates degradation, while protected installations extend life significantly.
Fiberglass tanks often last 20-30 years with proper care. Steel tanks vary widely—untreated steel may rust through in 10-15 years in humid climates, while properly coated or stainless steel tanks can last 30-50 years or more. Concrete tanks are the longest-lasting option, often functioning reliably for 50+ years when properly constructed. Underground installation generally extends tank life by protecting from UV exposure and temperature extremes.
Regular maintenance—annual cleaning, prompt repair of minor damage, and protecting from physical stress—significantly increases longevity regardless of material.
,000-3,000 in labor depending on complexity. Underground installation with excavation can add ,000-5,000. Larger tanks, premium materials like stainless steel, or complete treatment systems can push total costs to ,000-10,000 or more for complete turnkey installations.
Do I need a permit to install a water tank at my cabin?
Permit requirements vary significantly by location, so check with your local building department, county health department, and planning office before starting installation. Many rural and unincorporated areas have minimal regulations for private water storage, but some areas require permits for plumbing work, electrical installations, or structural platforms for elevated tanks.
If you’re collecting rainwater, a few states and municipalities have restrictions or requirements you’ll need to follow. Underground tank installations more commonly require permits due to excavation concerns and possible impacts on property drainage. Even if permits aren’t required, it’s wise to verify your installation meets local building codes for safety and to avoid issues when eventually selling the property.
What should I do if my water tank develops algae growth?
Algae growth occurs when light, water, and nutrients combine. While usually not harmful, algae create unpleasant taste, odor, and appearance. For existing algae problems, drain the tank completely, scrub all interior surfaces thoroughly with a brush and mild detergent, rinse multiple times, then disinfect with a chlorine solution (1 gallon of unscented household bleach per 1,000 gallons of water).
Let it stand for 24 hours, drain, and rinse again before refilling. To prevent future algae growth: choose opaque or dark-colored tanks that block light; keep lids sealed and access points covered; position tanks away from direct sunlight when possible; maintain tank screens to prevent organic matter entry; ensure good water circulation; and consider periodic disinfection treatments. Some cabin owners install UV sterilization systems that prevent algae growth while purifying water.
Can I install a water tank system myself, or should I hire a professional?
Most cabin owners with basic DIY skills and appropriate tools can successfully install a water tank system themselves, for straightforward above-ground installations with smaller tanks (under 750 gallons). The project involves manageable tasks like site preparation, positioning the tank, connecting fittings, and running pipes—nothing beyond typical homeowner capabilities if you follow instructions carefully.
Consider hiring professionals for: excavation and underground tank installation; electrical work for pump systems (unless you’re a qualified electrician); complex plumbing connections to existing systems; engineered elevated platforms for gravity-fed systems; or situations requiring equipment like backhoes or cranes. Many cabin owners take a hybrid approach—doing site prep and basic installation themselves while hiring professionals for specialized aspects like trenching, pump installation, or final connections to cabin plumbing.
How long do water storage tanks typically last?
Lifespan depends on material, installation quality, climate, and maintenance. Polyethylene plastic tanks typically last 10-20 years, with UV-resistant models lasting longer, specially when shaded or partially buried. Exposure to direct sunlight accelerates degradation, while protected installations extend life significantly.
Fiberglass tanks often last 20-30 years with proper care. Steel tanks vary widely—untreated steel may rust through in 10-15 years in humid climates, while properly coated or stainless steel tanks can last 30-50 years or more. Concrete tanks are the longest-lasting option, often functioning reliably for 50+ years when properly constructed. Underground installation generally extends tank life by protecting from UV exposure and temperature extremes.
Regular maintenance—annual cleaning, prompt repair of minor damage, and protecting from physical stress—significantly increases longevity regardless of material.
FAQ
How much water storage capacity do I need for my cabin?
The amount of water you need depends on several things. These include how many people will be there, how long they’ll stay, and what activities they’ll do. A good rule of thumb is to calculate your daily water use.
For example, showers use about 2.5 gallons per minute. Toilets use 1.6 gallons per flush. Cooking and drinking water needs are about 2-3 gallons per person daily. Then, multiply this by 2-3 days to have enough for emergencies.
For a weekend cabin with 2-4 people, a 250-500 gallon tank is usually enough. But, if you live there full-time or have a big family, you might need 1,000-1,500 gallons or more. Always get a tank that’s a bit bigger than you think you’ll need.
What’s the best material for a cabin water tank?
Polyethylene plastic tanks are the most popular choice. They’re affordable, durable, and easy to install. These tanks are food-grade safe and resist corrosion.
They’re also light enough to move with a pickup truck. You can install them above or below ground. Darker colored tanks last longer because they resist UV damage and prevent algae growth.
For extra durability in extreme temperatures, fiberglass tanks are a good option. Steel and stainless steel tanks are best for large capacities. Concrete tanks are great for underground installations that need to last a long time.
Can I create water pressure without electricity using gravity?
Yes, gravity-fed systems are a great choice for off-grid cabins. By placing your tank higher than your cabin, gravity creates pressure. This pressure is about 0.43 PSI for each foot of elevation difference.
For comfortable water pressure of 30-50 PSI, you’ll need the tank 70-115 feet above your cabin. You can place the tank on a hillside, elevated platform, or tower. Gravity-fed systems are reliable because they don’t need pumps, electricity, or moving parts.
If you can’t get the tank high enough, you’ll need to install a pump system with a pressure tank.
How do I protect my water tank and pipes from freezing in winter?
For seasonal cabins, draining the system completely is the best way to protect it from freezing. Shut off the water source and open all faucets from highest to lowest. Drain all pipes through low-point drain valves.
Consider adding RV antifreeze to drain traps. For year-round cabins, use a combination of strategies. Bury pipes below the frost line, wrap exposed pipes with foam insulation, and install self-regulating heat tape on vulnerable sections.
Insulate the tank itself with rigid foam panels. Underground tanks rarely need extra heating. Above-ground tanks may need tank heaters controlled by thermostats during extreme cold.
Do I need to filter or purify water stored in my tank?
Filtration needs depend on your water source. The tank itself is safe, but water entering it may contain contaminants. For well water from safe sources, basic sediment filtration (20-50 micron) protects plumbing and improves water clarity.
Rainwater collection systems need more extensive treatment. This includes sediment filters, carbon filters for taste and odor, and UV purification to eliminate bacteria and viruses. Surface water sources also need similar treatment.
Even with treated municipal water, sediment filtration prevents particles from damaging fixtures. Install filters in stages: primary sediment filter near the tank outlet, secondary finer filter before entering the cabin, and point-of-use filters at kitchen sinks for drinking water.
How often should I clean my water storage tank?
Plan to inspect and clean your water tank at least once a year. If you notice water quality issues, clean it more often. Clean the tank when it’s naturally low or can be drained without inconvenience.
The process involves draining the tank completely, scrubbing interior walls with a brush and mild detergent, rinsing thoroughly multiple times, inspecting for damage, and disinfecting with diluted bleach solution before refilling. Sediment naturally accumulates in tank bottoms over time and should be removed during annual cleaning.
Also, replace sediment filter cartridges every 3-6 months, carbon filters every 6-12 months, and UV bulbs annually even if they’re glowing, as UV output decreases over time.
What size pipe should I use for water lines between tank and cabin?
For most cabin installations, 1-inch or 1.5-inch diameter pipe provides enough flow for household needs. The right size depends on distance, elevation change, and flow requirements. For gravity-fed systems, larger pipe diameter reduces friction losses over distance.
Use 1.5-inch pipe for runs longer than 100 feet or when elevation difference is minimal. For pumped systems with good pressure, 1-inch pipe typically works well for runs under 100 feet. Use PVC pipe (Schedule 40) for above-ground or protected installations, or HDPE (high-density polyethylene) pipe for buried lines due to its flexibility and superior freeze resistance.
Always bury water lines at least 18-24 inches deep, or below your local frost line in cold climates, and maintain a slight downward slope toward drain points for winterizing.
How much does it cost to install a water tank system for a cabin?
Total costs vary based on tank size, material, installation complexity, and whether you’re doing it yourself or hiring professionals. For a DIY installation with a mid-sized setup: a 500-gallon polyethylene tank costs 0-800, plumbing materials and fittings run 0-400, foundation materials (concrete or compacted gravel) cost 0-300, filtration equipment ranges from 0-600, and tools you might need to purchase add 0-200.
A basic DIY system typically totals
FAQ
How much water storage capacity do I need for my cabin?
The amount of water you need depends on several things. These include how many people will be there, how long they’ll stay, and what activities they’ll do. A good rule of thumb is to calculate your daily water use.
For example, showers use about 2.5 gallons per minute. Toilets use 1.6 gallons per flush. Cooking and drinking water needs are about 2-3 gallons per person daily. Then, multiply this by 2-3 days to have enough for emergencies.
For a weekend cabin with 2-4 people, a 250-500 gallon tank is usually enough. But, if you live there full-time or have a big family, you might need 1,000-1,500 gallons or more. Always get a tank that’s a bit bigger than you think you’ll need.
What’s the best material for a cabin water tank?
Polyethylene plastic tanks are the most popular choice. They’re affordable, durable, and easy to install. These tanks are food-grade safe and resist corrosion.
They’re also light enough to move with a pickup truck. You can install them above or below ground. Darker colored tanks last longer because they resist UV damage and prevent algae growth.
For extra durability in extreme temperatures, fiberglass tanks are a good option. Steel and stainless steel tanks are best for large capacities. Concrete tanks are great for underground installations that need to last a long time.
Can I create water pressure without electricity using gravity?
Yes, gravity-fed systems are a great choice for off-grid cabins. By placing your tank higher than your cabin, gravity creates pressure. This pressure is about 0.43 PSI for each foot of elevation difference.
For comfortable water pressure of 30-50 PSI, you’ll need the tank 70-115 feet above your cabin. You can place the tank on a hillside, elevated platform, or tower. Gravity-fed systems are reliable because they don’t need pumps, electricity, or moving parts.
If you can’t get the tank high enough, you’ll need to install a pump system with a pressure tank.
How do I protect my water tank and pipes from freezing in winter?
For seasonal cabins, draining the system completely is the best way to protect it from freezing. Shut off the water source and open all faucets from highest to lowest. Drain all pipes through low-point drain valves.
Consider adding RV antifreeze to drain traps. For year-round cabins, use a combination of strategies. Bury pipes below the frost line, wrap exposed pipes with foam insulation, and install self-regulating heat tape on vulnerable sections.
Insulate the tank itself with rigid foam panels. Underground tanks rarely need extra heating. Above-ground tanks may need tank heaters controlled by thermostats during extreme cold.
Do I need to filter or purify water stored in my tank?
Filtration needs depend on your water source. The tank itself is safe, but water entering it may contain contaminants. For well water from safe sources, basic sediment filtration (20-50 micron) protects plumbing and improves water clarity.
Rainwater collection systems need more extensive treatment. This includes sediment filters, carbon filters for taste and odor, and UV purification to eliminate bacteria and viruses. Surface water sources also need similar treatment.
Even with treated municipal water, sediment filtration prevents particles from damaging fixtures. Install filters in stages: primary sediment filter near the tank outlet, secondary finer filter before entering the cabin, and point-of-use filters at kitchen sinks for drinking water.
How often should I clean my water storage tank?
Plan to inspect and clean your water tank at least once a year. If you notice water quality issues, clean it more often. Clean the tank when it’s naturally low or can be drained without inconvenience.
The process involves draining the tank completely, scrubbing interior walls with a brush and mild detergent, rinsing thoroughly multiple times, inspecting for damage, and disinfecting with diluted bleach solution before refilling. Sediment naturally accumulates in tank bottoms over time and should be removed during annual cleaning.
Also, replace sediment filter cartridges every 3-6 months, carbon filters every 6-12 months, and UV bulbs annually even if they’re glowing, as UV output decreases over time.
What size pipe should I use for water lines between tank and cabin?
For most cabin installations, 1-inch or 1.5-inch diameter pipe provides enough flow for household needs. The right size depends on distance, elevation change, and flow requirements. For gravity-fed systems, larger pipe diameter reduces friction losses over distance.
Use 1.5-inch pipe for runs longer than 100 feet or when elevation difference is minimal. For pumped systems with good pressure, 1-inch pipe typically works well for runs under 100 feet. Use PVC pipe (Schedule 40) for above-ground or protected installations, or HDPE (high-density polyethylene) pipe for buried lines due to its flexibility and superior freeze resistance.
Always bury water lines at least 18-24 inches deep, or below your local frost line in cold climates, and maintain a slight downward slope toward drain points for winterizing.
How much does it cost to install a water tank system for a cabin?
Total costs vary based on tank size, material, installation complexity, and whether you’re doing it yourself or hiring professionals. For a DIY installation with a mid-sized setup: a 500-gallon polyethylene tank costs $400-800, plumbing materials and fittings run $200-400, foundation materials (concrete or compacted gravel) cost $100-300, filtration equipment ranges from $200-600, and tools you might need to purchase add $100-200.
A basic DIY system typically totals $1,000-2,500. Adding a pump system increases costs by $500-1,500. Professional installation adds $1,000-3,000 in labor depending on complexity. Underground installation with excavation can add $2,000-5,000. Larger tanks, premium materials like stainless steel, or complete treatment systems can push total costs to $5,000-10,000 or more for complete turnkey installations.
Do I need a permit to install a water tank at my cabin?
Permit requirements vary significantly by location, so check with your local building department, county health department, and planning office before starting installation. Many rural and unincorporated areas have minimal regulations for private water storage, but some areas require permits for plumbing work, electrical installations, or structural platforms for elevated tanks.
If you’re collecting rainwater, a few states and municipalities have restrictions or requirements you’ll need to follow. Underground tank installations more commonly require permits due to excavation concerns and possible impacts on property drainage. Even if permits aren’t required, it’s wise to verify your installation meets local building codes for safety and to avoid issues when eventually selling the property.
What should I do if my water tank develops algae growth?
Algae growth occurs when light, water, and nutrients combine. While usually not harmful, algae create unpleasant taste, odor, and appearance. For existing algae problems, drain the tank completely, scrub all interior surfaces thoroughly with a brush and mild detergent, rinse multiple times, then disinfect with a chlorine solution (1 gallon of unscented household bleach per 1,000 gallons of water).
Let it stand for 24 hours, drain, and rinse again before refilling. To prevent future algae growth: choose opaque or dark-colored tanks that block light; keep lids sealed and access points covered; position tanks away from direct sunlight when possible; maintain tank screens to prevent organic matter entry; ensure good water circulation; and consider periodic disinfection treatments. Some cabin owners install UV sterilization systems that prevent algae growth while purifying water.
Can I install a water tank system myself, or should I hire a professional?
Most cabin owners with basic DIY skills and appropriate tools can successfully install a water tank system themselves, for straightforward above-ground installations with smaller tanks (under 750 gallons). The project involves manageable tasks like site preparation, positioning the tank, connecting fittings, and running pipes—nothing beyond typical homeowner capabilities if you follow instructions carefully.
Consider hiring professionals for: excavation and underground tank installation; electrical work for pump systems (unless you’re a qualified electrician); complex plumbing connections to existing systems; engineered elevated platforms for gravity-fed systems; or situations requiring equipment like backhoes or cranes. Many cabin owners take a hybrid approach—doing site prep and basic installation themselves while hiring professionals for specialized aspects like trenching, pump installation, or final connections to cabin plumbing.
How long do water storage tanks typically last?
Lifespan depends on material, installation quality, climate, and maintenance. Polyethylene plastic tanks typically last 10-20 years, with UV-resistant models lasting longer, specially when shaded or partially buried. Exposure to direct sunlight accelerates degradation, while protected installations extend life significantly.
Fiberglass tanks often last 20-30 years with proper care. Steel tanks vary widely—untreated steel may rust through in 10-15 years in humid climates, while properly coated or stainless steel tanks can last 30-50 years or more. Concrete tanks are the longest-lasting option, often functioning reliably for 50+ years when properly constructed. Underground installation generally extends tank life by protecting from UV exposure and temperature extremes.
Regular maintenance—annual cleaning, prompt repair of minor damage, and protecting from physical stress—significantly increases longevity regardless of material.
,000-2,500. Adding a pump system increases costs by 0-1,500. Professional installation adds
FAQ
How much water storage capacity do I need for my cabin?
The amount of water you need depends on several things. These include how many people will be there, how long they’ll stay, and what activities they’ll do. A good rule of thumb is to calculate your daily water use.
For example, showers use about 2.5 gallons per minute. Toilets use 1.6 gallons per flush. Cooking and drinking water needs are about 2-3 gallons per person daily. Then, multiply this by 2-3 days to have enough for emergencies.
For a weekend cabin with 2-4 people, a 250-500 gallon tank is usually enough. But, if you live there full-time or have a big family, you might need 1,000-1,500 gallons or more. Always get a tank that’s a bit bigger than you think you’ll need.
What’s the best material for a cabin water tank?
Polyethylene plastic tanks are the most popular choice. They’re affordable, durable, and easy to install. These tanks are food-grade safe and resist corrosion.
They’re also light enough to move with a pickup truck. You can install them above or below ground. Darker colored tanks last longer because they resist UV damage and prevent algae growth.
For extra durability in extreme temperatures, fiberglass tanks are a good option. Steel and stainless steel tanks are best for large capacities. Concrete tanks are great for underground installations that need to last a long time.
Can I create water pressure without electricity using gravity?
Yes, gravity-fed systems are a great choice for off-grid cabins. By placing your tank higher than your cabin, gravity creates pressure. This pressure is about 0.43 PSI for each foot of elevation difference.
For comfortable water pressure of 30-50 PSI, you’ll need the tank 70-115 feet above your cabin. You can place the tank on a hillside, elevated platform, or tower. Gravity-fed systems are reliable because they don’t need pumps, electricity, or moving parts.
If you can’t get the tank high enough, you’ll need to install a pump system with a pressure tank.
How do I protect my water tank and pipes from freezing in winter?
For seasonal cabins, draining the system completely is the best way to protect it from freezing. Shut off the water source and open all faucets from highest to lowest. Drain all pipes through low-point drain valves.
Consider adding RV antifreeze to drain traps. For year-round cabins, use a combination of strategies. Bury pipes below the frost line, wrap exposed pipes with foam insulation, and install self-regulating heat tape on vulnerable sections.
Insulate the tank itself with rigid foam panels. Underground tanks rarely need extra heating. Above-ground tanks may need tank heaters controlled by thermostats during extreme cold.
Do I need to filter or purify water stored in my tank?
Filtration needs depend on your water source. The tank itself is safe, but water entering it may contain contaminants. For well water from safe sources, basic sediment filtration (20-50 micron) protects plumbing and improves water clarity.
Rainwater collection systems need more extensive treatment. This includes sediment filters, carbon filters for taste and odor, and UV purification to eliminate bacteria and viruses. Surface water sources also need similar treatment.
Even with treated municipal water, sediment filtration prevents particles from damaging fixtures. Install filters in stages: primary sediment filter near the tank outlet, secondary finer filter before entering the cabin, and point-of-use filters at kitchen sinks for drinking water.
How often should I clean my water storage tank?
Plan to inspect and clean your water tank at least once a year. If you notice water quality issues, clean it more often. Clean the tank when it’s naturally low or can be drained without inconvenience.
The process involves draining the tank completely, scrubbing interior walls with a brush and mild detergent, rinsing thoroughly multiple times, inspecting for damage, and disinfecting with diluted bleach solution before refilling. Sediment naturally accumulates in tank bottoms over time and should be removed during annual cleaning.
Also, replace sediment filter cartridges every 3-6 months, carbon filters every 6-12 months, and UV bulbs annually even if they’re glowing, as UV output decreases over time.
What size pipe should I use for water lines between tank and cabin?
For most cabin installations, 1-inch or 1.5-inch diameter pipe provides enough flow for household needs. The right size depends on distance, elevation change, and flow requirements. For gravity-fed systems, larger pipe diameter reduces friction losses over distance.
Use 1.5-inch pipe for runs longer than 100 feet or when elevation difference is minimal. For pumped systems with good pressure, 1-inch pipe typically works well for runs under 100 feet. Use PVC pipe (Schedule 40) for above-ground or protected installations, or HDPE (high-density polyethylene) pipe for buried lines due to its flexibility and superior freeze resistance.
Always bury water lines at least 18-24 inches deep, or below your local frost line in cold climates, and maintain a slight downward slope toward drain points for winterizing.
How much does it cost to install a water tank system for a cabin?
Total costs vary based on tank size, material, installation complexity, and whether you’re doing it yourself or hiring professionals. For a DIY installation with a mid-sized setup: a 500-gallon polyethylene tank costs $400-800, plumbing materials and fittings run $200-400, foundation materials (concrete or compacted gravel) cost $100-300, filtration equipment ranges from $200-600, and tools you might need to purchase add $100-200.
A basic DIY system typically totals $1,000-2,500. Adding a pump system increases costs by $500-1,500. Professional installation adds $1,000-3,000 in labor depending on complexity. Underground installation with excavation can add $2,000-5,000. Larger tanks, premium materials like stainless steel, or complete treatment systems can push total costs to $5,000-10,000 or more for complete turnkey installations.
Do I need a permit to install a water tank at my cabin?
Permit requirements vary significantly by location, so check with your local building department, county health department, and planning office before starting installation. Many rural and unincorporated areas have minimal regulations for private water storage, but some areas require permits for plumbing work, electrical installations, or structural platforms for elevated tanks.
If you’re collecting rainwater, a few states and municipalities have restrictions or requirements you’ll need to follow. Underground tank installations more commonly require permits due to excavation concerns and possible impacts on property drainage. Even if permits aren’t required, it’s wise to verify your installation meets local building codes for safety and to avoid issues when eventually selling the property.
What should I do if my water tank develops algae growth?
Algae growth occurs when light, water, and nutrients combine. While usually not harmful, algae create unpleasant taste, odor, and appearance. For existing algae problems, drain the tank completely, scrub all interior surfaces thoroughly with a brush and mild detergent, rinse multiple times, then disinfect with a chlorine solution (1 gallon of unscented household bleach per 1,000 gallons of water).
Let it stand for 24 hours, drain, and rinse again before refilling. To prevent future algae growth: choose opaque or dark-colored tanks that block light; keep lids sealed and access points covered; position tanks away from direct sunlight when possible; maintain tank screens to prevent organic matter entry; ensure good water circulation; and consider periodic disinfection treatments. Some cabin owners install UV sterilization systems that prevent algae growth while purifying water.
Can I install a water tank system myself, or should I hire a professional?
Most cabin owners with basic DIY skills and appropriate tools can successfully install a water tank system themselves, for straightforward above-ground installations with smaller tanks (under 750 gallons). The project involves manageable tasks like site preparation, positioning the tank, connecting fittings, and running pipes—nothing beyond typical homeowner capabilities if you follow instructions carefully.
Consider hiring professionals for: excavation and underground tank installation; electrical work for pump systems (unless you’re a qualified electrician); complex plumbing connections to existing systems; engineered elevated platforms for gravity-fed systems; or situations requiring equipment like backhoes or cranes. Many cabin owners take a hybrid approach—doing site prep and basic installation themselves while hiring professionals for specialized aspects like trenching, pump installation, or final connections to cabin plumbing.
How long do water storage tanks typically last?
Lifespan depends on material, installation quality, climate, and maintenance. Polyethylene plastic tanks typically last 10-20 years, with UV-resistant models lasting longer, specially when shaded or partially buried. Exposure to direct sunlight accelerates degradation, while protected installations extend life significantly.
Fiberglass tanks often last 20-30 years with proper care. Steel tanks vary widely—untreated steel may rust through in 10-15 years in humid climates, while properly coated or stainless steel tanks can last 30-50 years or more. Concrete tanks are the longest-lasting option, often functioning reliably for 50+ years when properly constructed. Underground installation generally extends tank life by protecting from UV exposure and temperature extremes.
Regular maintenance—annual cleaning, prompt repair of minor damage, and protecting from physical stress—significantly increases longevity regardless of material.
,000-3,000 in labor depending on complexity. Underground installation with excavation can add ,000-5,000. Larger tanks, premium materials like stainless steel, or complete treatment systems can push total costs to ,000-10,000 or more for complete turnkey installations.
Do I need a permit to install a water tank at my cabin?
Permit requirements vary significantly by location, so check with your local building department, county health department, and planning office before starting installation. Many rural and unincorporated areas have minimal regulations for private water storage, but some areas require permits for plumbing work, electrical installations, or structural platforms for elevated tanks.
If you’re collecting rainwater, a few states and municipalities have restrictions or requirements you’ll need to follow. Underground tank installations more commonly require permits due to excavation concerns and possible impacts on property drainage. Even if permits aren’t required, it’s wise to verify your installation meets local building codes for safety and to avoid issues when eventually selling the property.
What should I do if my water tank develops algae growth?
Algae growth occurs when light, water, and nutrients combine. While usually not harmful, algae create unpleasant taste, odor, and appearance. For existing algae problems, drain the tank completely, scrub all interior surfaces thoroughly with a brush and mild detergent, rinse multiple times, then disinfect with a chlorine solution (1 gallon of unscented household bleach per 1,000 gallons of water).
Let it stand for 24 hours, drain, and rinse again before refilling. To prevent future algae growth: choose opaque or dark-colored tanks that block light; keep lids sealed and access points covered; position tanks away from direct sunlight when possible; maintain tank screens to prevent organic matter entry; ensure good water circulation; and consider periodic disinfection treatments. Some cabin owners install UV sterilization systems that prevent algae growth while purifying water.
Can I install a water tank system myself, or should I hire a professional?
Most cabin owners with basic DIY skills and appropriate tools can successfully install a water tank system themselves, for straightforward above-ground installations with smaller tanks (under 750 gallons). The project involves manageable tasks like site preparation, positioning the tank, connecting fittings, and running pipes—nothing beyond typical homeowner capabilities if you follow instructions carefully.
Consider hiring professionals for: excavation and underground tank installation; electrical work for pump systems (unless you’re a qualified electrician); complex plumbing connections to existing systems; engineered elevated platforms for gravity-fed systems; or situations requiring equipment like backhoes or cranes. Many cabin owners take a hybrid approach—doing site prep and basic installation themselves while hiring professionals for specialized aspects like trenching, pump installation, or final connections to cabin plumbing.
How long do water storage tanks typically last?
Lifespan depends on material, installation quality, climate, and maintenance. Polyethylene plastic tanks typically last 10-20 years, with UV-resistant models lasting longer, specially when shaded or partially buried. Exposure to direct sunlight accelerates degradation, while protected installations extend life significantly.
Fiberglass tanks often last 20-30 years with proper care. Steel tanks vary widely—untreated steel may rust through in 10-15 years in humid climates, while properly coated or stainless steel tanks can last 30-50 years or more. Concrete tanks are the longest-lasting option, often functioning reliably for 50+ years when properly constructed. Underground installation generally extends tank life by protecting from UV exposure and temperature extremes.
Regular maintenance—annual cleaning, prompt repair of minor damage, and protecting from physical stress—significantly increases longevity regardless of material.


