Over 20 million Americans face dangerously loud environments every day. Noise pollution harms your health, focus, and well-being. A quiet cabin retreat offers a peaceful escape from this noise.
Building or renovating a cabin can make it a peaceful place. This guide will teach you about cabin noise reduction. You’ll learn about materials, acoustic principles, and installation techniques.
This guide covers how sound travels and DIY vs. professional help. You’ll learn about materials, installation, and maintenance. Making your peaceful cabin getaway is easier than you think. The benefits to your life make it all worth it.
Why Soundproofing Your Cabin Matters for Peace and Relaxation
The dream of a quiet cabin retreat often clashes with reality. Unexpected noise from many sources can ruin your fun. Fixing cabin noise problems is key to making your cabin a true sanctuary.
Many cabin owners find out too late about acoustic challenges. But, these issues can be fixed with the right materials and approach.
Noise Sources That Disrupt Your Cabin Experience
Cabins face unique sound challenges. Their natural settings and construction methods make them vulnerable to noise.
Outdoor noise disturbances are a big problem. Sounds from wildlife, like birds and coyotes, can be loud. Weather events like rain and wind also make noise.
Living near neighbors adds to the noise. You might hear conversations, TV, road traffic, and barking dogs.
- Conversations and television noise from adjacent properties
- Road traffic and loud vehicle engines passing nearby
- Barking dogs and other pets from surrounding cabins
- Generators and power equipment during peak usage times
Interior sounds also disrupt peace. Footsteps echo, doors barely block sound, and plumbing noises travel.
Thinner walls and less insulation in cabins make things worse. Open designs also let sound spread easily.
What You Gain from Effective Sound Control
Good soundproofing does more than just reduce noise. It improves cabin relaxation and function in many ways.
Better sleep quality is a big win. Soundproofing blocks out outdoor and interior noises, helping you sleep better.
Privacy also gets a boost. You can watch movies without disturbing others. Conversations stay private, even with guests nearby.
For remote workers, sound control is essential. It makes video calls and work sessions distraction-free.
Soundproofing also adds value to your cabin. It makes your cabin more attractive to buyers and renters, increasing its worth.
Most importantly, soundproofing lets you enjoy your cabin’s peace. It’s a real escape from stress, making each visit more enjoyable.
Improving your cabin’s sound quality is possible, no matter its current state. Even small changes can make a big difference, turning your cabin into the quiet retreat you dreamed of.
Understanding How Sound Travels in Cabin Structures
Learning how sound moves through walls, floors, and ceilings is key to smart soundproofing. Knowing how noise travels helps you focus your efforts where they matter most. This saves time and money when improving your cabin.
Sound acts differently based on its source and the materials it hits. Your cabin’s build affects which sounds you hear most. By understanding these patterns, you can tailor your soundproofing to your needs.
Two Main Types of Noise
Airborne noise travels through the air to your ears. This includes conversations, TV sounds, music, and outdoor noises. These sounds easily pass through thin walls and gaps in your cabin.
When airborne noise hits a surface, it makes the material vibrate. These vibrations then carry the sound to the other side. Thicker walls vibrate less, making things quieter.
Impact noise comes from objects touching your cabin’s structure. Footsteps, door slamming, and dropping items all create this type of noise. Unlike airborne noise, impact noise starts as vibrations within the materials.

These vibrations move well through solid connections between floors, walls, and ceilings. That’s why you might hear footsteps from above, even if walls block conversation. Each noise type needs its own soundproofing strategy.
Here’s what makes each type challenging:
- Airborne sounds slip through any opening, making sealed gaps essential
- Impact vibrations spread through structural connections that are hard to break
- Windows and doors typically allow both types to pass through easily
- Low-frequency sounds like bass music penetrate better than high-frequency noises
Vulnerable Areas in Your Cabin
Most cabins have weak points where sound travels easily. Knowing these areas helps you focus your soundproofing efforts. Traditional building often sacrifices sound quality for cost or looks.
Thin walls with little insulation are common weak spots. Many cabins have wall cavities with no sound-absorbing material. Single-pane windows offer little noise protection, acting like open holes.
Hollow-core doors are another major weak point. These doors are mostly air, letting sound pass through easily. Gaps around door and window frames also let noise in.
Common problem areas include:
- Electrical outlets and switch plates that create holes straight through walls
- HVAC vents and ductwork that carry sound between rooms
- Joints where walls meet floors and ceilings
- Recessed lighting fixtures in ceilings
- Plumbing penetrations through floors and walls
Even small gaps around these features can greatly reduce your cabin’s sound quality. Air leaks equal sound leaks. Fixing these vulnerabilities is key to any soundproofing plan.
Making Sense of STC Numbers
STC ratings help compare how well materials block sound. The Sound Transmission Class system gives numbers to barriers. Higher numbers mean better soundproofing.
An STC rating shows how much noise a material reduces. For example, a wall with an STC of 50 makes loud speech barely audible. Most homes have walls with STC ratings between 33 and 45, allowing a lot of noise transfer.
Here’s what different STC levels mean in practical terms:
- STC 25: Normal speech easily understood through the barrier
- STC 35: Loud speech heard but not fully understood
- STC 45: Loud speech becomes a murmur; some privacy achieved
- STC 50: Loud sounds barely audible; good privacy
- STC 60+: Excellent soundproofing; most sounds blocked effectively
But STC ratings have limits. They work best for common noises like conversation and TV audio. They don’t handle low-frequency sounds well, like bass from music or traffic rumble.
Bass frequencies often get through barriers that block higher-pitched sounds. This is why you might hear your neighbor’s subwoofer clearly, even through walls that block their voices. When choosing materials, consider both STC performance and low-frequency transmission for full protection.
Understanding sound transmission basics helps you make informed choices. With this knowledge, you can assess your cabin’s needs and develop an effective soundproofing plan. This will give you real results.
Assessing Your Cabin’s Current Soundproofing Needs
This phase is like detective work. You’re finding out where sound gets in and out of your cabin. Before starting any soundproofing, a detailed sound assessment is key. It helps you know exactly what your cabin needs.
Spending a few hours now can save you money later. You’ll make a plan that focuses on the biggest noise problems. This way, every dollar you spend will help you enjoy more peace and quiet.
Pinpointing Where Unwanted Sound Originates
First, find out where noise comes from inside and outside your cabin. Outside, it might be from roads, neighbors, animals, or equipment. Inside, it could be footsteps, plumbing, appliances, or heating systems.
Make a noise map by spending time in each room at different times. Note what you hear and when. Use your phone or a notebook.
Walk around your cabin to find outside noise sources. Look for road traffic, neighbors, and equipment. This tells you which walls need more work.
Inside, listen for sounds moving between rooms and floors. Stand in quiet spots and listen for HVAC, water, and conversations. This helps you know which barriers to strengthen.
Finding Hidden Openings and Air Gaps
Sound follows air. Finding cabin air leaks shows where your sound barriers are weak. Even small gaps can hurt your soundproofing.
The smoke or incense test shows air movement. Light incense or use a smoke pen around suspected areas. Watch for smoke moving.
Common trouble spots include:
- Electrical outlets between rooms
- HVAC vents without sealing
- Gaps around doors and windows
- Window frames with old sealing
- Wall and floor junctions
- Light fixture holes in ceilings
Wet your hand and hold it near gaps. You’ll feel air moving as it cools your skin. This works well around windows and doors.
Check where walls meet floors and ceilings for sound travel. Look for gaps where drywall doesn’t reach the ceiling in closets or where partition walls meet exterior walls.
Measuring Your Existing Construction
Knowing your cabin’s wall and floor thickness helps choose soundproofing methods. Thicker walls offer more space for insulation.
Use a stud finder to find framing members. Then, measure the distance between them. Standard spacing is 16 or 24 inches.
For a full cabin check, you need to know what you’re working with. Use a stud finder to find framing members, then measure the distance between them. Standard spacing is 16 or 24 inches.
Non-destructive ways to assess include:
- Measuring outlet depth to guess wall thickness
- Looking at attic spaces for ceiling details
- Inspecting unfinished areas like closets or basements
- Tapping walls to hear if they’re hollow or solid
Removing outlet covers can show wall construction details. You can see insulation, cavity depth, and drywall layers.
For floors, measure from the finished floor to the ceiling below. This shows joist depth and underlayment options without raising the floor too much.
| Assessment Area | What to Check | Tools Needed | Priority Level |
|---|---|---|---|
| External Noise | Road traffic, neighbors, equipment, wildlife | Notebook, smartphone timer | High |
| Internal Noise | HVAC, plumbing, footsteps, appliances | Notepad, different times of day | High |
| Air Leaks | Outlets, windows, doors, ceiling fixtures | Incense stick, wet hand test | Critical |
| Wall Construction | Stud spacing, cavity depth, existing insulation | Stud finder, tape measure | Medium |
| Floor Structure | Joist depth, existing underlayment, subfloor type | Tape measure, access to below | Medium |
Keep all your findings with photos and measurements. This will be your project guide. It helps you buy the right materials and set realistic goals. The effort you put in now will lead to effective solutions for your noise problems.
Planning Your Soundproofing Project and Budget
Creating a soundproofing budget helps turn a big project into smaller steps. Before you start, knowing what your project needs helps you focus on the most important parts. This way, you avoid spending too much money on things that won’t help much.
Knowing where to spend your money wisely is key. Some areas of your cabin can block more noise for less money. Finding these spots helps you get the most bang for your buck.
Setting Realistic Expectations
It’s hard to get complete silence, but you can cut down a lot of noise. Knowing this helps you set goals that are achievable. This way, you won’t be disappointed.
Good soundproofing doesn’t come from just one thing. For example, acoustic foam alone won’t solve all your problems. Real results come from using many strategies together, like insulation, mass, and sealing.
With the right steps, you can cut noise levels by 50-80%. This means loud talks become soft whispers, and car sounds become barely noticeable. You can make your cabin quiet without building a fortress.
How long it takes to soundproof your cabin also matters. It usually takes a few weeks, depending on your cabin’s size and how much time you work on it. Breaking the project into parts keeps you going without getting too tired.
Cost Breakdown by Area
Knowing how much soundproofing costs in different areas helps you plan your budget better. Each part of your cabin needs different things, and knowing this helps avoid surprises.
| Cabin Area | Basic Approach | Mid-Range Solution | Premium Treatment |
|---|---|---|---|
| Walls (per sq ft) | $1.50 – $3.00 | $4.00 – $7.00 | $8.00 – $12.00 |
| Windows (per unit) | $50 – $150 | $300 – $800 | $1,000 – $2,500 |
| Doors (per unit) | $75 – $200 | $400 – $700 | $900 – $1,500 |
| Ceilings (per sq ft) | $2.00 – $4.00 | $5.00 – $8.00 | $9.00 – $15.00 |
Wall Soundproofing Costs
Wall treatments are the biggest part of most soundproofing projects. Basic wall soundproofing costs $1.50-$3.00 per square foot. This includes standard insulation and acoustic caulk.
Mid-range solutions cost $4.00-$7.00 per square foot. This includes better insulation and mass-loaded vinyl. These upgrades make a big difference.
Premium wall treatments cost $8.00-$12.00 per square foot. This includes double drywall and professional damping compounds. These are worth it for the best results.

Windows and doors are big weak spots in your cabin’s sound barrier. But, the cost to upgrade varies a lot. Basic window treatments like curtains and weatherstripping cost $50-$150 per window and work surprisingly well.
Window inserts are a middle option at $300-$800 per window. They’re easy to install and block a lot of noise. They’re perfect for seasonal cabins.
Full window replacements with double or triple-pane units are the most expensive option at $1,000-$2,500 per window. They need professional installation but are very effective.
Door upgrades also vary in cost. Simple fixes like door sweeps cost $75-$200 per door. Replacing doors with solid-core ones costs $400-$700. Acoustic doors cost $900-$1,500 but block the most noise.
DIY vs. Professional Installation Considerations
Doing it yourself can save a lot of money but requires knowing your limits. Some tasks are easy for anyone to do, while others need a pro.
Great DIY projects include:
- Installing door sweeps and weatherstripping
- Applying acoustic caulk and sealants
- Hanging heavy curtains and acoustic panels
- Adding insulation to accessible areas
- Installing carpet padding and underlayment
These tasks need basic tools and skills most people have. With clear instructions and patience, you can get professional results without the high cost.
Consider professional installation for:
- Installing resilient channels and sound clips
- Replacing windows and exterior doors
- Major wall reconstruction or drywall installation
- Spray foam insulation application
- Electrical work around outlets and switches
Professional installation ensures the job is done right and often comes with a warranty. This upfront cost helps avoid mistakes and ensures long-term quality.
Many people choose a mix of DIY and professional work. Do the easy tasks yourself and hire pros for the hard stuff. This way, you get the best of both worlds and make your budget go further.
You don’t have to do everything at once. Start with simple fixes like sealing gaps and adding door sweeps. These quick wins help right away while you save for bigger projects.
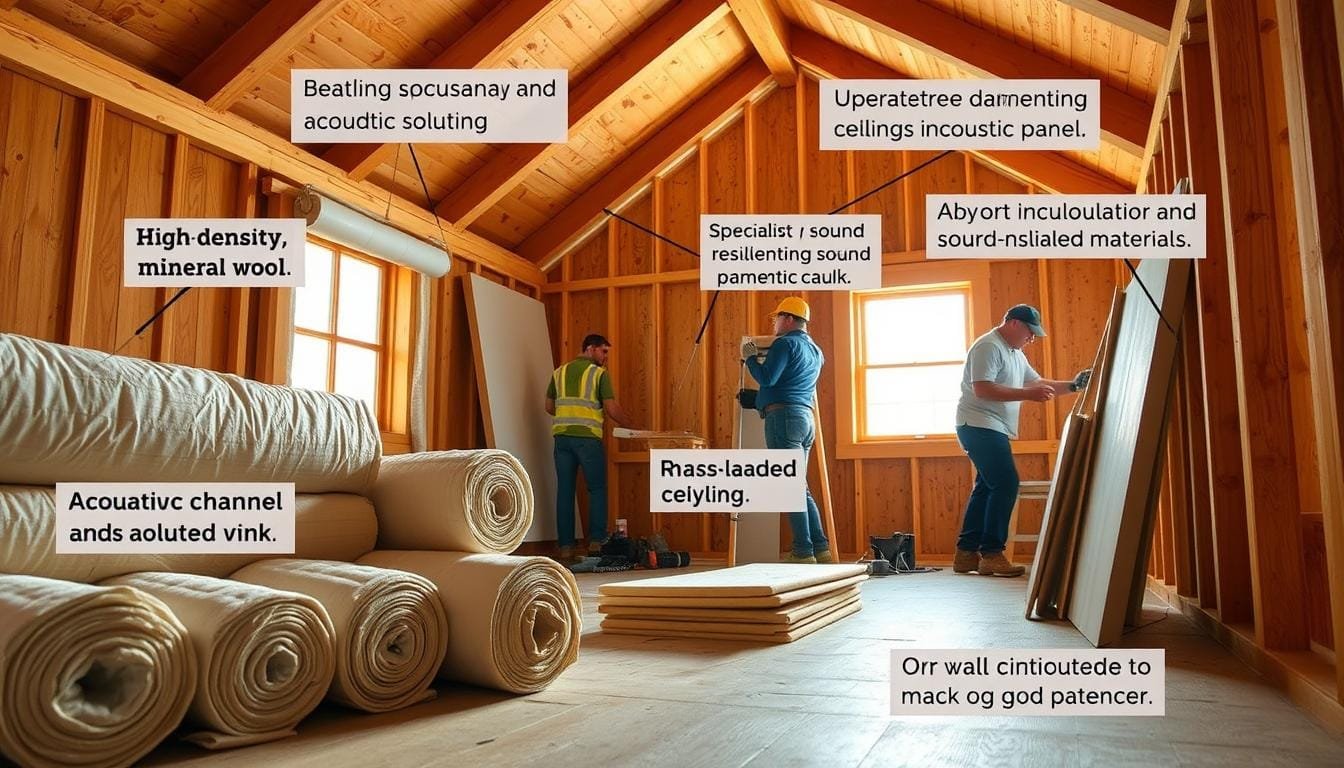
Essential Materials and Tools for Cabin Soundproofing
Starting your soundproofing journey means knowing which materials block noise well. You also need the right tools to install them. Having the right soundproofing materials makes the process smoother. You don’t need to buy everything at once.
Quality acoustic insulation is key for soundproofing. The materials you choose depend on your budget and the noise problems. You’ll work on walls, ceilings, or floors.
Comparing Popular Insulation Options
Fiberglass batts are the most affordable option. They provide good thermal and some acoustic insulation. You can find them in most hardware stores and they’re easy to install.
Mineral wool, like Rockwool, is better for sound absorption. It’s made from stone fibers and blocks noise well. It’s also fire-resistant and protects against moisture. It costs more but works better.
Spray foam insulation fills all gaps in your cabin’s structure. It creates an airtight seal to stop sound leaks. It’s great for sealing but often used with other materials.
| Material Type | Sound Absorption | Cost Level | Best Application | Installation Difficulty |
|---|---|---|---|---|
| Fiberglass Batts | Moderate | Budget-friendly | Wall cavities, attics | Easy (DIY-friendly) |
| Mineral Wool | Excellent | Mid to high range | All areas, special walls | Easy to moderate |
| Spray Foam | Good (via sealing) | Higher cost | Gaps, irregular spaces | Moderate (requires equipment) |
| Mass-Loaded Vinyl | Excellent blocking | Premium pricing | Walls, floors, ceilings | Moderate |
Specialized Sound-Blocking Materials
Mass-loaded vinyl is a top soundproofing material. It’s thin but blocks a lot of sound. It adds mass without taking up space.
You can put it on studs before adding drywall or between walls. It works on walls, floors, and ceilings. Measure each area to figure out how much you need.
Acoustic barriers are sheet materials designed to block sound. They use density and flexibility to dampen noise. Acoustic isolation membranes add extra protection against noise.
Bonding Compounds That Make the Difference
Green Glue is a game-changer for soundproofing. It’s a viscoelastic compound that turns sound into heat. It improves sound blocking without adding much thickness.
Applying Green Glue is simple. You spread it on one drywall sheet, then attach the second. It takes weeks to cure but works great. One tube covers about 16 square feet.
Acoustic sealant is important for keeping sound out. It’s flexible and doesn’t crack like regular caulk. Use it around electrical boxes and wall seams.
Look for acoustic sealant that won’t shrink or crack. It’s essential for keeping your soundproofing effective. You’ll need a lot, so stock up.
Equipment Checklist for Installation Success
Having the right tools makes your project safer and more efficient. Start with measuring and cutting tools. A stud finder helps find framing members.
For installation, you’ll need a caulk gun and a drill. A level ensures things are straight. Hand tools like hammers and pry bars are also necessary.
Safety equipment is a must. Wear safety glasses, a dust mask, and gloves. They protect you from particles and materials.
For big projects, consider renting specialized tools. A drywall lift makes ceiling work safer. An insulation blower speeds up attic work. Renting is affordable.
You don’t need everything at once. Buy materials and tools as you go. This saves money and keeps your cabin organized.
How to Soundproof a Cabin: Step-by-Step Wall Treatment
Ready to make your cabin walls quieter? This guide will help you turn ordinary walls into sound barriers. Walls are the biggest surface in any cabin, making them key for soundproofing.
This method works for new and old cabins. You’ll learn to tackle every layer, from studs to the surface. This ensures no sound can sneak through.
Step 1: Remove Existing Wall Coverings
To soundproof walls, you need to get to the studs. Start by removing drywall, paneling, or other finishes. Be careful not to damage materials you want to keep.
First, remove baseboards and trim. Use a utility knife to score along ceiling lines and corners. This helps avoid damage to other walls or ceilings.
Find studs with a stud finder before cutting drywall. Cut between studs, not over them. This protects the framing.
Safety Precautions and Preparation
Always wear protective gear when working on walls. Turn off electricity to the walls you’re working on. Use a voltage tester before touching wires.
Wear:
- Dust mask or respirator to avoid inhaling particles
- Safety glasses to protect your eyes
- Work gloves to avoid sharp edges
- Long sleeves and pants to protect your skin
Use plastic sheeting to catch dust. Seal doorways with tape to keep dust out. Place drop cloths to protect floors and furniture.
Have a plan for disposing of old materials. They can be heavy and bulky. Rent a dumpster or arrange for removal before starting.
Step 2: Install Insulation Between Studs
Now, fill the empty spaces between studs with insulation. This blocks sound transmission. Use mineral wool or fiberglass batts for this.
Measure your stud cavities before buying insulation. Use 2×4 or 2×6 studs. Choose insulation that matches your stud depth for best results.
Work from top to bottom on each wall. This prevents insulation from falling. Check for obstacles like wiring and ducts before adding insulation.
Cutting Insulation to Fit
Proper cutting ensures insulation fits perfectly. Use a sharp knife for clean cuts. Place insulation on a flat surface or cutting board.
Measure each cavity separately. Old cabins may have irregular spacing. Add half an inch to your measurements for a snug fit.
Make precise cuts around obstacles. Never compress insulation too much. Leave space around heat-producing fixtures.
Cut insulation slightly oversized. You can compress it to fit, but not the other way around.
Securing Insulation Properly
Insulation should fit snugly between studs. Press it firmly into cavities without compressing too much.
For batts with facings, staple the flanges to studs. Use staples every 8 to 12 inches. Keep the facing smooth.
Use supports for unfaced batts. These rods snap between studs. Space supports every 24 inches vertically.

Step 3: Add Mass-Loaded Vinyl or Additional Drywall
Adding mass blocks sound waves. You can use mass-loaded vinyl (MLV) or more drywall. Both options work well.
MLV is thin but blocks sound well. It weighs one to two pounds per square foot. Hang it over your insulated walls.
More drywall adds mass but costs less. Many use both for best results.
Hanging Mass-Loaded Vinyl Correctly
MLV is heavy and hard to handle. Have a helper for this step. It’s hard to manage alone.
Start at the top and unroll downward. Overlap seams by two inches. Stagger seams to prevent sound leaks.
Attach MLV to studs with nails or screws. Place fasteners every 12 inches. Don’t pull too tight to avoid tearing.
Cut MLV with a sharp knife. Make straight cuts with a straightedge. Cut openings slightly smaller than boxes.
Pay attention to corners and edges. Overlap material generously and seal with acoustic caulk. This prevents sound leaks.
Step 4: Use Acoustic Sealant on All Seams
Sealing seams is key to soundproofing. Acoustic sealant fills gaps where sound escapes. Even small gaps can reduce sound blocking.
Apply sealant to all seams and edges. Focus on key areas:
- Where walls meet the floor and ceiling
- All vertical seams between drywall or MLV sheets
- Around electrical boxes and switch plates
- Where walls meet adjacent walls at corners
- Any penetrations for pipes or wiring
Use a caulking gun for smooth application. Cut the nozzle at a 45-degree angle. Apply a continuous bead without gaps.
Don’t use regular caulk. It hardens and cracks. Acoustic sealant stays flexible and maintains a seal as your cabin settles.
Smooth sealant beads with a gloved finger or caulk tool. Wipe away excess with a damp cloth before it dries.
Step 5: Finish with Your Chosen Wall Covering
The final layer completes your soundproof wall system. Choose a wall covering that looks good and maintains sound blocking.
Most choose standard drywall. Hang sheets horizontally to minimize seams. Offset seams from the MLV or base drywall layer underneath.
Use drywall screws long enough to penetrate studs. Space screws 12 inches apart along studs and 16 inches apart along horizontal edges. Avoid overdriving screws, which breaks the paper facing.
For a rustic look, use tongue-and-groove boards or wood paneling. Install these over your soundproofing layers. The wood adds more mass for better sound blocking.
After hanging your wall covering, tape and finish drywall seams. Apply joint compound, let it dry, sand smooth, and repeat for a professional finish. Apply acoustic sealant where the new wall covering meets the ceiling and floor before installing trim.
Reinstall electrical outlet and switch covers using foam gaskets behind the plates. These inexpensive gaskets prevent sound leaks through these common weak points. Cut openings in the wall covering precisely to maintain snug fits around boxes.
Your newly treated walls now form a formidable barrier against unwanted noise. The multiple layers work together—insulation absorbs sound, mass blocks transmission, and sealant eliminates air gaps. This approach delivers the quiet retreat you’re seeking.
Soundproofing Cabin Ceilings to Block Overhead Noise
Overhead noise can really disrupt a cabin retreat. Footsteps from above, rain on the roof, or wildlife on the ceiling are common issues. A soundproof ceiling can turn your cabin into a quiet haven.
Ceiling treatment involves several steps to block sound. You don’t have to do everything at once. Even a few steps can make a big difference in quieting your space.
Adding Insulation to the Attic Space
Your attic is the first line of defense against sound. Adding attic insulation blocks sound and saves energy. It’s a smart and cost-effective upgrade.
Insulation absorbs sound waves before they reach your ceiling. The thicker and denser it is, the better it blocks noise. Aim for 10-14 inches of insulation in your attic.
Insulation also keeps your cabin comfortable year-round. It lowers your heating and cooling costs. This makes your investment worthwhile for more than just quiet.
Blown-In vs. Batt Insulation
Choosing between blown-in and batt insulation depends on your cabin and budget. Each has its own benefits for different situations.
Blown-in insulation is loose fibers that pros spray into your attic. It fills gaps and corners well. It’s great for retrofitting without removing ceiling finishes.
Batt insulation fits between joists. It’s DIY-friendly for homes with open joist bays. Mineral wool batts block sound well but need careful installation.
https://www.youtube.com/watch?v=pio6rNd9tAc
| Feature | Blown-In Insulation | Batt Insulation |
|---|---|---|
| Installation Method | Requires professional equipment and expertise | DIY-friendly for experienced homeowners |
| Coverage Quality | Fills all gaps and irregular spaces completely | May leave small gaps around obstacles |
| Best Application | Retrofit projects without ceiling removal | New construction or exposed joist access |
| Sound Blocking | Excellent when properly dense | Superior with mineral wool batts |
Installing Resilient Channels or Sound Clips
Resilient channels are a top soundproofing choice. They create a decoupling effect that stops vibrations. This stops sound from traveling through your ceiling.
Sound clips with hat channels offer even better decoupling. They attach to joists and create a strong barrier. This stops sound from reaching your ceiling.
The key is to isolate your ceiling from the structure. This breaks the sound pathway. It greatly reduces overhead noise.
Proper Spacing and Attachment Methods
Getting resilient channels right is key. Channels must run perpendicular to your ceiling joists. Space them 24 inches apart for best results.
Attach channels only to joists, not between them. When installing drywall, screws should go into the channel, not joists. This keeps the sound barrier intact.
Make sure to double-check every screw. A single misplaced screw can ruin the soundproofing. It’s worth the extra effort.
Double Drywall Application Technique
Adding a second drywall layer boosts sound blocking. It works by adding mass. Heavier surfaces take more energy to vibrate, reducing noise.
Green Glue damping compound makes the drywall layers even more effective. It converts sound energy into heat, stopping vibrations. Apply it in a random pattern on each drywall sheet.
When adding the second layer, offset the seams. Use shorter screws to avoid penetrating too far. This method is simpler than resilient channels but effective.
Many cabin owners use both techniques for the best results. It’s a combination that works well.
Addressing Ceiling Fixtures and Penetrations
Light fixtures, ceiling fans, and vents can let sound through. Even small openings can bypass your insulation and drywall.
IC (insulation contact) and airtight recessed light housings solve the lighting problem. They prevent sound and air leaks. For existing lights, build acoustic enclosures in the attic.
Ceiling fans need sealing around the bracket and electrical box. Use acoustic sealant around the fan canopy. Wrap ventilation ducts in the attic with mass-loaded vinyl and seal connections with acoustic caulk.
Don’t forget about electrical junction boxes. Seal all ceiling penetrations with acoustic caulking. This final step keeps your soundproofing system effective.
Floor Soundproofing Methods for Impact Noise Reduction
Thumping and bumping sounds through cabin floors can be really annoying. Every step, dropped object, or moved chair makes vibrations. These vibrations can travel through the floor and even to other parts of your cabin.
Effective floor soundproofing tackles impact noise at different levels. Hard surfaces like wood or tile make these sounds worse. But, there are many ways to greatly reduce these disturbances and make your cabin quiet.
Underlayment Options for Existing Floors
Adding underlayment under your flooring creates a cushioning layer. This layer absorbs impact before it goes through the structure. Underlayment acts as a barrier that stops vibrations at their source.
You can put underlayment during a flooring update or under certain existing floors. The material gets compressed when stepped on, turning mechanical energy into heat instead of sound. This simple step makes a big difference in impact noise reduction.

Rubber underlayment products are great at reducing impact noise because they are dense and resilient. These synthetic rubber sheets come in rolls that you unroll on your subfloor. They are 2mm to 6mm thick, with thicker ones better at sound control.
First, clean your subfloor well and fix any damage. Make sure the surface is dry and free of debris. Roll out the rubber underlayment in the opposite direction of your flooring.
Cut the material around obstacles like floor vents and doorways with a sharp knife. Make sure the edges fit tightly together without overlapping. Seal all seams with the recommended tape to keep sound from escaping.
Most rubber underlayment doesn’t need adhesive because your flooring will hold it in place. But, on walls or vertical uses, you might need construction adhesive. Always follow the product instructions for the best results.
Cork Underlayment Benefits
Cork is a natural option with great sound properties. It comes from tree bark that regenerates, making it eco-friendly. Cork’s structure traps sound waves and vibrations.
Cork also has natural antimicrobial properties that fight mold and mildew. It provides some cushioning that feels good underfoot. Cork underlayment comes in rolls or sheets, 3mm to 12mm thick.
Installing cork is similar to rubber underlayment. Make sure your subfloor is clean and level. Cork can be more sensitive to moisture, so consider adding a vapor barrier in damp areas. It cuts easily with a utility knife and doesn’t need special tools.
Cork works well under laminate and engineered wood floors. When learning how to soundproof a cabin, many appreciate cork’s noise reduction and thermal insulation.
Installing Carpet and Thick Padding
Carpet with quality padding is a top floor soundproofing choice. It absorbs impact and airborne sound, adding warmth and comfort. This is great for bedrooms and living areas.
Choose carpet padding that’s at least 1/2 inch thick for good sound control. Denser padding like memory foam or rubber works better than standard foam. The padding is the main sound barrier, with the carpet adding extra absorption.
Put the padding down first, cutting it to fit your room with seams perpendicular to carpet seams. Staple or tape it down to prevent shifting. Then, install your carpet as usual.
Thicker, denser carpets with deeper pile heights are better at sound control. Loop pile carpets absorb sound better than cut pile. This solution reduces impact noise without major construction.
Floating Floor Systems
Floating floor installations change the game by breaking the floor’s connection to the structure below. These systems, like laminate, engineered wood, and luxury vinyl, don’t get nailed or glued down. They sit on underlayment and interlock.
The big plus of floating floors is decoupling. Without direct contact with the subfloor, vibrations can’t easily pass through. The underlayment beneath these floors is key, as it’s the only barrier against sound.
Choose acoustic underlayment made for floating floors. Products with rubber and cork layers work great. Some advanced options have built-in vapor barriers and cushioning in one product.
When installing, keep the right expansion gap around the room’s edges, 1/4 to 1/2 inch. This gap lets the floor expand and contract with humidity changes while keeping sound decoupled. Never nail or glue the floor planks to the subfloor, as this defeats their soundproofing purpose.
Treating Crawl Spaces and Basements
Don’t overlook the space under your floors when soundproofing. Adding insulation between floor joists from below greatly improves sound control and thermal efficiency. This is very effective in cabins with crawl spaces or unfinished basements.
Use friction-fit insulation batts between joists without compressing them. Compression reduces effectiveness. The insulation absorbs sound waves and stops them from reflecting back up.
Use unfaced insulation or position the vapor barrier correctly for your climate. In most cases, the vapor barrier faces the warm side, which is usually the living space above. Support the insulation with wire mesh, strapping, or insulation supports to keep it in place long-term.
Working in crawl spaces is challenging due to limited headroom and lighting. Wear protective gear like a respirator, gloves, and eye protection. Bring lots of lighting and take breaks often. If access is hard, consider hiring professionals.
Sealing air leaks in the floor structure from below also helps. Use acoustic sealant around pipes, wires, and any subfloor penetrations. This all-around floor soundproofing tackles both impact and airborne noise.
| Floor Soundproofing Method | Impact Noise Reduction | Installation Difficulty | Best Application |
|---|---|---|---|
| Rubber Underlayment | Excellent | Moderate | Under hard flooring surfaces |
| Cork Underlayment | Very Good | Moderate | Eco-friendly projects with laminate |
| Carpet with Thick Padding | Excellent | Easy to Moderate | Bedrooms and living areas |
| Floating Floor Systems | Very Good | Moderate | Modern renovations seeking decoupling |
| Joist Insulation from Below | Good | Challenging | Accessible basements and crawl spaces |
Using several floor soundproofing methods together works best for your cabin retreat. Many successful projects use underlayment with carpet or floating floors and treat the space below. This layered approach tackles impact noise from all sides, keeping your quiet getaway peaceful.
Upgrading Windows for Maximum Sound Blocking
Windows are often the weakest spot in soundproofing. Even with treated walls, floors, and ceilings, old windows let in a lot of noise. Luckily, there are many ways to fix this, from DIY to full window replacements.
Choosing how to soundproof your windows depends on your budget and how much noise you want to block. Some fixes work on your current windows, while others need a full swap. Let’s look at your options from cheapest to most effective.
Window Inserts and Acoustic Panels
Window inserts are a good middle choice. They fit over your current windows, adding a second barrier. This air gap helps block noise.
Installing them is easy for DIY fans. Just measure, order, and attach with magnets or tubes. They’re easy to remove when you need to open the window.
Acoustic panels are great for windows you don’t need to see through. They fit in the window and can cut noise by 20-30 decibels. They’re perfect for basement or side windows.

For better results, consider professional soundproofing. But many people successfully install inserts themselves with basic tools.
Replacing with Double or Triple-Pane Windows
Switching to double-pane windows is the best way to soundproof. They have two layers of glass with an air gap, greatly reducing noise. Triple-pane windows add a third layer for even better sound blocking.
The cost is $300 to $1,000+ per window, depending on size and type. It’s a big investment, but you’ll save on heating and cooling. Energy efficiency can cut costs by 20-30%.
New windows also reduce condensation and improve comfort. They can make your cabin 25-35 decibels quieter.
Understanding Laminated Glass Options
Laminated glass is a top choice for soundproofing. It’s made by bonding two panes with plastic. This stops sound vibrations well.
The plastic layer absorbs sound, making it great for blocking low-frequency sounds. It’s more expensive, but worth it for serious noise issues. It also adds security and UV protection.
Heavy Curtains and Window Plugs
Acoustic curtains are an affordable way to block noise. They’re not just drapes; they’re heavy, sound-absorbing fabric. They can reduce noise by 10-20 decibels.
Look for curtains with multiple layers, a vinyl core, and tight weave. They should cover the whole window and have sealed edges.
Window plugs are for maximum sound blocking. They’re foam wrapped in fabric that seals the window. You can make them yourself for $20-40 per window.
Window plugs can block 20-30 decibels of noise. They’re great for bedrooms where you want quiet at night but light during the day.
Sealing Window Frames Properly
Even the best windows fail if the frames aren’t sealed. Gaps let sound through, wasting your money. Sealing is key for noise reduction.
Check your frames for gaps and air leaks. Clean and caulk the outside where the frame meets siding. Use interior caulk on the inside where trim meets drywall.
Install foam weatherstripping on operable windows and door sweeps on sliding windows. Acoustic caulk stays flexible, keeping the seal tight.
Check and reapply caulk yearly. Sealing costs less than $50 per window but can make a big difference in quietness.
| Window Upgrade Method | Noise Reduction | Cost Per Window | Installation Difficulty | Best For |
|---|---|---|---|---|
| Window Inserts | 15-25 decibels | $150-$400 | Easy (DIY) | Renters, existing windows in good condition |
| Double-Pane Replacement | 25-35 decibels | $300-$800 | Professional recommended | Comprehensive upgrade, energy savings |
| Laminated Glass Windows | 30-40 decibels | $400-$1,200 | Professional required | Severe noise issues, low-frequency sounds |
| Acoustic Curtains | 10-20 decibels | $50-$200 | Very easy (DIY) | Budget-conscious, temporary solutions |
| Frame Sealing | 5-10 decibels | $30-$50 | Easy (DIY) | Essential companion to any window upgrade |
Using different methods together works best. For example, inserts and curtains together block more noise than either alone. New windows also need to be sealed and treated for the best results.
Soundproofing Doors and Entry Points
Doors have gaps that let sound pass through. But, fixing these gaps is easier than you think. Doors are second only to windows in letting sound in. Upgrading your doors and sealing their gaps delivers immediate, noticeable results in reducing noise transmission.
Most cabins have hollow-core doors that don’t block sound well. These doors are light and let sound bounce around. Fixing your door soundproofing makes your cabin quieter and keeps out outside noise.
Installing Solid Core Doors
Switching to solid core doors is a smart soundproofing move. These doors are made of dense materials that block sound better. They have more mass, which helps block sound.
A solid core door is much heavier than a hollow one. Solid core doors can reduce noise transmission by 50-70% compared to hollow alternatives. This makes talking in one room less heard in another.
Getting solid core doors is worth it. They cost $150-$300 each, but they make your cabin much quieter. The price difference is small compared to the quietness they bring.

Putting in soundproof doors needs careful measuring and fitting. Start by measuring your door opening’s height, width, and depth at three points. Doors and frames can settle unevenly over time, so don’t assume all measurements are identical.
Check the door’s swing direction before removing the old door. Most doors swing into rooms. Confirming this detail prevents ordering mistakes. Remove the old door by taking out the hinge pins from bottom to top.
When hanging your new door, use wooden shims to position it correctly in the frame. The door should sit level and plumb, with consistent gaps of about 1/8 inch on the sides and top. Proper alignment ensures that door seals make complete contact when closed, maximizing soundproofing effectiveness.
If you’re not comfortable with carpentry work, hiring a professional makes sense. Poor installation can leave gaps that undermine your soundproofing investment. For detailed guidance on door construction and installation techniques, check out how to build a soundproof door.
Door Sweeps and Threshold Seals
The gap under your door is a major sound leak. Even a small gap lets a lot of sound through. Door sweeps attach to the door bottom and block this gap.
Basic door sweeps have a metal or plastic holder with a rubber, brush, or vinyl flap. These simple devices cost $10-$25 and install in minutes with just a screwdriver. The flap compresses against the floor or threshold when the door closes.
Automatic door bottoms provide a more sophisticated solution for frequently used doors. These mechanisms use a flat spring that triggers when the door closes, lowering a neoprene seal against the floor. When you open the door, the seal retracts automatically, preventing drag and wear.
Threshold seals work with door sweeps. These metal or wood strips install at floor level in the doorway. They often include a rubber gasket that compresses when the door closes, creating an airtight and sound-tight barrier.
Weatherstripping Around Door Frames
Gaps around the door perimeter let sound leak through. Weatherstripping compresses when the door closes, filling these spaces and blocking sound transmission. Several weatherstripping types work well for soundproofing applications.
Compression weatherstripping made from foam, felt, or rubber attaches to the door frame where the door makes contact. When you close the door, the material compresses to create a seal. Self-adhesive foam weatherstripping offers the easiest installation, though rubber versions last longer and provide better soundproofing.
V-strip or tension seal weatherstripping folds into a V-shape and fits into the gap between the door and frame. It creates a spring tension that seals effectively while remaining nearly invisible. This type works well for older doors with slightly uneven frames.
Replace worn weatherstripping annually or whenever you notice gaps. The material degrades from repeated compression and temperature changes. Fresh weatherstripping maintains your door’s soundproofing performance over time.
Adding Mass with Door Blankets
Door blankets offer an affordable, temporary solution for soundproofing doors without permanent modifications. These heavy blankets hang over doors using hooks or a curtain rod. They add mass that blocks sound and provide some sound absorption from their soft material.
Specialized soundproofing blankets feature multiple layers of dense material with mass-loaded vinyl or similar sound-blocking components. They typically weigh 5-15 pounds and cost $30-$100 depending on size and quality. Regular heavy moving blankets work too, though they provide less soundproofing benefit.
Door blankets work well for doors you don’t use frequently, like closets or storage rooms. They’re also ideal for renters who can’t make permanent modifications. Simply hang them when you need quiet and remove them when you don’t.
For best results, ensure the blanket covers the entire door and extends at least several inches beyond all edges. This overlap prevents sound from flanking around the blanket’s perimeter.
| Soundproofing Method | Cost Range | Noise Reduction | Installation Difficulty | Best For |
|---|---|---|---|---|
| Solid Core Door Replacement | $150-$300 per door | 50-70% reduction | Moderate | Permanent solution for main doors |
| Door Sweeps | $10-$50 | 20-30% reduction | Easy | Sealing bottom gaps quickly |
| Weatherstripping | $5-$30 | 15-25% reduction | Easy | Perimeter gap sealing |
| Door Blankets | $30-$100 | 25-40% reduction | Very Easy | Temporary or renter-friendly options |
| Automatic Door Bottoms | $40-$80 | 30-40% reduction | Moderate | High-traffic doors needing clearance |
Don’t forget to check for gaps around your door frames after installation. Even the best solid core doors and door seals won’t perform well if gaps exist in the surrounding frame. Use acoustic caulk to fill any cracks or spaces between the door frame and wall. This final step ensures your soundproofing efforts work together as a complete system.
Regular maintenance keeps your door soundproofing effective. Inspect door sweeps quarterly for wear, tighten loose hinges that create gaps, and replace weatherstripping when it becomes compressed or damaged. These simple checks preserve your cabin’s quietness for years to come.
Sealing Gaps, Cracks, and Air Leaks Throughout the Cabin
Sealing gaps and cracks is key to a quiet cabin. Even the best insulation can’t block sound if there are small openings. Remember, where air can travel, sound follows right behind.
Just one small gap can cut your wall’s sound-blocking by 30% or more. This detailed work is a big return on your soundproofing investment. It might not be exciting, but it’s essential for real results.
Finding Hidden Air Gaps
First, find where air leaks hide. Look at obvious trouble spots like windows and doors. Also, check baseboards, corners, and where pipes or wires go through walls.
On windy days, feel for air movement with a damp hand. Move it slowly over suspected leak areas. You’ll feel air where gaps are.
Common hidden gaps include:
- Around ceiling light fixtures and fans
- Where walls meet the floor or ceiling
- Behind and around electrical outlets and switches
- At plumbing penetrations in bathrooms and kitchens
- Around fireplace surrounds and chimneys
- At cable and internet line entry points
Using the Incense or Smoke Test
The smoke test helps find air leaks and sound paths. It works best on breezy days or with a fan.
Light an incense stick or smoke pen near leak areas. Slowly move it along suspected spots. Watch for smoke movement to find leaks.
Safety reminder: Keep smoke away from flammable stuff and ventilate well. Mark problem areas with tape for later sealing.

Acoustic Caulking Techniques
Once you’ve found all gaps, seal them with acoustic caulking. Regular caulk won’t work because it gets brittle and cracks.
Acoustic sealant stays flexible, keeping a tight seal even with temperature changes. This is key for long-term soundproofing.
Here’s how to apply it:
- Prepare the surface: Clean and dry areas to seal, removing dust and old caulk
- Cut the tube tip: Angle the cut at 45 degrees and size it for the gap width
- Apply smooth beads: Move steadily along the gap, keeping pressure on the caulk gun
- Tool the caulk: Use a damp finger or caulk tool to press the sealant into the gap
- Allow proper curing: Follow the manufacturer’s drying time before painting
Focus on sealing gaps around windows, doors, and baseboards. These areas are key for soundproofing.
Outlet and Switch Plate Insulation
Outlets and switch plates are often overlooked but are big sound leak points. They let sound travel through walls.
Installing outlet insulation is a quick fix. You have several options:
| Solution | Installation | Effectiveness | Cost per Unit |
|---|---|---|---|
| Outlet Gaskets | Foam pads installed behind cover plates | Reduces air and sound leaks by 60-70% | $0.50-$1.00 |
| Putty Pads | Moldable material wrapped around boxes | Blocks sound transmission by 70-80% | $2.00-$4.00 |
| Acoustic Electrical Boxes | Replacement boxes with built-in sound barriers | Maximum protection at 80-90% reduction | $8.00-$15.00 |
Start with outlet gaskets on all boxes in soundproofed walls. Just remove the cover, add the gasket, and put it back. This makes a big difference.
For critical areas, use putty pads. These wrap around the box for extra sound blocking. Always turn off power before working with them.
Don’t forget to caulk around electrical boxes. Even a small gap can let sound bypass insulation. This attention to detail makes a big difference in noise control.
Adding Acoustic Panels and Soft Furnishings for Sound Absorption
Sound absorption is different from soundproofing. It makes your cabin feel more comfortable. Sound absorption controls how sound behaves within a room. Knowing the difference between soundproofing vs sound absorbing is key. Even a well-sealed cabin can feel loud and echoey without the right treatment.
Acoustic panels absorb sound waves instead of reflecting them. This reduces echo and noise in your cabin. Hard surfaces like wood floors and beams make your cabin look great but also bounce sound around.
Using acoustic panels with soft furnishings is the best way to dampen sound. These treatments make your cabin feel cozy and improve comfort. Plus, many sound absorption solutions are also beautiful décor pieces.
Strategic Placement of Acoustic Panels
Putting acoustic panels anywhere is a waste. You need to place them where your cabin needs them most. Professional designers know how to find these spots.
Start by noticing which rooms feel echoey. Clap your hands and listen to how long the sound lasts. Rooms with longer echoes need more acoustic treatment.
The best places for acoustic panels include:
- Walls facing where you sit or sleep
- Corners, where two walls meet, near the ceiling
- Areas above where you talk or watch TV
- Walls next to windows
- Spaces between studs in open construction
Corner placement is great because sound builds up there. Bass frequencies, in particular, gather in corners. So, fabric absorbers in corners work well for all kinds of noise.

First reflection points are where sound bounces before you hear it. Treating these spots with acoustic panels makes a big difference in sound quality.
Finding these points is easy. Sit in your usual spot. Have someone move a mirror along the wall while you watch. Where you see your sound source reflected is a first reflection point.
This mirror trick works for side walls and ceilings too. Mark these points with tape. These spots are where acoustic panels will help the most. Even small panels here can reduce echoes better than covering whole walls.
For cabin retreats, focus on first reflection points in:
- Living areas around where you sit
- Bedroom walls by the bed
- Dining spaces where you talk
- Home office or reading nook areas
Using Rugs, Curtains, and Upholstered Furniture
Sound dampening doesn’t need special products. Using soft furnishings can make your cabin quieter and cozier. Every soft material absorbs sound that would bounce around.
Area rugs on hard floors absorb sound well. They reduce footstep noise and stop sound from bouncing off floors. Choose thick rugs with dense pile for best results. Add a rug pad underneath for more absorption.
Heavy curtains block sound at windows and keep out external noise. Velvet, lined cotton, or thermal curtains work best. The thicker and heavier the fabric, the better it absorbs sound. Extend curtain rods beyond window frames to cover more wall for extra treatment.
Upholstered furniture absorbs sound better than you might think. Fabric sofas and chairs soak up mid and high-frequency sounds. Adding throw pillows and blankets increases sound-absorbing surface area.
Wall hangings add decoration and absorb sound. Tapestries, quilts, or fabric art pieces soak up sound while adding personality. Hang them with a small air gap behind for better low-frequency absorption.
| Soft Furnishing Type | Sound Absorption Level | Best Placement | Cost Range |
|---|---|---|---|
| Heavy area rugs with padding | High (0.50-0.70 absorption coefficient) | Living rooms, bedrooms, hallways | $100-$600 |
| Thick curtains or drapes | Moderate to High (0.40-0.65 absorption coefficient) | All windows, specially large ones | $80-$300 per window |
| Upholstered furniture | Moderate (0.30-0.50 absorption coefficient) | Primary living and sleeping areas | $300-$2,000 per piece |
| Wall tapestries or fabric art | Moderate (0.25-0.45 absorption coefficient) | Large blank wall sections | $50-$400 |
DIY Fabric-Wrapped Sound Absorbers
Making your own acoustic panels is affordable and customizable. DIY fabric absorbers are cheaper than commercial ones but work just as well. You can match them to your cabin’s look and make them any size you need.
Building basic panels is easy. Start with simple frames from 1×4 inch wood strips. Cut the wood to your panel size, usually 2×4 feet or 2×2 feet. Assemble frames with wood glue and corner braces for stability.
Fill the frames with acoustic insulation material. Mineral wool is great because it’s dense, fire-resistant, and absorbs sound well. Rockwool Safe’n’Sound or Roxul panels fit well in standard frames. Cut the insulation to fit snugly in your frames.
Wrap the filled frames with acoustically transparent fabric. Burlap, linen, or breathable cotton fabrics work well and come in many colors and patterns. Stretch the fabric tightly over the frame and staple it to the back. Fold corners neatly for a clean look.
The step-by-step process involves:
- Cut wood strips to length and assemble rectangular frames
- Measure and cut mineral wool insulation to frame dimensions
- Press insulation firmly into frames
- Cut fabric 4-6 inches larger than frame dimensions
- Stretch and staple fabric to frame backs, starting with opposing sides
- Fold and staple corners for clean edges
- Attach mounting hardware to backs
Mount finished panels directly to walls using the right hardware. French cleats are great for heavier panels. Picture hanging wire and hooks work for lighter ones. Place panels according to the first reflection point strategy for the best sound dampening effect.
Consider making panels in different sizes for visual interest. Mix 2×4 foot panels with smaller 1×2 foot ones. Arrange them in artistic patterns that serve as functional wall art. This makes acoustic treatment part of your cabin’s design, not just a technical fix.
For better looks, build deeper frames for thicker insulation. Four-inch-deep panels absorb lower frequencies better than shallow ones. The extra depth adds a shadow-box effect that enhances your cabin’s walls.
Enjoying Your Newly Soundproofed Quiet Retreat
Your cabin is now a peaceful place. The soundproofing you did makes every day better. Morning coffee is sweeter without the noise of traffic.
Conversations stay private, and sleep is better. External sounds are gone.
Your cabin is perfect for new activities. You can play music without disturbing others. Record podcasts without background noise. Meditate in real silence. Work from your cabin with clear focus.
Professional soundproof cabin solutions can cut noise by 20-50 decibels. This makes your cabin ideal for any activity.
To keep your cabin quiet, do simple checks. Check door seals every three months. Replace weatherstripping when it’s worn out. Fix any new cracks right away. These steps help keep your cabin peaceful for years.
The best part is the calm you feel when you enter. Creativity flows freely in quiet spaces. You get better rest in quiet nights. Your cabin is a true escape from the world’s noise.
You’ve made something special. Your quiet retreat is your own oasis. It’s ready when life gets too loud. Enjoy it fully. Your soundproofed space is more than just walls and insulation. It’s your sanctuary.


