Building your dream getaway on a hillside has its challenges. Steep terrain can cause erosion, limit outdoor space, and make building harder. But, the right support system can turn this challenge into a beautiful, functional property.
Hillside cabin retaining solutions do more than just hold back soil. They make space for decks, gardens, and paths while keeping your property safe from water and land movement. The right choice turns unusable slopes into valuable living space that fits perfectly with the mountains.
This guide will help you choose the perfect support system. We’ll look at materials like rustic timber and engineered concrete, discuss costs and installation, and share design tips. Whether you face mild erosion or dramatic elevation changes, you’ll find practical solutions. These will protect your land while keeping your retreat cozy.
Why Your Sloped Cabin Property Needs a Retaining Wall
Your sloped cabin site is beautiful and private. But, it also has stability issues that retaining walls fix. If you own a hillside property, you know the beauty of elevated views. Yet, these slopes can harm your investment over time.
Soil erosion is a big problem for sloped cabin owners. Heavy rain and strong winds can wash away soil, exposing your foundation. Without erosion control, even small storms can damage your landscaping and foundation.
Retaining walls keep soil in place during bad weather. They stop the natural movement of earth on slopes. This protects your cabin’s foundation, driveway, and outdoor features.
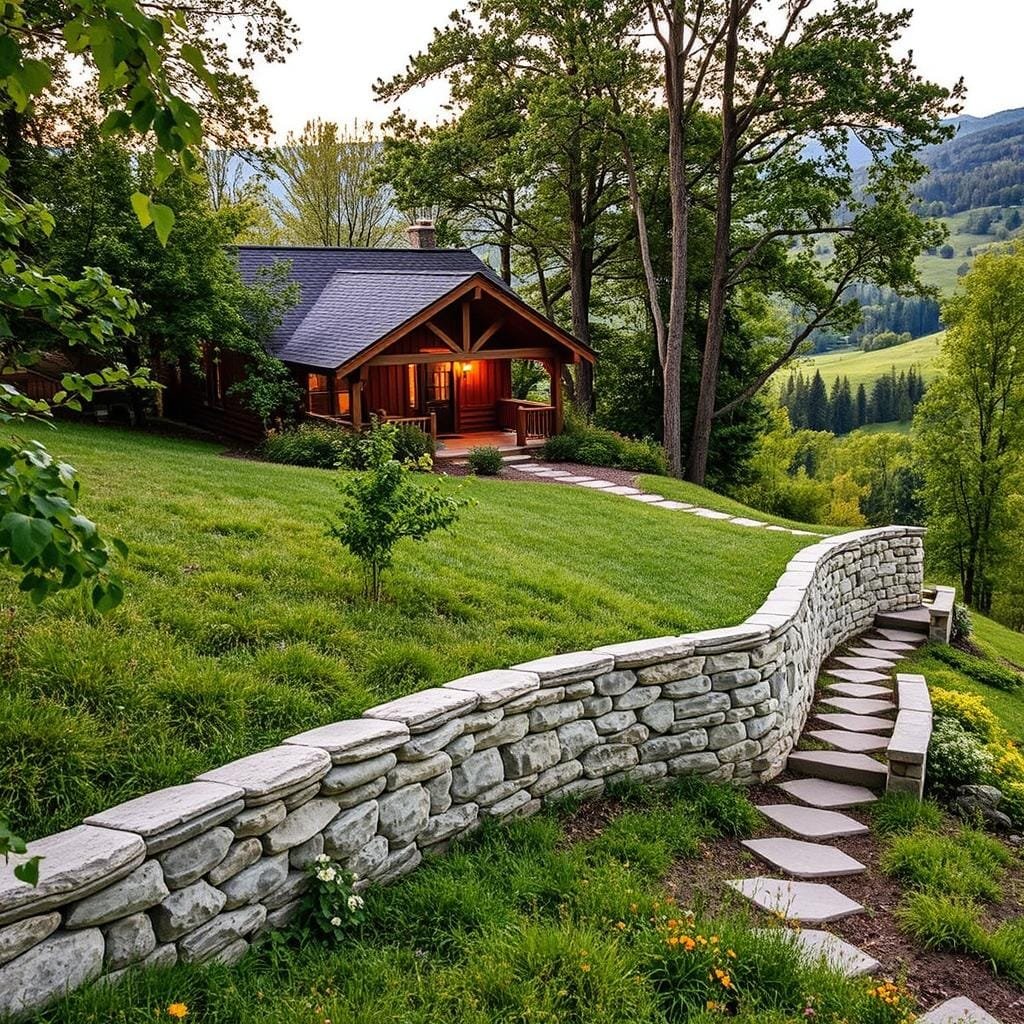
Sloped property retaining walls turn hillside areas into usable outdoor spaces. They make flat areas for patios, fire pits, gardens, and parking. These areas make your property feel bigger and better for guests and activities.
Water management is another reason for erosion control for sloped cabin sites. Retaining walls have drainage systems that keep rain away from your foundation. This stops basement flooding, reduces moisture issues, and protects your cabin from water damage.
From a financial view, retaining walls increase your property’s value. They show you manage your site well to buyers and insurance companies. Good walls can raise your resale value by 10-15% and cut down on maintenance costs.
Retaining walls do more than solve problems. They also add beauty to your cabin’s look. Built with materials that match your cabin, they create interest and solve engineering challenges of hillside living.
Understanding the Challenges of Building on Sloped Terrain
Mountain cabin owners face three main challenges with sloped properties. These challenges affect your choice of retaining wall and construction plan. Let’s explore what building on an incline entails.
Erosion and Soil Stability Issues
Erosion is the biggest threat to cabin foundations on inclines. Rain and snowmelt can wash away soil, exposing roots and creating gullies. This weakens your cabin’s foundation.
Different soils react differently to water and pressure. Clay soils expand and shrink, causing foundation cracks. Sandy soils drain fast but are prone to washouts. Loamy soils are stable but need erosion control during heavy weather.
Your soil type affects the best retaining wall choice. A soil test shows how well it can bear loads and drain. This info helps engineers design walls for your terrain.
Water Runoff and Drainage Concerns
Water flows downhill easily on sloped properties. Managing this flow is key to protecting your cabin and walls. Poor drainage can cause walls to bulge, crack, or fail.
Mountain environments have varied water patterns. Spring snowmelt and summer thunderstorms create huge runoff. Winter freeze-thaw cycles also cause soil instability.
Effective water runoff management involves several strategies:
- Gravel backfill behind walls for drainage
- Perforated drain pipes at the base to channel water
- Surface grading to direct water away from structures
- Vegetation to slow water and increase absorption
Understanding water flow on your property is key. Walk your land during rainstorms to find natural drainage paths and problem areas.
Creating Usable Outdoor Living Space
Steep slopes limit outdoor use. But, retaining walls can turn these areas into terraces for parking, entertaining, or gardening.
Terracing creates different zones at various levels. You can have a patio near the cabin, a fire pit zone, and a garden terrace below. Each zone serves a purpose and connects through steps or pathways.
Building terraces involves cutting into the slope and constructing retaining walls. This creates stable platforms for landscaping. Steep sloped backyards can be structured with retaining walls that prevent erosion and allow planting.
Planning is needed for navigating levels. Steps or staircases make moving around your property easier. These paths should be natural and safe in all weather.
Soil stability, drainage, and usable space influence your retaining wall choice. A gravity wall works for moderate slopes with good drainage. But, steep sloped terrain with poor soil needs engineered systems. Assessing these factors before construction saves money and prevents problems.
Types of Retaining Wall Systems for Hillside Cabins
For cabins on slopes, four main retaining wall systems offer great benefits. Each system uses a unique approach to hold back soil and manage pressure. Knowing how these systems work helps you choose the best one for your property.
The right retaining wall system depends on several factors. These include wall height, slope steepness, soil type, and your budget. Some systems are perfect for gentle slopes and shorter walls, while others handle dramatic elevation changes and heavy loads. Let’s explore each system so you can find the perfect solution for your cabin site.
Mass and Weight-Based Walls
A gravity retaining wall for steep terrain relies on its own weight to resist soil pressure. These walls use their heavy weight to stay in place without needing special engineering or reinforcement. They work through simple physics—the heavier the wall, the more force it takes to move it.
Gravity walls typically stand under 4 feet tall and work best on gentle to moderate slopes. They’re built from heavy materials like thick concrete blocks, natural stone, or stacked boulders. The wall’s thickness increases toward the base, creating a stable profile that naturally resists tipping.
These walls offer several advantages for cabin owners:
- Simple construction that doesn’t require engineering calculations for shorter applications
- Rustic aesthetic appeal that blends beautifully with mountain and forest settings
- Excellent drainage when built with gaps between stones or blocks
- DIY-friendly for walls under 3 feet on stable soil
The main limitation is height. Building gravity walls taller than 4 feet requires massive amounts of material, making them expensive and impractical. They also need solid foundation soil that won’t compress or shift over time.
Engineered L-Shaped Designs
Cantilever retaining walls use a clever engineering trick to handle taller heights efficiently. The wall features an L-shaped cross-section with a horizontal base that extends back under the soil being retained. This design uses the weight of the soil itself to help stabilize the wall—pretty smart, right?
These walls typically range from 4 to 10 feet tall and require reinforced concrete construction. Steel rebar runs through the concrete to handle tension forces that develop in the structure. The base slab, called the footing, usually extends about one-third to one-half the wall height into the retained soil.
Cantilever walls work well when you need:
- Taller walls without the massive material costs of gravity designs
- Stronger structural support for cabins on slopes with heavy loads
- Long, continuous walls that maintain consistent height
- Professional appearance with smooth concrete finishes
The trade-off is complexity. These walls require professional design by a structural engineer and careful construction to ensure proper reinforcement placement. Foundation requirements are also more stringent than simpler wall types.
Cable and Rod Reinforcement Systems
Anchored retaining walls tackle the toughest terrain challenges by connecting the wall face to stable soil or bedrock deep behind it. Steel cables or threaded rods extend back into the hillside at an angle, anchoring to buried plates or rock formations. This creates a mechanical tie that prevents the wall from tipping or sliding forward.
These systems handle extreme height requirements and heavy loads that would overwhelm other wall types. You’ll find anchored walls used on very steep slopes, for tall walls exceeding 10 feet, or where space constraints prevent using a thicker gravity or cantilever design.
Key characteristics of anchored walls include:
- Maximum holding power for challenging hillside conditions
- Thinner wall faces compared to gravity designs of similar height
- Flexibility in materials—can use concrete, steel, or treated timber faces
- Professional installation required with specialized drilling equipment
The anchor installation process involves drilling holes deep into the slope, inserting the anchor rods, and grouting them in place. This requires geotechnical analysis to identify stable anchor zones and ensure the system will perform as designed.
Multiple Level Stepped Approaches
Terraced and tiered systems break up a steep slope into multiple shorter walls at different elevations. Each tier creates a flat platform or terrace, stepping down the hillside like giant stairs. This approach distributes soil pressure across several walls instead of concentrating it on one massive structure.
Terracing offers practical and aesthetic advantages that single tall walls can’t match. The flat terraces between walls become functional outdoor spaces—perfect for patios, gardens, walkways, or fire pit areas. Each level can serve a different purpose around your cabin property.
Benefits of terraced wall systems include:
- Reduced pressure on each individual wall structure
- Creation of multiple usable outdoor living zones
- Enhanced visual interest with varied landscaping opportunities
- Easier construction with shorter wall sections
- Better drainage management between tiers
Planning terraced systems requires thinking about the overall layout. You’ll need to determine the number of tiers, height of each wall, and depth of each terrace platform. A general rule suggests making each terrace at least twice as deep as the wall in front of it is tall.
| Wall System Type | Typical Height Range | Best Applications | Complexity Level |
|---|---|---|---|
| Gravity Walls | Up to 4 feet | Gentle slopes, garden beds, rustic aesthetics | Low to moderate |
| Cantilever Walls | 4 to 10 feet | Moderate slopes, residential properties | Moderate to high |
| Anchored Walls | 10+ feet | Steep terrain, extreme loads, space constraints | High (professional only) |
| Terraced Systems | Varies by tier | Creating functional spaces, dramatic elevation changes | Moderate |
Choosing between these systems depends on your specific site conditions and goals. Gravity walls offer simplicity and charm for modest height requirements. Cantilever designs provide efficient solutions for mid-height applications. Anchored systems handle the toughest challenges when nothing else will work. Terraced approaches create beautiful, functional outdoor spaces while managing steep slopes effectively.
Most cabin sites benefit from combining different systems. You might use a gravity wall for a raised garden area near the cabin while employing a cantilever wall to manage the steepest section of your driveway. Working with the natural contours of your land and matching the right system to each challenge creates the most successful outcome.
Timber Retaining Walls: Rustic Charm for Cabin Sites
Timber is perfect for blending with nature on sloped cabin properties. It has been a favorite for generations. The warmth of timber makes your cabin feel welcoming and provides strong support.
Wooden walls fit well in wooded areas, blending into the landscape. They’re also great for DIY projects, allowing for creative designs. Wood can curve around trees or follow the terrain.
Best Wood Types for Durability
Choosing the right wood is key for a long-lasting timber wall. Different types resist rot, insects, and weathering. Knowing these differences helps match the wood to your site and budget.
Climate affects wood longevity. Areas with high moisture or extreme temperatures need durable wood. Soil contact also speeds up decay, so posts and bottom timbers need extra protection.
Pressure-Treated Pine and Cedar Options
Pressure-treated pine is the most economical choice for hillside cabins. Chemical preservatives protect the wood from rot and insects. This treatment can last 15-20 years in most climates.
But, treated lumber can leach chemicals. Avoid it near vegetable gardens or water sources. For these areas, natural cedar is better.
Cedar resists decay without chemicals. Its oils repel insects and fight moisture damage. Western red and northern white cedar last 20-25 years with proper care.
Cedar costs more than pine, by 40-60%. But, its natural look and chemical-free nature are worth the extra cost for many.

Railroad ties add authentic charm to cabins. Originally treated with creosote, they preserve well. Many love their weathered look.
But, older ties can leach creosote into soil. This makes them unsuitable near gardens or play areas. Inspect ties for cracks or soft spots before buying.
Reclaimed timber from old buildings offers unique character. Salvaged hardwoods like oak are strong and long-lasting. They can outlast new wood.
When buying reclaimed materials, check for lead paint and damage. A bit of extra effort gets you unique materials with a story.
Installation Considerations and Lifespan
Proper installation is key for a long-lasting timber wall. Drainage behind the wall is critical. Water pressure can push walls forward.
Use gravel backfill for drainage. Add landscape fabric to prevent soil clogging. Posts should be one-third of the wall height in the ground for stability.
For walls over 3 feet, use deadman anchors. These timbers tie the wall to the earth behind. This prevents movement over time.
Timber walls last 15-25 years, depending on wood type and climate. Cedar lasts longer than treated pine. Good drainage and climate can extend lifespan by 5-10 years.
Regular maintenance is vital. Inspect for rot and damage annually. Seal the wood every few years in harsh climates.
Cost Breakdown for Timber Walls
Timber walls are affordable hillside solutions. Costs vary by wood type and dimensions. DIY installation can save a lot of money.
The table below shows typical costs for timber walls. These include materials and professional installation for a 4-foot wall.
| Wood Type | Material Cost per Sq Ft | Installed Cost per Sq Ft | Expected Lifespan |
|---|---|---|---|
| Pressure-Treated Pine | $8-12 | $15-25 | 15-20 years |
| Cedar | $12-18 | $22-35 | 20-25 years |
| Railroad Ties | $6-10 | $15-22 | 20-30 years |
| Reclaimed Hardwood | $10-20 | $20-40 | 25-40 years |
Additional costs include drainage materials and site preparation. These can add $3-10 per square foot. DIY installation can save 40-60% of the cost.
DIY installation is possible for moderate slopes. But, steeper slopes or unstable soils need professional help.
Timber is a great choice for cabins. It’s affordable, looks natural, and is easy to work with. With proper care, timber walls last decades while keeping your cabin’s woodland charm.
Concrete Block Retaining Walls: Strength and Versatility
Concrete blocks are a top choice for engineered wall systems for sloped lots. They are durable and flexible in design. Many cabin owners prefer them for their reliability and affordability.
These walls can handle harsh mountain weather. They also come in various styles to match any cabin’s look.
Concrete block systems fall in the middle price range. They cost more than basic poured concrete but less than natural stone. This makes them a good value for those seeking quality without high prices.
Standard Concrete Blocks vs. Interlocking Systems
Traditional concrete blocks are the basic way to build sloped property retaining walls. They need mortar between each layer, which increases labor and installation time. You’ll need masonry skills to stack them correctly and ensure stability.
Interlocking systems changed the game. These blocks stack without mortar and have built-in guides. They lock together, making walls faster to build than traditional methods.
The benefits of interlocking systems include:
- Faster installation times that reduce labor costs
- No specialized masonry skills required for basic projects
- Better flexibility that allows walls to settle without cracking
- Built-in drainage features that prevent water pressure buildup
- Easier repairs if individual blocks become damaged
Allan Block and Versa-Lok Systems
Allan Block and Versa-Lok are leaders in interlocking concrete block systems for cabin retaining walls. Both have proven track records and offer engineered wall systems for sloped lots that handle tough terrain confidently.
Allan Block has a hollow-core design for easier handling. The hollow cores also allow for vertical reinforcement in taller walls. This makes it great for DIY projects because the blocks are lighter.
Versa-Lok uses solid blocks and an integrated pinning system. Steel pins connect each course to the one below, creating exceptional strength. This design excels on steeper slopes where extra stability is needed.
Allan Block AB Classic and Fieldstone Collections
The AB Classic collection offers a modern look that suits contemporary cabins. These blocks have smooth faces with subtle texture. They’re ideal for blending into the background while doing their job.
The Fieldstone collection has a different vibe. It includes textured faces that mimic natural stone. This collection is perfect for log cabins and traditional mountain architecture, giving a rustic look without the high cost or installation challenges.
Both collections use the same installation methods and structural principles. Your choice depends on your aesthetic preference, not performance differences.
Versa-Lok Standard and Mosaic Systems
The Versa-Lok Standard line is great for most residential retaining walls. These full-sized blocks can create walls up to moderate heights without needing extensive engineering. They’re the workhorses of the Versa-Lok family.
The Mosaic system features smaller blocks for shorter walls and decorative uses. These are perfect for terraced landscaping around cabins. You can create multiple levels of planting beds or define outdoor living spaces with attractive low walls.
Mosaic blocks offer more color and texture options than the Standard line. This gives you more freedom in designing your cabin’s landscape features.
Pricing and Installation Requirements
Understanding the cost of sloped property retaining walls means looking at more than just material prices. Installation requirements also play a big role. Concrete block systems offer great value when considering both upfront costs and long-term performance.
| Cost Component | Price Range | Key Factors |
|---|---|---|
| Material Costs | $15-25 per sq ft | Block style, color options, quantity discounts |
| Installation Labor | $10-20 per sq ft | Site access, wall height, soil conditions |
| Total Installed Cost | $25-45 per sq ft | Complete project including base prep and drainage |
Proper installation starts with a solid foundation. You’ll need a compacted gravel base at least 6 inches deep for most applications. This base provides stable footing and helps with drainage. Skipping this step invites settlement problems down the road.
Walls taller than 3-4 feet require geogrid reinforcement. This synthetic fabric extends back into the slope from each few courses of blocks. Geogrid dramatically increases wall strength and stability by anchoring the structure to the hillside itself.
Drainage systems behind the blocks are non-negotiable. Water pressure destroys retaining walls faster than anything else. Install drainage pipe behind the wall and backfill with gravel to allow water to escape safely. This simple step extends wall life by decades.
Most cabin owners find interlocking concrete block systems offer the sweet spot between affordability and quality. They stand up to mountain weather year after year while maintaining their appearance. The relatively straightforward installation also means projects move forward on reasonable timelines without specialized equipment or crews.
Natural Stone Retaining Walls for Mountain Cabins
Natural stone is perfect for hillside cabin retaining walls. It looks like it’s always been there. These walls are strong and have a real mountain feel that modern materials can’t match. They’re great for those who want both function and natural beauty.
Natural stone lasts a long time and gets better with age. It fits well with the mountains, making your property more valuable. Whether you pick rustic fieldstone or cut granite, your walls will look timeless and fit any cabin style.
Dry Stack vs. Mortared Stone Construction
The way you build your wall affects how it looks and works. Dry stack construction uses stones without mortar, relying on gravity and placement for stability. This method gives walls a natural, old look that many like.
Dry stack walls let water drain, preventing damage. They work best for walls under 4 feet tall. But, they need careful craftsmanship to stay stable.
Mortared stone walls use cement to hold stones together, making them stronger. This method lets you build taller walls. But, you’ll need to add drainage to stop water buildup.
Mortared walls cost more because of the extra materials and labor. They look more formal and last longer than dry stack walls. Your choice depends on how tall you want your wall, the soil, and your style.
Selecting Local Stone Materials
Using local stone for your wall has many benefits. It saves on transport costs, sometimes by 30-40 percent. Local stone also fits better with the surrounding rocks.
Local suppliers know the best stone for your climate. They help you avoid choosing the wrong stone, saving you money.
Fieldstone and Boulders
Fieldstone from your area or nearby gives a true mountain look. These stones are irregular and weathered, making walls look like they’ve always been there. Arranging fieldstone artfully makes retaining walls appear like natural outcroppings that have always existed on your land.
Boulders add a rugged look to your project. Their size and shape provide stability. Using different sizes adds interest and strengthens the wall.
Fieldstone walls are cheaper if you get the stone from your site. The stones’ irregular shapes take more time to fit but save on cutting costs. This approach is perfect for a true wilderness feel.
Cut Stone and Flagstone Options
Cut stone has uniform dimensions, making it easier to stack and saving on labor. Materials like granite and limestone offer a traditional look. These stones fit well with formal cabin designs.
Flagstone is great for adding features like seating or planters to your wall. Its flat surfaces make it versatile for terraced designs.
Premium materials like slate or polished granite add luxury to your cabin. They cost more but last longer and look amazing. They’re worth it for standout walls in your landscape.
Cost Considerations for Stone Walls
The cost of stone walls varies a lot. Fieldstone walls using site-collected material might cost $25-40 per square foot with labor. This is the most affordable option for budget-conscious owners.
Premium cut stone or imported materials can cost $75-150 per square foot. Mortared walls add $15-30 per square foot due to materials and labor. Transport costs increase for remote locations.
Despite the higher upfront cost, stone walls are a long-term investment. They can last 50-100+ years with little maintenance. Their durability and timeless beauty make them a valuable addition to your property.
| Stone Type | Cost Per Sq. Ft. | Best Applications | Expected Lifespan |
|---|---|---|---|
| Fieldstone (Site-Sourced) | $25-40 | Rustic cabins, natural landscapes, lower walls | 75-100+ years |
| Local Cut Stone | $45-70 | Formal designs, higher walls, terraced systems | 80-100+ years |
| Premium Granite/Slate | $75-150 | Upscale properties, focal features, architectural statements | 100+ years |
| Flagstone Integration | $50-90 | Seating areas, steps, decorative elements | 60-80 years |
Poured Concrete Retaining Walls for Steep Slopes
For sloped cabin properties with big elevation changes or unstable soil, engineered wall systems for sloped lots are key. Poured concrete retaining walls are the strongest option for tough terrain. They handle extreme slopes better than modular blocks or timber.
Building poured concrete walls is complex and costly. But they last for decades in harsh conditions. This is vital for cabin owners with extreme slopes or big structures above their walls.
Engineering Requirements for Challenging Terrain
Your cabin site needs engineered walls for steep slopes. Slopes steeper than 35 degrees need professional designs. Walls over 6 feet tall also need engineering.
A licensed engineer will assess your site and design the right wall. They’ll figure out soil pressure and wall thickness. This ensures your wall can handle soil and any extra weight.
Local codes often require engineered walls for heavy loads or unstable soils. Unlike gravity walls, engineered walls use reinforcement to resist forces. You’ll need engineering drawings for permits.
Foundation and Structural Reinforcement Details
The foundation for poured concrete walls starts deep below ground. Footings must go below the frost line to avoid damage from freezing. In cold areas, this means digging 4-5 feet deep, while warmer places need only 18-24 inches.
Steel reinforcement makes concrete strong and flexible. Horizontal and vertical rebar grids are spaced 12-18 inches apart. This reinforcement goes from the footing to the top of the wall, making it strong against cracking and bending.
In extreme cases, tie-backs and buttresses may be needed. Tie-backs go deep into the hillside, and buttresses add extra support to tall walls.
Building poured concrete walls is a complex process. It requires skilled professionals for every step. Forms must be built carefully, reinforcement placed correctly, and concrete mixed to the right strength. Rushing these steps can harm the wall’s strength.
Aesthetic Finishing Options
Raw concrete doesn’t have to look bad at your cabin. Modern finishing techniques can make it look great. Choose finishes early, as some need to be applied during construction.
Textured finishes can mimic stone or wood. These patterns are cast into the concrete and last forever. They add beauty without needing upkeep.
| Finishing Method | Aesthetic Result | Cost Impact | Maintenance Needs |
|---|---|---|---|
| Integral Color | Consistent earth tones throughout concrete depth | +$3-5 per sq ft | Minimal—color won’t peel or fade |
| Textured Form Liners | Stone or wood grain surface patterns | +$8-15 per sq ft | None—texture is permanent |
| Stain or Paint | Wide color range, uniform appearance | +$2-4 per sq ft | Reapplication every 5-8 years |
| Stone Veneer Facing | Natural stone appearance with full authenticity | +$20-35 per sq ft | Occasional repointing of mortar joints |
Integral color mixes pigments into the concrete for a uniform look. Earth tones like tan, brown, and gray blend well with mountains. Minor damage won’t expose gray concrete underneath.
Stone veneer is the top choice for a natural look. Real stone is attached to the concrete face, making the wall look like it’s made of stone. This adds beauty but increases costs.
Paint or concrete stain is the cheapest option for color. These coatings can be applied later and changed if needed. But, they need to be reapplied over time as they wear off.
Poured concrete retaining walls cost between $60 to $100+ per square foot. This is the highest initial cost but offers unmatched strength and durability. It’s essential for severe slopes or structures above the wall.
Gabion Walls: Modern Solution for Erosion Control
Wire mesh cages filled with stone are changing how cabin owners handle hillsides. Gabion walls bring a modern look to sloped property retaining walls. They are strong and work well on tough terrain. The name “gabion” comes from the Italian word for “big cage,” fitting these structures perfectly.
These systems are different from solid walls. They let water flow through while holding soil back. This makes them great for erosion control for sloped cabin sites with lots of water or near streams.

Understanding the Gabion System Mechanics
Gabion systems use rectangular wire mesh baskets that stack like blocks. They are made from galvanized or PVC-coated steel to last a long time. Each basket is 3 feet wide and 3 feet tall, with lengths from 3 to 9 feet.
The building process makes the walls strong. Each basket is filled with rocks 3 to 6 inches in diameter. When stacked, these cages form a flexible yet sturdy structure that can handle ground movement better than rigid walls.
What makes gabion walls special is how they handle water. The gaps between rocks let water drain freely. This prevents water pressure from building up behind the wall, which is a common problem with other retaining walls.
Why Cabin Owners Choose Gabion Walls
Gabion walls look good and work well for hillside properties. They mix industrial wire cages with natural stone for a modern rustic look. You can pick rock types that match your landscape.
The benefits of gabions are clear:
- Superior drainage solves water pressure issues
- Flexibility means the structure can adjust to ground settlement
- Immediate effectiveness for erosion control along streams
- Environmental friendliness supports plant growth between rocks
- Load distribution spreads weight evenly across the foundation
Gabion walls are perfect for areas with lots of rain or snowmelt. Water flows through, reducing erosion and foundation problems that affect other walls.
Building Your Gabion Retaining Wall
Building gabion walls is easier than poured concrete systems. It’s a DIY-friendly option that can look professional with careful steps.
Begin with a level and compacted base of crushed stone or gravel. This base should be 6 inches wider than the wall on all sides. A good base prevents settling and keeps the wall stable for decades.
Start assembling the wire panels as the instructions say. Most systems use spiral binders or hog rings to connect panels. Place the cages on your base and stake them to prevent shifting while filling.
Choosing the right rocks is key for both looks and function. Pick stones larger than the wire mesh openings to keep them in place. Angular rocks work better than smooth ones. Many choose local stone for a natural look that fits the landscape.
Fill the cages carefully, placing rocks by hand for the outer faces. This makes them look good. Fill the inside faster with a machine or wheelbarrow. Connect wires every 12 inches vertically to keep the wall from bulging.
Gabion walls cost between $20 to $40 per square foot, based on basket quality and rock availability. Galvanized wire mesh baskets last 50 years or more. PVC-coated versions last even longer in harsh weather or acidic soil.
Higher-quality cages cost more but last longer. Budget $15-25 per linear foot for wire baskets and $50-100 per cubic yard for rock. Professional installation adds $30-50 per square foot if you want an expert to build it.
Gabion walls are a distinctive alternative to traditional sloped property retaining walls. They offer a modern look and practical benefits. Their natural drainage and flexible structure make them ideal for erosion control on challenging cabin sites.
Choosing the Right Retaining Wall for Sloped Cabin Sites
Your cabin’s hillside location needs a retaining wall that’s both strong and looks good. You must consider your property’s conditions and choose materials that work well. The right choice protects your cabin and makes your mountain retreat better.
Three key factors help you pick the best retaining wall for sloped cabin projects. Each factor is important for your property’s needs. Making the right choice saves money and prevents problems later.
Understanding Your Terrain Conditions
Knowing your property is the first step in choosing a retaining wall. The slope and soil type decide which walls will work. Getting this right saves money and prevents failures.
Measuring your slope percentage is key. Divide the vertical rise by the horizontal run, then multiply by 100. This tells you if your terrain is gentle, moderate, or steep.
Here’s how slope categories break down:
- Gentle slopes (under 15%): Most wall types work well, including timber and basic concrete blocks
- Moderate slopes (15-30%): Require sturdier systems like interlocking blocks or reinforced designs
- Steep slopes (over 30%): Demand engineered solutions such as cantilever or anchored walls
Soil type affects stability and drainage. Sandy soils drain fast but don’t support walls well. Clay soils hold water and put pressure on walls. Rocky soils drain well and are stable.
A professional soil test shows bearing capacity and drainage. This tells you if your cabin foundation on incline needs special care. The test results help decide on footer depth, drainage, and reinforcement.
Calculating Structural Requirements
Wall height and the loads it must support dictate which construction methods meet engineering standards. Underestimating these requirements leads to structural failure, while overbuilding wastes money on unnecessary materials.
Height determines complexity and cost more than any other single factor. Shorter walls offer more material choices and simpler construction. Taller walls require professional engineering and specialized installation techniques.
Consider these height-based guidelines:
- Walls under 4 feet: Many DIY-friendly options including timber, natural stone, and standard concrete blocks work well
- Walls 4-8 feet: Typically require engineered interlocking systems or reinforced concrete with proper drainage
- Walls over 8 feet: Almost always need professional design with cantilever or anchored construction methods
Load-bearing requirements extend beyond simple soil retention. Will the wall support a driveway or parking area? Does it need to hold back fill beneath a deck or patio? Will it serve as part of your cabin foundation on incline support system?
Additional loads require stronger wall systems with deeper footers and enhanced reinforcement. A wall holding back soil alone faces different forces than one supporting vehicle traffic. Be honest about all intended uses when planning your project.
Creating Visual Harmony with Your Property
The best retaining wall for sloped cabin properties balances function with form. Your wall should look like it belongs on your property, complementing your cabin’s style.
Different wall materials pair naturally with specific cabin designs. Matching these elements creates cohesive outdoor spaces that feel intentional and well-planned. Poor aesthetic choices make even perfectly functional walls look like afterthoughts.
| Cabin Style | Best Wall Materials | Visual Benefits |
|---|---|---|
| Traditional Log Cabin | Fieldstone, timber, natural boulders | Rustic authenticity that honors mountain heritage |
| Contemporary Mountain Modern | Poured concrete, gabions, interlocking blocks | Clean lines and industrial textures create sophistication |
| Craftsman Style | Natural stone, high-quality masonry, stacked block | Detailed craftsmanship echoes architectural details |
| A-Frame or Mid-Century | Smooth concrete, gabions, modern block systems | Geometric forms complement angular architecture |
Color and texture matter as much as material choice. Walls using local stone blend naturally with surrounding landscapes. Concrete products come in numerous finishes that mimic natural materials or make bold contemporary statements.
Consider how the wall interacts with other landscape features. Will it connect to existing stonework? Does it need to coordinate with driveway materials or patio surfaces? These connections create unified outdoor spaces that feel professionally designed.
Budget constraints influence material selection, but they shouldn’t override structural requirements. A cheaper wall that fails costs far more than investing in appropriate materials from the start. Find the sweet spot where structural needs, aesthetic preferences, and financial reality align for your specific property.
The perfect retaining wall choice emerges when you’ve thoroughly evaluated terrain conditions, calculated accurate structural requirements, and selected materials that enhance your cabin’s character. Taking time for this analysis prevents expensive mistakes and creates outdoor spaces you’ll enjoy for decades.
Drainage Solutions for Retaining Walls on Slopes
Your retaining wall’s biggest enemy isn’t visible from the front—it’s the water accumulating behind it. This water buildup causes most failures. Without proper drainage, even the strongest walls will eventually fail under water pressure.
Effective water management protects your retaining structure and cabin foundation on incline from moisture damage. The cost of drainage systems adds only 10-20% to your project cost. This can extend your wall’s lifespan from 15 years to 50 years or more.

Allowing Water Escape Through Strategic Openings
Weep holes serve as pressure relief valves that let water pass through your wall. These small openings appear as gaps between blocks or inserted pipes in solid walls. Place weep holes every 4 to 6 feet horizontally along the wall’s base, starting about 6 inches above ground level.
For timber and concrete block walls, simply leave gaps during construction. Poured concrete and stone walls require PVC pipes (typically 2-3 inches in diameter) installed before the wall hardens. Angle these pipes slightly downward to encourage water flow outward.
Drainage pipes behind taller walls collect groundwater more aggressively than weep holes alone. Install perforated 4-inch PVC pipes along the wall base, with holes facing downward. These pipes connect to solid pipes that carry water to safe discharge points away from your structure.
Creating a Permeable Barrier Layer
The combination of gravel backfill and filter fabric creates a two-part defense system against water retention and soil migration. This partnership is essential for erosion control for sloped cabin sites where runoff can quickly compromise wall stability.
Start by placing landscape filter fabric directly against the back of your retaining wall. This geotextile material prevents fine soil particles from washing into your drainage system while allowing water to pass freely. Overlap fabric seams by at least 12 inches and extend the fabric up the wall height and back into the hillside.
Backfill with 12 to 18 inches of clean crushed stone or drainage gravel behind the fabric. Avoid rounded river rock, which doesn’t compact well. Angular gravel creates air spaces that let water percolate down to collection pipes instead of saturating soil behind the wall. This gravel layer acts as a vertical drain that significantly reduces hydrostatic pressure.
Comprehensive Water Interception Systems
French drains represent the most effective solution for managing large water volumes before they reach your retaining wall. These underground channels intercept groundwater upslope and redirect it around your protected area. For properties with springs, seasonal streams, or heavy seasonal runoff, French drains provide critical protection.
A properly constructed French drain consists of a perforated pipe surrounded by gravel in a fabric-lined trench. Dig the trench 2 to 3 feet deep and at least 10 feet upslope from your retaining wall. Line the trench with filter fabric, add 3 inches of gravel, place the perforated pipe (holes facing down), cover with more gravel, then wrap and cover with soil.
Position French drains to follow the natural contour of your slope, maintaining a consistent downhill grade of 1% minimum (1 inch drop per 10 feet). The system should discharge to daylight at a lower elevation or connect to a dry well away from structures. Multiple French drains may be necessary for complex terrain or to protect your cabin foundation on incline from various water sources.
Surface water management complements underground drainage through swales, catch basins, and diversion berms. Swales are shallow ditches that channel surface runoff around your retaining wall area. Catch basins collect concentrated water from downspouts or paved areas and direct it to safe outlets. Together, these elements create a complete water management system that addresses both surface and subsurface moisture.
| Drainage Solution | Best Application | Typical Cost Range | Maintenance Needs |
|---|---|---|---|
| Weep Holes | Walls under 4 feet with moderate water exposure | $50-$150 total (minimal material cost) | Annual inspection for clogs, clear debris as needed |
| Perforated Drainage Pipes | Walls over 4 feet or with consistent groundwater | $8-$15 per linear foot installed | Check outlets annually, flush pipes every 3-5 years |
| Gravel Backfill with Filter Fabric | Essential for all retaining walls on slopes | $25-$45 per cubic yard of gravel plus fabric | Minimal; verify fabric remains in place during inspections |
| French Drain Systems | High water volume sites, springs, or seasonal streams | $15-$30 per linear foot installed | Inspect outlets twice yearly, clear sediment buildup |
| Comprehensive Water Management | Complex terrain with multiple water sources | $3,000-$8,000 for complete system | Seasonal inspection of all components, clear vegetation |
The most successful installations combine multiple drainage strategies. A typical setup includes weep holes or drainage pipes at the wall base, gravel backfill with filter fabric behind the wall, and a French drain positioned upslope to intercept groundwater before it reaches the structure.
Don’t view drainage as an optional expense. The cost of installing proper water management during initial construction is a fraction of what you’ll spend repairing or rebuilding a failed wall. Drainage investments protect your entire property investment while ensuring erosion control for sloped cabin sites remains effective for decades to come.
Cost Factors for Cabin Retaining Wall Projects
Planning your budget for slope stabilization is key. Material choices, site conditions, and installation methods all play a role. Building a hillside cabin retaining wall is more than just picking a type. Your total cost includes foundation prep, wall construction, and landscaping.
Starting with realistic expectations about retaining wall costs is smart. Some cabin owners are surprised by professional quotes. Others underestimate the complexity of DIY projects.
Understanding the major expense categories helps avoid financial surprises. Let’s explore the main cost factors for your retaining wall budget.
Understanding Material Expenses for Different Wall Systems
The type of retaining wall you choose sets the foundation of your budget. Material costs vary by a factor of ten between the most economical and premium options.
Pressure-treated timber walls are the budget-friendly choice at $15-25 per square foot installed. They are attractive for those with tighter budgets or covering large areas.
Standard concrete blocks fall in the middle range at $20-35 per square foot. Interlocking systems like Allan Block or Versa-Lok cost $30-50 per square foot but offer better stability and appearance.
Natural stone pricing varies widely. Fieldstone costs $35-75 per square foot, while premium cut stone reaches $100-150 per square foot. Local stone availability greatly impacts these prices.
Engineered poured concrete walls are the most expensive at $60-100+ per square foot. These costs reflect the structural engineering, reinforcement steel, and specialized forming required. Gabion systems offer a middle ground at $25-40 per square foot, combining modern aesthetics with reasonable pricing.
| Wall Type | Cost Per Square Foot | Best For | Lifespan |
|---|---|---|---|
| Pressure-Treated Timber | $15-25 | Budget-conscious projects, moderate slopes | 15-20 years |
| Concrete Blocks (Standard) | $20-35 | DIY-friendly, versatile applications | 30-50 years |
| Interlocking Block Systems | $30-50 | Professional appearance, easier installation | 50-75 years |
| Natural Stone (Fieldstone) | $35-75 | Rustic mountain aesthetics | 50-100 years |
| Natural Stone (Cut/Premium) | $100-150 | High-end cabin designs | 100+ years |
| Poured Concrete (Engineered) | $60-100+ | Steep slopes, heavy loads | 50-100 years |
| Gabion Systems | $25-40 | Modern design, excellent drainage | 50-75 years |
Site Preparation and Equipment Access Challenges
Excavation and site access expenses often surprise cabin owners. These “hidden” costs can add 20-50% to your total project budget depending on terrain challenges.
Base excavation for proper footings typically adds $5-15 per square foot. Rocky mountain soil that requires breaking or removal pushes excavation costs even higher. Some sites need blasting or specialized equipment to prepare foundations properly.
Access limitations create the biggest cost variables for hillside properties. If heavy equipment must navigate narrow mountain roads or cannot reach your site at all, expect significant price increases. Equipment mobilization fees for remote locations range from $500-3,000 depending on distance and difficulty.
Some cabin sites require alternative approaches when standard equipment cannot access the build area:
- Hand excavation and manual material transport (labor-intensive but sometimes necessary)
- Smaller equipment rental that can navigate tight spaces (slower but more maneuverable)
- Helicopter material delivery for extremely remote locations (expensive but occasionally the only option)
- Temporary access road construction to reach the build site (adds upfront cost but enables standard equipment)
Steep terrain increases both time and difficulty for crews. Labor rates may increase 25-40% when workers face challenging slope conditions that slow productivity and increase safety requirements.
Comparing Professional Installation Versus DIY Cost Savings
The choice between hiring professionals or tackling installation yourself creates the largest cost swing. DIY installation can save 40-60% on material costs but requires honest assessment of your capabilities.
Professional installation offers several advantages. Licensed contractors provide engineering expertise, warranty protection, and efficient completion. They handle permit applications and ensure code compliance. Professional crews complete in days what might take DIYers weeks or months.
Labor typically represents 50-70% of professional installation quotes. A $10,000 material cost becomes $20,000-30,000 when hiring professionals. This markup covers their expertise, insurance, equipment, and overhead.
DIY-friendly options include timber walls, concrete blocks, and gabion systems for walls under 4 feet on moderate slopes. These projects require basic tools, physical stamina, and willingness to learn proper techniques. Capable DIYers with construction experience can achieve professional-quality results while pocketing significant savings.
Yet, some situations demand professional help regardless of DIY ambitions:
- Walls exceeding 4 feet in height (engineering and building codes typically require professional work)
- Steep slopes with challenging soil conditions (expertise prevents costly failures)
- Sites requiring structural engineering stamps (only licensed professionals can obtain these)
- Heavy equipment needs beyond typical rental options (specialized machinery requires trained operators)
Don’t forget additional budget items that apply to both approaches. Permit fees range from $150-500 depending on your jurisdiction and wall specifications. Structural engineering for walls requiring calculations costs $500-2,000 based on project complexity.
Smart budgeters add a 15-20% contingency fund for unexpected conditions. Rocky soil, hidden springs, or unsuitable base materials discovered during excavation can derail even well-planned budgets. This cushion prevents project delays when surprises arise.
Tool rental for DIY projects adds another cost layer. Plate compactors, concrete mixers, and excavation equipment rent for $50-200 per day. Multi-week projects accumulate significant rental expenses that reduce overall savings.
The total investment for your retaining wall project depends on all these interconnected factors. A simple 3-foot timber wall on accessible terrain might cost $3,000-5,000 DIY or $8,000-12,000 professionally installed. An extensive poured concrete system on steep, difficult-access terrain could easily reach $50,000-100,000 or more.
Permits and Engineering Requirements for Sloped Sites
Getting the right permits and engineering plans is key to avoiding headaches. Without them, you could face stop-work orders, fines, or even have to tear down your wall. Knowing the rules before you start is essential for a smooth and legal project.
Most places have rules about when you need permits and engineering. These rules help keep everyone safe by preventing walls from failing.
Professional Engineering Requirements
Whether you need a structural engineer depends on your site and wall design. Most places require engineering stamps for walls over 4 feet tall. But, some areas might need them for walls as short as 3 feet, depending on the terrain.
Walls that support cabins on slopes or driveways need engineering, no matter their height. Also, walls on slopes steeper than 35 degrees need special designs to stay stable.

Poor soil can also mean you need engineering. Clay, loose fill, or high water tables add extra pressure. Even if not required, engineering your wall can give you peace of mind.
What structural engineers provide for your project:
- Soil analysis and testing
- Calculations for earth pressure
- Foundation designs for local frost
- Reinforcement for walls
- Drawings for permit approval
- Construction checks
Engineering costs range from $500 to $2,000, depending on your site. While it’s an extra cost, it can save you money in the long run by catching problems early.
For complex sites, more detailed engineering might be needed. This protects your cabin and provides value for future buyers.
| Wall Height | Engineering Required | Typical Permit Fees | Review Timeline |
|---|---|---|---|
| Under 3 feet | Usually not required | $150-$250 | 1-2 weeks |
| 3-4 feet | Varies by jurisdiction | $200-$350 | 2-3 weeks |
| 4-6 feet | Required in most areas | $300-$450 | 3-5 weeks |
| Over 6 feet | Always required | $400-$600 | 4-6 weeks |
Navigating Building Codes
Building codes vary a lot, so check with your local department first. Mountain areas often have stricter rules because of erosion and stability risks.
Setback rules are common. They require walls to be at least 2-3 feet from property lines. This keeps the wall from encroaching on neighbors and allows for maintenance access.
Structural design must include safety factors. Engineers design walls to handle forces 1.5 to 2.0 times normal loads. This extra safety is for unexpected soil conditions and extreme weather.
Frost depth for footings varies across the U.S. Northern areas might need foundations 4 feet or more deep. Southern areas have less frost concern. Your local department will tell you the frost depth for your area.
Drainage is a key part of retaining wall codes. Proper water management prevents pressure that can cause walls to fail. Codes usually require weep holes, drainage pipes, or other systems to manage water.
Inspections during construction are important. Most places require inspections at key stages: excavation, foundation, reinforcement, and final completion. Missing these can delay your project and cost more.
Some areas require geological surveys for steep sites. This is important in areas with landslide history or unstable soil. Surveys help identify hazards before construction starts.
Permit fees for retaining walls are usually $150 to $500. The process takes 2-6 weeks, depending on the workload and if engineering is needed. Having complete, professional plans can speed up approval.
While permits and engineering add time and cost, they ensure your wall is safe and protects your investment. Building without them can lead to costly fixes and liability issues if the wall fails.
Reach out to your local building department early to understand what you need for your site. Many offer pre-application consultations to help you navigate the process and spot issues before you submit your plans.
Terraced Landscaping and Multi-Level Design
Terraced landscaping turns a sloped cabin site into charming outdoor rooms. Each room has its own purpose. A terraced retaining wall for mountain cabin properties makes hillsides into beautiful spaces.
Multi-level design spreads soil pressure across smaller structures. This approach makes space usable and cuts down on costs. Each terrace has its own unique character and function.
Creating Multiple Tiers for Functional Spaces
Breaking your slope into levels creates outdoor zones that work harder than a single flat space. Plan each tier for a specific purpose. A lower terrace might have a fire pit and seating, while a middle level could have a garden.
The upper terrace near your cabin is perfect for a deck or patio. Each functional terrace should be at least 6 to 8 feet deep to be useful. Narrow terraces feel cramped and limit furniture options.
When planning tier heights, consider the slope. Instead of one big wall, use three smaller ones. This reduces the pressure behind each wall.
Smaller walls are easier to build and require simpler materials. Timber or concrete blocks work well for walls up to 4 feet. Taller walls need more complex solutions. The spaces between walls help with drainage by allowing water to flow through.
| Terrace Configuration | Best Applications | Wall Height Range | Terrace Depth |
|---|---|---|---|
| Two-tier system | Moderate slopes, dual-purpose areas | 4-6 feet each | 8-12 feet |
| Three-tier system | Steep hillsides, varied functions | 3-5 feet each | 6-10 feet |
| Four-tier system | Dramatic slopes, maximum usability | 2-4 feet each | 6-8 feet |
| Mixed height system | Custom layouts, focal points | 2-6 feet varied | 6-15 feet varied |
Integrating Pathways and Stairs
Pathways and stairs connect your terraced levels, making the hillside accessible. Tiered landscaping for cabin on hill needs careful planning for easy movement. Stairs become design features, not afterthoughts.
Natural stone steps match rustic walls beautifully. They blend with the environment and are durable. Timber stairs add warmth and can match wooden walls for a cohesive look.
Poured concrete stairs work well with concrete block walls. They can be finished with decorative aggregates or stamping. Place stairs to create natural flow between areas. Straight runs are good for direct access, while switchback stairs soften the climb on steep sites.
Plan landings every 8 to 12 steps on steep terrain. These resting points make climbing easier and safer. They also offer spots to enjoy views. Pathway materials should match your retaining walls for a harmonious look.
Gravel or crushed stone paths are budget-friendly and drain well. They’re great for rustic designs. Pavers or flagstone create formal pathways that suit contemporary designs.
Lighting for pathways and stairs is important for use after dark. Low-voltage LED fixtures are safe and don’t overpower the night. Solar options are good for remote sites without easy electrical access.
Planting Strategies for Terraced Walls
Planting on and around terraced walls adds beauty and controls erosion. Groundcovers like creeping phlox soften edges and stabilize soil. They also bloom seasonally.
Ornamental grasses add vertical interest and move in mountain breezes. They develop deep roots that grip soil well. They’re low-maintenance and tolerate variable moisture.
Flowering shrubs create color and attract pollinators. Choose native species for the best results. They also provide privacy between terraces.
Small ornamental trees anchor terrace corners without overwhelming the space. They add height variation without compromising wall stability. Space trees at least 6 feet from walls to prevent root interference.
Plant selection should match the terrace’s sun and drainage conditions. Upper terraces get more sun and drain faster, ideal for sun-loving plants. Lower terraces in shade are better for moisture-loving plants.
Plan for seasonal interest in your plantings. Spring bulbs, summer perennials, fall foliage, and evergreen structure keep your landscape attractive year-round. This mirrors the physical layering of your terraced walls.
Well-designed terracing creates usable outdoor space while reducing wall costs. The combination of terraces, pathways, and planting transforms hillsides into favorite outdoor areas.
Maintenance and Longevity of Hillside Retaining Walls
Keeping your hillside cabin safe starts with regular wall maintenance. Small problems can turn into big repairs if not caught early. Different materials need different care, but all benefit from consistent upkeep.
Spotting problems early is key to long-lasting walls. A regular check-up schedule and quick fixes can extend your wall’s life. Knowing what to look for and how to fix it makes maintenance easy, even for busy owners.
What to Check During Your Seasonal Inspections
Regular checks help find problems before they get worse. Inspect your walls twice a year. Once after spring thaw and again after fall rains.
Start by looking for drainage issues. Check for standing water, saturated soil, or stains on the wall. These signs often show up first and can lead to wall failure.
Next, look for wall movement. Check for tilting, bulging, or gaps. Even small changes need attention, as they can get worse over time.

- Cracking in concrete or masonry – Hairline cracks are normal, but anything wider than 1/4 inch needs evaluation
- Loose or missing blocks – Common in modular systems and easily addressed if caught early
- Rot or insect damage – Critical for timber walls; look for soft spots and bore holes
- Erosion patterns – Check both at the wall base and behind the structure
- Vegetation in joints – Plant roots create pressure that can damage walls over time
Take photos and notes of your findings. This helps track changes and provides useful info for structural engineers.
Fixing Drainage Problems and Settling Issues
Act fast when you find drainage or settlement problems. Poor drainage is the main cause of wall issues, so fix it first.
Start with simple solutions for drainage problems. Clean weep holes and drainage pipes. Use a pressure washer or plumbing snake to clear blockages. This simple task can solve many drainage issues.
Settlement is a bigger challenge. It often means the wall wasn’t built right or the soil moved. Minor settlement (less than an inch) might be fixed by adding gravel or soil behind the wall.
But, significant movement needs a pro’s help. If the wall leans forward or has big gaps, it’s a sign of serious problems. Don’t wait to fix these issues—walls rarely get better on their own.
Settling can affect just one part of a wall. In these cases, you might only need to rebuild that section. This saves money while keeping the wall stable.
Care Strategies for Maximum Wall Lifespan
Material-specific care extends your wall’s life. Each type has its own needs for long-term performance.
Timber walls need the most care. Use wood preservative or stain every year to protect against moisture and UV damage. Check for rot or insect damage and replace damaged boards. Keep plants 12 inches away from the wood to improve air flow and reduce moisture.
Concrete and stone walls need less care but benefit from regular checks. Power wash every 2-3 years to remove moss and algae. In cold climates, apply masonry sealer every 3-5 years to prevent water damage.
For mortared stone walls, check joints annually and repoint any damaged areas. This prevents stones from shifting and keeps the wall strong.
All wall types benefit from these universal practices:
- Maintain proper drainage systems with annual cleaning and inspection
- Keep soil properly graded behind the wall to direct water away
- Limit heavy loads near the wall—avoid parking vehicles or storing materials within 3 feet
- Control vegetation by removing deep-rooted plants that could pressure the wall
- Address small problems immediately to prevent them from getting worse
Expected lifespan varies by material. Timber walls last 20-30 years, concrete block systems 50-75 years, and natural stone walls 75-100+ years. These lifespans assume proper construction and consistent maintenance.
| Wall Type | Expected Lifespan | Maintenance Frequency | Primary Care Focus |
|---|---|---|---|
| Timber | 20-30 years | Annual | Preservative treatment, rot prevention |
| Concrete Block | 50-75 years | Every 2-3 years | Drainage maintenance, cleaning |
| Natural Stone | 75-100+ years | Every 3-5 years | Joint inspection, mortar repair |
| Poured Concrete | 50-100 years | Every 3-5 years | Crack sealing, surface sealing |
Remember, proper drainage is key. Even the most durable materials fail if water pressure builds up. Keep drainage systems working well, and your retaining wall will protect your cabin for generations.
DIY vs. Professional Installation Considerations
Choosing between DIY and hiring a contractor affects your budget and project success. Knowing when to DIY and when to hire a pro can save you money and time. It’s about finding the right balance for your project.
DIY can cut 40-60% off your total project costs for certain walls. But, it requires careful planning and physical effort. Professional installation costs more but offers expertise, equipment, and warranty.
Knowing When Professional Help Is Essential
Some projects need professionals for safety and compliance. Walls over 4 feet high often require engineering and permits. If your cabin’s slope is steep, you might need a pro.
Bad soil or high water tables are also challenges for DIYers. Pros know how to handle these issues with the right tools and knowledge. They’ve learned from years of experience.
Consider hiring a pro for these situations:
- Walls that support structures, driveways, or vehicles
- Projects needing a lot of excavation or heavy equipment
- Unstable or very steep terrain
- Not enough time to do the job right
- Complex drainage problems
Professionals offer more than just labor. They have good relationships with inspectors, access to special tools, and warranties. Most importantly, they have insurance to protect you.
Wall Types Perfect for DIY Installation
Some retaining solutions are easy for DIYers with basic skills. Timber walls under 4 feet are a good start. You’ll need to drill holes, stack the timbers, and secure them with rebar.
Interlocking concrete blocks under 3 feet are designed for homeowners. Brands like Allan Block and Versa-Lok make installation easy. The blocks are heavy but manageable, and you don’t need special tools.
Gabion walls are great for any height. The wire baskets are pre-formed, and filling them with rocks is easy. Gabion walls are forgiving, so small mistakes won’t be a big deal.
Dry-stack stone walls under 3 feet are another DIY option. You’ll need local stone and patience. This method doesn’t need mortar and creates beautiful walls.
| Wall Type | Max DIY Height | Skill Level | Tools Required |
|---|---|---|---|
| Timber | 4 feet | Beginner-Intermediate | Drill, saw, level, tamper |
| Interlocking Blocks | 3 feet | Beginner | Level, tamper, shovel |
| Gabion Baskets | No limit | Beginner | Wire cutters, gloves, shovel |
| Dry-Stack Stone | 3 feet | Intermediate | Level, hammer, shovel |
DIY success depends on following instructions and preparing the base well. A solid gravel base is critical for wall stability. Take your time with this step, even if it’s tedious.
Safety Must Come First on Slopes
Working on steep terrain is risky. Falls, rolling materials, and unstable footing are hazards. OSHA suggests professional help for slopes over 30 degrees.
If you DIY on a slope, safety gear is essential. Wear sturdy boots, gloves, and safety glasses. A hard hat is wise if there’s a risk of falling objects.
Never work alone on a slope. Having a partner helps with moving materials and spotting hazards. They can also assist if something goes wrong.
Make stable work platforms before starting. Level areas reduce fatigue and prevent accidents. Secure materials to prevent them from rolling downhill.
Be careful with power tools on slopes. Circular saws and drills are harder to control. Take breaks to stay focused and avoid mistakes.
Many cabin owners use a hybrid approach. They hire pros for major walls and excavation. Then, they do smaller decorative walls and landscaping themselves. This way, they get professional quality where it matters most while saving on finishing work.
Assess your skills, time, and project complexity before DIYing. There’s no shame in getting professional help when needed. A well-built wall by experts will last decades and protect your property better than a DIY attempt.
Planning Your Perfect Retaining Wall for Sloped Cabin Success
Building the right retaining wall for your sloped cabin site starts with careful planning. Walk your property during different weather conditions to see how water moves. Note areas where erosion already causes problems. This helps you choose the best wall type for your needs.
Creating a terraced retaining wall for mountain cabin properties requires a complete landscape view. Think about where your driveway will go and which outdoor spaces you want to develop. Also, consider how pathways will connect different areas. This approach prevents one solution from creating new challenges elsewhere.
Set a realistic budget that includes materials, installation, drainage systems, and permits. Add 15-20% extra for unexpected site conditions. Choose wall materials that match your cabin’s style—rustic timber for log structures, natural stone for traditional mountain designs.
Proper drainage is key to a long-lasting wall. Plan for easy maintenance access to inspect and repair drainage systems when needed.
Take time researching contractors, comparing bids, and checking references. Your investment in tiered landscaping for cabin on hill properties transforms challenging terrain into beautiful, functional outdoor spaces. With careful planning and quality construction, your retaining wall becomes a lasting asset that protects your property and enhances your mountain retreat for years ahead.


