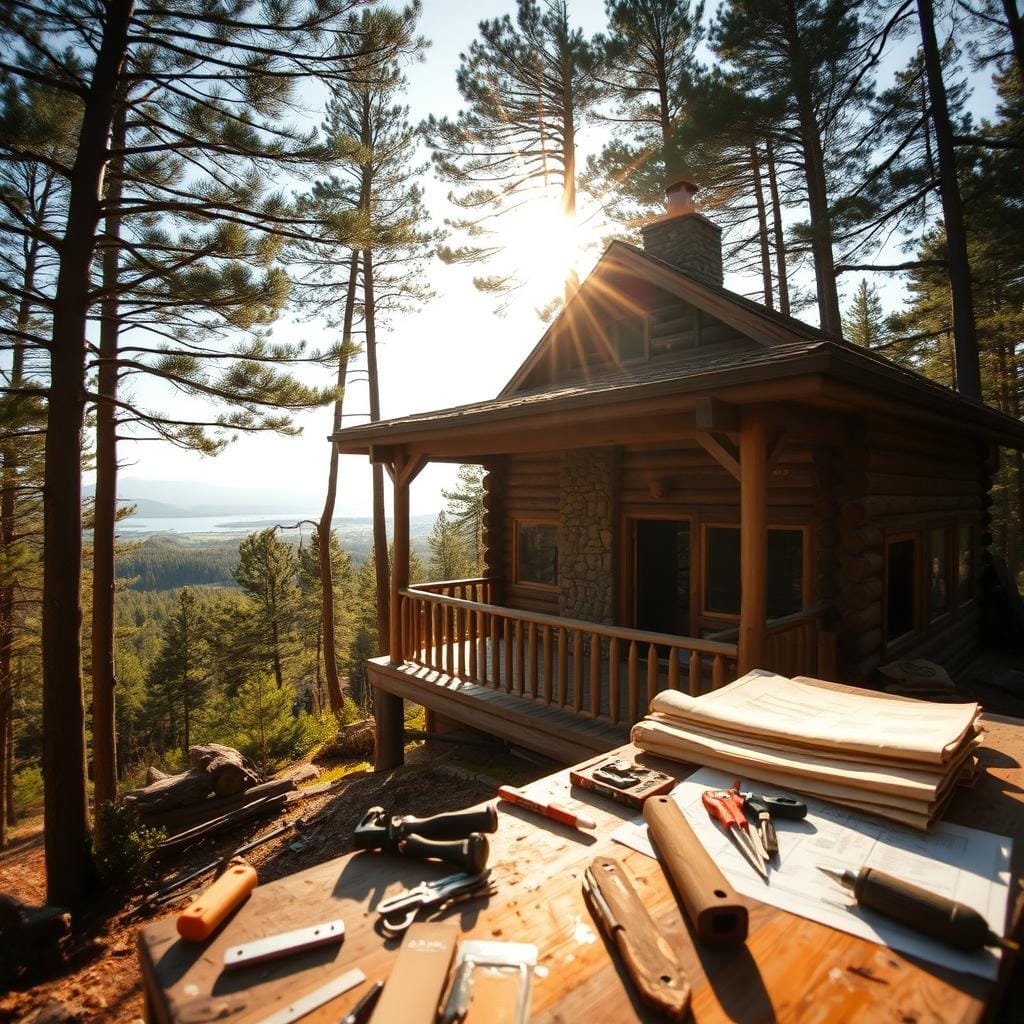
Imagine creating your own peaceful retreat deep in the woods. The dream of a personal cabin remains powerful, even today. It offers a quiet escape from our busy, connected lives.
Turning this vision into reality takes more than just enthusiasm. It requires real skills and a hands-on approach. Master builder Steve Maxwell spent thirty years in the field. He often wishes he knew at the start what decades of experience taught him.
This knowledge is exactly what we want to share with you. We’ll walk you through the entire process of building your own hideaway. You’ll learn the technical tricks and smart planning that make all the difference. Our aim is to help you avoid common pitfalls and build something beautiful and lasting.
Whether you’re a beginner or have some skills, this journey is achievable. It demands dedication and a willingness to get your hands dirty. The reward is immense: the pride of creating a special place with your own two hands.
Planning Your DIY Cabin Adventure
The journey to your woodland retreat begins long before the first log is cut. Solid planning is the foundation of any successful project. Taking ample time upfront to consider your site, budget, and timeline will save you countless headaches later.
Before you even think about purchasing land, research is crucial. Local building codes, zoning rules, and permit needs vary greatly. These regulations can significantly impact your design and construction plans. Knowing them early prevents costly mistakes.
Expert Steve Maxwell offers a brilliant tip for beginners. He suggests building a scale model of your design. Use small pieces of “lumber” cut to scale for width but slightly thicker. This makes assembly easier without losing the model’s value.
This hands-on exercise helps you visualize the final structure. It also lets you work through design challenges on a small scale. If the model proves too difficult, it’s a clear sign you may need more practice before the big project.
Start looking for land now, even if you’re not ready to buy. As Graeme Jenvey advises, understanding land prices and availability gives you a major advantage. You’ll know a great place when you see it.
Designing a Functional Cabin Layout
Smart design choices can make even the most compact dwelling feel spacious and inviting. The layout determines how you’ll live in and enjoy your retreat.
Expert Steve Maxwell advises against oversized plans. A well-designed smaller cabin offers more comfort than a stretched-budget larger one.
Optimizing Floor Plans for Cozy Spaces
Consider a 12′ x 20′ footprint providing 240 square feet. This size works beautifully as a guest house or personal office.
Maximize every square foot with multi-functional areas. Built-in storage and thoughtful furniture placement create an uncluttered feel.
| Cabin Size | Footprint | Roof Style | Key Benefits |
|---|---|---|---|
| Compact (240 sq ft) | 12′ x 20′ | Shed-style | Low cost, easy maintenance |
| Medium (500 sq ft) | 20′ x 25′ | Steep pitch | Loft space, family comfort |
| Large (1000 sq ft) | 25′ x 40′ | Various options | Spacious but higher costs |

Integrating a Front Porch and Loft Area
A 45-degree roof pitch creates valuable loft space underneath. This adds sleeping or storage area without expanding your footprint.
Always include a front porch in your design. This transitional zone provides shelter for relaxing and enjoying nature.
For shed-style roofs, plan varying wall heights. A 12-foot wall transitioning to 8 feet creates dramatic interior space.
Use real lumber instead of sheet materials for visible surfaces. This maintains the authentic character that defines a true cabin experience.
Selecting Quality Materials and Essential Tools
With your design finalized, the next critical step is gathering your lumber and tools. The choices you make here directly impact the project’s cost, durability, and final look. Investing time in selection pays off for years to come.
Smart sourcing keeps your budget manageable. You might be surprised how few specialized tools are actually required.
Choosing the Right Wood and Lumber
Your choice of wood species is crucial. Pine is a common and economical lumber choice for this type of construction. However, its bark can be stubborn to peel, often leaving debris.
Eucalyptus is an excellent alternative if available locally. It peels cleanly and is very easy to shape when green. This wood is naturally durable, often needing no chemical treatment.
The key is to cut eucalyptus at the right time and dry it in the shade. This prevents the cracking it’s known for. For critical areas, chestnut lumber offers exceptional longevity.
It can outlast most other materials, making it a premium investment for trim or structural elements. Always opt for real wood over sheet goods for visible surfaces to maintain an authentic feel.
As builder Graeme Jenvey advises, you likely own most tools already. He only purchased an auger for foundation holes and a staple gun for siding. Buy specialized tools only as specific needs arise during your project.
Building a Solid Foundation and Base
Laying a proper foundation is the most critical, yet often overlooked, phase of your construction project. Expert Steve Maxwell admits this is where many, including himself, have made mistakes. The work feels tedious compared to raising walls, but rushing this step guarantees future problems.
A stable base that resists frost heave and settling is non-negotiable. It’s the difference between a lasting structure and a “B-grade” one. Your enthusiasm for the project must extend to this fundamental work.

Start by excavating holes about 12 inches deep. This depth provides a stable footing in most soils. Maxwell recommends building stone foundation piers on a concrete footing. Using forms makes this process faster and requires less skill.
Avoid simple concrete blocks. They may be quick, but they detract from the rustic aesthetic. The superior look and performance of stone are worth the extra effort.
On top of the piers, construct a small base wall. Aim for 12 inches high and 8 inches wide, using stone and concrete. This wall elevates the first logs, protecting them from ground moisture and rot.
This simple foundation design is highly effective. It creates a crucial barrier between your structure and the earth.
| Foundation Type | Skill Level | Durability | Aesthetic Appeal |
|---|---|---|---|
| Stone Piers | Intermediate | Excellent | High (Rustic) |
| Concrete Blocks | Beginner | Good | Low |
| Poured Concrete | Professional | Superior | Medium |
Finally, plan your log placement strategically. Use your thickest, highest-quality logs for the bottom course. They will be most exposed to rain and snow. This careful planning during the foundation construction pays off for decades.
Step-by-Step Construction Process
The moment you start stacking logs marks the true beginning of your hands-on journey. This phase transforms your plans into a physical structure. It requires patience and a methodical approach.
Rushing through this construction step can lead to significant issues later. Taking your time here ensures straight, stable walls for years to come.
Preparing Logs and Structural Framing
Your first crucial task is preparing all your lumber. Debarking every log is non-negotiable for a successful building project.
Leaving the bark on creates a safe haven for insects. It also stops protective wood treatments from soaking in properly. A clean log is a durable log.
Pine trees can be stubborn to peel, often leaving debris. If available, eucalyptus is an excellent alternative that peels cleanly.
Techniques for Seamless Log Placement
Setting the logs in place is often the most demanding part of the work. This step demands careful attention.
If you’re using natural, un-milled logs, expect curves and irregularities. This makes the fitting work more complex but also more rewarding.
Plan for a full day’s work to properly seat just four logs. Constant adjustments and shimming are necessary to achieve level courses.
Remember that traditional log construction with overhanging corners reduces your interior space. Factor this into your initial walls layout.
| Construction Challenge | Recommended Approach | Time Estimate |
|---|---|---|
| Debarking Logs | Use a drawknife; peel when wood is green | 1-2 days |
| Placing First Course | Set on a mortar bed for stability | Half a day |
| Seating Crooked Logs | Shim and adjust patiently; avoid forcing | 1 day per 4 logs |
| Installing Door Frames | Set plumb “shoulder pads” before stacking | 2-3 hours per opening |
Before stacking logs, install supports for doors and windows. These vertical guides must be perfectly plumb. They dictate how well your doors and windows will function later.
Build one level at a time. Ensure each log is stable before adding the next. This systematic step-by-step process is the key to straight walls and a sound structure.
diy cabin building guide: Frame, Walls, and Roof Installation
Raising the walls and installing the roof structure is where your project truly takes its final shape. This phase demands careful attention to detail for a sturdy and lasting result.
Begin by carefully marking the gable ends. This ensures your roof will have the proper pitch for effective water drainage. A good gradient is crucial for protecting your walls.

As you build the triangular gable wall sections, cut each log progressively shorter. This creates the slope needed to meet the ridge beam. Using sharp tools makes this precision construction work much easier.
If your walls show any instability, address it immediately. Install diagonal bracing anchors beneath the ridge beam. Secure them to the last full-length logs for solid support.
The main ridge beam and additional support beams carry the roof‘s load. Eucalyptus wood, about 5 inches in diameter, offers excellent strength for a small structure. Extend these beams to create a protective overhang.
Always ensure your wood is properly prepared and your tools are sharp. This prevents frustrating delays and leads to a professional-looking finish on your cozy retreat.
Cabin Insulation, Windows, and Door Installation
The difference between a drafty shelter and a cozy retreat often comes down to proper insulation and sealing techniques. This phase transforms your structure into a comfortable home that protects you from weather extremes.
Insulation Strategies for Year-Round Comfort
Expert builder Steve Maxwell warns against skipping proper insulation. Even if you plan only summer use, build for four-season comfort. Your space will be quieter and more pest-resistant.
Good insulation keeps your retreat cooler during hot months by blocking heat transfer. It also prevents drafts that can make any season uncomfortable.
Consider structural insulated panels (SIPs) for superior performance. They create a tight envelope that deters vermin better than traditional methods.
If using batt insulation, seal all exterior surfaces completely. Mice and insects love to nest in exposed insulation within your walls.
Build substantial doors from durable wood like chestnut. Use thick materials and strong hinges for security and longevity.
Install weather-tight frames around all openings. Proper seals prevent animal entry and maintain your insulation’s effectiveness.
Take time to close gaps between wall components. Small cracks become highways for pests and compromise your comfort.
Roofing, Siding, and Exterior Finishing Touches
Achieving a look that belongs in the woods requires careful selection of roofing and siding materials that age gracefully. Expert Steve Maxwell defines “appropriate” materials in two key ways. They must have a rustic appearance and offer decades of durability with minimal upkeep.
Using suburban materials can ruin a forested site. The goal is harmony with nature and long-lasting performance.

Sustainable Roofing and Siding Options
For your roof, fiberglass shingles are a top choice. They protect your structure for 30 to 50 years while maintaining a traditional look. Another excellent option is recycled cement tiles, which are exceptionally durable and sustainable.
For siding, cedar shingles are ideal. They can last 50 years on vertical surfaces without any maintenance. You can install them in creative patterns for a unique look.
Factory-finished aluminum fascia is a smart choice for roof edges. It looks fine and is far superior to bare wood that needs constant painting.
| Material | Best Use | Lifespan | Maintenance Level |
|---|---|---|---|
| Cedar Shingles | Siding | 50+ years | Very Low |
| Fiberglass Shingles | Roofing | 30-50 years | Low |
| Composite Decking | Porches | Longer than wood | None |
| Recycled Cement Tiles | Roofing | Exceptional | Low |
Enhancing the Rustic Appeal with Natural Materials
Composite decking is great for porches. It lasts longer than traditional wood and needs no sealing. This is a fantastic way to reduce long-term chores.
The best approach prioritizes materials with both rustic character and proven longevity. This avoids the cycle of constant maintenance. You can then focus on enjoying your peaceful retreat for years to come.
Essential Tips, Tricks, and Lessons Learned from the Field
The final phase of creating your woodland retreat involves learning from those who have already walked the path. Builder Graeme Jenvey emphasizes that the most important step is simply to begin. Don’t let a lack of professional experience hold you back.
Many successful builders learned through hands-on work. Your unique approach might discover techniques that work perfectly for your situation. Listen to advice, but remember there are countless valid ways to build.

Don’t wait for perfect conditions. Taking that first step is often easier than you think. The journey of daily problem-solving is incredibly rewarding.
Make your project a real priority. Allocate day-to-day time and mental energy for consistent progress. Thorough research on local codes and techniques will bring ease to the entire process.
Steve Maxwell reminds us that successful construction requires completing steps in a logical order. Rushing foundational things creates problems later. A methodical approach is the most efficient way forward.
| Common Challenge | Recommended Mindset | Key Takeaway |
|---|---|---|
| Fear of Starting | Focus on action, not perfection | Just begin; you’ll learn as you go. |
| Comparing Skills | Celebrate your own progress | Everyone starts as a beginner. |
| Information Overload | Research fundamentals first | Understand basic codes and framing. |
| Project Momentum | Schedule regular work sessions | Consistent effort beats bursts of activity. |
Embrace the challenges as learning opportunities. The pride of creating something with your own hands is an experience like no other. Your dream cabin is absolutely within reach.
Budgeting, Scheduling, and Project Management Insights
A realistic budget and a flexible schedule are your best allies for a successful personal project. Let’s look at real numbers and timelines to set clear expectations for your own work.
Builder Graeme Jenvey completed his small house for about $12,745. The exterior cost $8,000, while interior finishes were around $4,750. A heat pump and flooring made up half of the interior budget.
His total hands-on time was nearly 55 full days. This was spread over many months, using weekends and evenings. This approach allows for steady progress without quitting your job.
Cost-Saving Tactics and Tool Investments
You can keep costs down by being smart with tools. Jenvey only bought two specialized items: an auger for foundation holes and a staple gun for siding.

He also had help from family and friends on some weekends. This sped things up while he still did most of the work himself. The knowledge gained felt like a decade of learning packed into one year.
His key advice is to make your dream a financial priority. Affordability comes from choices. You can find more detailed planning help in this project tip sheet.
| Budget Category | Estimated Cost | Timeline (Months) | Primary Work Periods |
|---|---|---|---|
| Exterior (Shell, Roof, Siding) | $8,000 | 4-6 | Weekends, Summer Evenings |
| Interior (Floors, Walls, Finishes) | $4,750 | 2-3 | Weekends, Half-Days |
| Major Systems (Heat Pump) | ~$2,375 | 1 | Scheduled Full Days |
| Tools (Specialized Only) | Minimal | As Needed | Purchase Before Specific Phase |
Remember, consistent effort over months is more effective than trying to do everything at once. Plan your time and money wisely, and your retreat will become a reality.
Embracing the Cabin Lifestyle and Future Projects
What begins as a construction project transforms into a lifestyle that reshapes your daily experience. Waking in a space you built brings profound satisfaction. You’ll appreciate simple details like a pine table for meals and shelves holding favorite books.
This way of living offers remarkable ease and freedom. Unlike maintaining a large house, your modest retreat is paid for and simple to care for. Your place in the woods becomes flexible space for reading, working, or hosting guests.
The journey doesn’t end when construction finishes. Maintaining your site and addressing minor cracks becomes part of the relationship with your home. Many builders find this first structure inspires future projects like composting toilets or additional guest spaces.
Take inspiration from experienced builders who’ve created homesteads over many years. Your skills will grow, enabling you to continue developing your property. This lifestyle represents a meaningful choice for simpler, more intentional living.


