Building your dream cabin starts with one crucial element that determines the entire structure’s stability and longevity. The foundation serves as the bedrock of your woodland retreat, supporting everything from the walls to the roof.
Whether you’re creating a weekend escape or a permanent residence, understanding the construction process is essential. Proper planning and execution prevent costly repairs down the road.
A well-built concrete base protects your investment from moisture, soil shifts, and structural damage. This guide walks you through each step of the process, from initial site assessment to final finishing touches.
You’ll learn practical techniques for working with construction materials and discover which tools are absolutely necessary. We cover everything from soil evaluation and permits to achieving that smooth, professional finish for your home.
By following these steps, you’ll gain the confidence to tackle your project successfully. Avoid common mistakes that first-time builders often encounter and ensure your cabin stands strong for years to come.
Laying the Groundwork: Planning and Permitting
Before the first shovel hits the ground, careful preparation sets the stage for a solid build. This initial phase involves understanding your land and navigating legal requirements.
Assessing Your Soil and Site Conditions
Your building spot’s soil composition directly affects foundation depth and stability. Standard depth typically reaches 3 feet, but hillside locations or high-moisture soil may require deeper excavation.
Test soil moisture using the coffee can method. Fill a can with soil, add water, and time absorption rates. Slow absorption indicates low moisture content.
Professional diagnostics provide comprehensive analysis of soil composition and drainage patterns. This information helps determine if your area needs special considerations.
Navigating Permits and Utility Checks
Obtaining proper permits ensures your project meets local building codes. This legal step protects against costly mistakes and inspection failures.
Call 811 several days before digging begins. This free service marks underground utilities like pipes and wires. Hitting these can cause dangerous accidents and expensive repairs.
Taking time for proper planning might feel tedious, but it’s essential home improvement safety. Skipping these steps risks legal issues and structural problems.
Clearing and Excavating Your Foundation Area
With permits secured and utilities marked, the real hands-on work begins on your cabin site. This phase transforms your planned area into a clean, stable base ready for construction.

Removing Debris and Vegetation
Start by clearing the entire building space. Remove all vegetation, stumps, and rocks. Heavy equipment like a bobcat makes quick work of this on larger lots.
For smaller projects, manual clearing with shovels and hoes is effective. This initial step is a critical part of site preparation.
Precision Excavation for Stable Footings
Before you start digging, it’s wise to call 811 again if markings have faded. Hitting buried pipes wires causes serious problems.
The excavation process involves removing the top layer of soil. Score the perimeter with a shovel for accuracy. Remove four to six inches of topsoil to reach stable ground.
If you encounter tough dirt, a hoe can break it up. Rocky terrain or hillside cuts may need professional equipment. This ensures a level base.
Leave at least two feet of working space around the perimeter. This room is essential for the next stages of the foundation digging process.
Once the area is cleared and leveled, you are ready for the gravel base. Proper excavation sets the stage for a strong and durable build.
Designing the Foundation Layout and Footing Forms
Accurate layout planning ensures your cabin’s structural integrity begins with mathematically perfect angles. This phase demands careful measurement since errors become permanent once the material sets.
Marking Your Cabin Layout
Construct wooden forms using 2×4 lumber to outline your house footprint. The frame defines the shape that will contain the material.
Use the 3-4-5 method to verify square corners. Measure three feet along one side, four feet along the adjacent side. The diagonal should measure exactly five feet.
Score the ground along the form edges before removing the frame. This creates precise guide marks for excavation.
Determining Optimal Footing Depth and Width
Footings typically need to be two feet wide and two feet deep. For maximum stability, aim for three feet depth.
After digging trenches, add three inches of gravel as a base layer. This promotes drainage and creates a stable surface.
Reinstall forms and secure them with stakes every two feet around the perimeter. Use a level frequently to ensure your foundation remains perfectly horizontal.
The extra space around the perimeter becomes essential working area. This allows comfortable access to all parts during construction phases.
Integrating Reinforcement: Rebar, Wire Mesh, and Grade Pins
The structural integrity of your cabin relies heavily on the hidden skeleton within the base. This reinforcement system transforms a brittle material into a durable, long-lasting support.
Proper installation is a non-negotiable part of the process. It prevents cracking under stress from ground shifts or heavy loads.

Proper Rebar Placement with Grade Pins
Rebar, or reinforcing bar, consists of ridged steel rods. They are arranged in a grid pattern inside the form.
You need use grade pins for correct placement. Space these pins about two feet apart and one foot from corners.
They hold the rebar at the true center of the slab’s depth. This allows the material to flow completely around the steel.
Always attach the bars using the manual hooks on the pins. Never use string or wire ties that can deteriorate.
Benefits of Wire Mesh Integration
Wire mesh offers a lightweight alternative or supplement. It comes in pre-fabricated grid pattern sheets, saving time.
This type of reinforcement is ideal for thinner slabs. It is easy to adjust during placement if it shifts.
For areas supporting heavy vehicles, rebar is the recommended choice. Advanced systems like post-tension cables provide exceptional strength for challenging soil conditions.
Choosing the right reinforcement ensures your cabin stands strong for decades.
Master Guide: How to Pour Concrete Foundation
The moment has arrived to transform your carefully prepared site into a permanent base for your woodland retreat. This phase requires careful execution to ensure long-term stability.
Mixing the Right Concrete Blend
Accurate material calculation prevents waste or shortages. Use an online calculator based on your slab’s cubic yard volume.
You have two primary options for obtaining your building material. Each method suits different project scales and locations.
| Mixing Method | Best For | Key Considerations |
|---|---|---|
| Ready-Mix Delivery | Large projects, consistent quality | Truck access required, timed delivery |
| Bagged Mix | Small cabins, remote locations | Manual labor intensive, precise water ratios |
Step-by-Step Pouring Techniques
Always wear protective gear including gloves and eye protection. The material can cause skin irritation.
Work in manageable sections rather than filling the entire form at once. This approach allows for proper spreading and reinforcement checks.
Pour the mixture slightly above the form edges. This provides extra material for the smoothing process that follows.
Achieving a Smooth Initial Surface
Screeding creates your level surface. Use a straight 2×4 board in a gentle sawing motion across the form tops.
Make two to three passes to eliminate high spots and fill low areas. Avoid pressing too hard to prevent grooves.
This entire process typically takes a couple of hours. By day’s end, your base will be firm enough for careful walking.
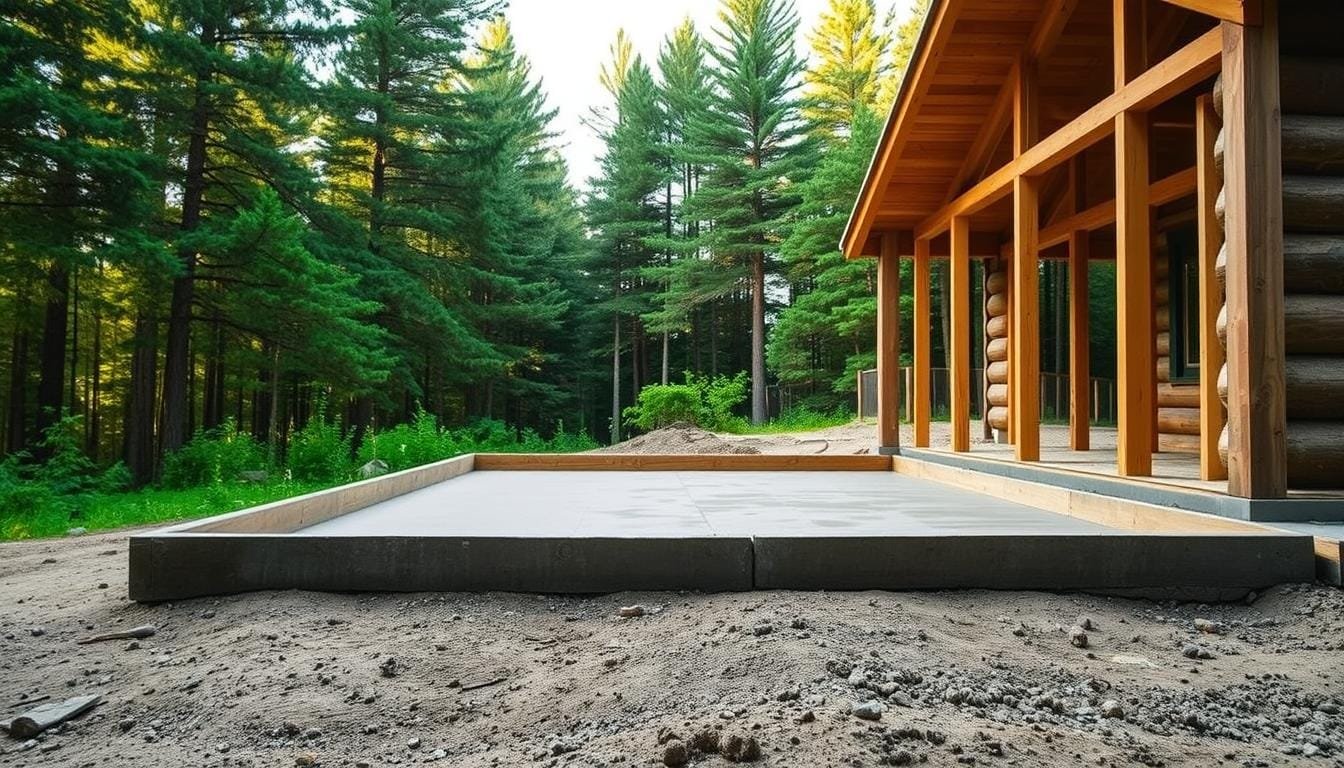
Forming and Finishing the Concrete Walls
The vertical walls of your cabin’s base require careful forming and finishing to ensure structural integrity. This phase transforms your footing into the visible support system that will carry your entire structure.

Installing Wooden Frames Accurately
Build your wall forms using 2×10 boards placed on the cured footing. Position boards on both interior and exterior sides to create the wall thickness.
Secure the parallel boards with metal bars across the top. Add stakes around the outside with packed dirt for stability against the wet material pressure.
Make sure your forms are perfectly plumb using a level. Even slight angles create leaning walls that cause serious structural problems.
Techniques for Smoothing and Edging the Walls
Remove wooden forms promptly after adequate curing time. Pull straight up from the top to prevent damage to the fresh surface.
Wait until the material loses its wet sheen but remains workable. Use a magnesium hand float in two three long, sweeping passes to eliminate marks.
Edge the top perimeter once the material is firm but not solid. Create rounded corners that resist chipping using long, smooth strokes.
For walls longer than 10 feet, cut control joints at regular intervals. These intentional grooves give the material predetermined places to crack as it settles.
Apply waterproof coating to both exterior and interior surfaces after curing. This creates a moisture barrier protecting your investment from water damage.
The final touch involves running a concrete broom across horizontal surfaces. Pull toward you in consistent strokes to create non-slip texture.
Managing Additional Elements: Plumbing, Curing, and Safety
Managing the embedded components in your foundation requires forward-thinking planning. These systems become permanent parts of your structure once the material sets.
Ensuring Proper Placement of Plumbing and Drainage
White PVC pipes for drainage sit along the outside edges of your foundation. This placement directs water away from your structure, preventing damage.
In regions without basements, all plumbing gets set directly into the slab. You must position these pipes perfectly the first time. Mistakes require expensive repairs involving jackhammering.
Water lines for kitchen islands and electrical conduits get installed after reinforcement but before the final step. Radiant heating tubing goes above the vapor barrier if planned for your house.
Monitoring Curing Times and Safety Precautions
The curing process is critical for achieving full strength. Wait at least seven days before building on your new base. Concrete continues gaining strength for weeks.
During hot weather, mist the surface with water occasionally. This prevents rapid drying that causes cracks. Keep people and pets away from wet areas for safety.
Schedule all required inspections before proceeding. Most areas need multiple checks including plumbing and reinforcement verification. This thorough preparation process for concrete slab foundations ensures code compliance.
Remove forms after two to three days. If using post-tension cables, this is when they get tightened and cut. Proper timing prevents future structural issues.
Wrapping Up the Project: Final Touches and Future Maintenance
You’ve reached the last part of your project. After the material has cured for a few days, it’s time for the final touches. Carefully remove all stakes and wooden forms. A pry bar can help loosen boards stuck to the surface.
Give the entire area a good sweep. Clear away wood scraps and debris. This cleanup makes the site safer for the next phase of building your home.
Inspect the top of your slab and walls. Look for small cracks or uneven spots. Minor issues can be fixed with a patching compound. For serious problems, consider a professional concrete foundation repair assessment.
Apply a sealant to protect your investment. This creates a strong barrier against water and weather. Your hard work will support your cabin for many years.
Simple maintenance keeps your base strong. Check it each spring for new cracks or settling. Ensure the ground slopes away from your home. A well-built foundation provides peace of mind for decades.


