Imagine yourself in an old barn, surrounded by the scent of aged wood. Your hand touches a weathered drawer pull. Its smooth curves tell stories of many openings and closings. Rustic wooden handles are not just useful; they tell stories.
Making DIY wooden handles is more than a craft; it’s a journey into woodworking art. These rustic drawer pulls can turn ordinary dressers into unique pieces. With simple tools and creativity, you can make handmade furniture accents that make your home special.
Imagine opening a drawer and feeling the handle you made. It’s a small detail that can make a big difference. Whether you’re fixing an old piece or adding charm to a flea market find, these handles bring warmth and personality.
Are you ready to start your woodworking journey? Let’s learn how to make these charming rustic drawer pulls together. You’ll find out how to pick the right wood, learn basic carving, and finish them perfectly. By the end, you’ll be able to turn simple wood into beautiful, unique handles that make your furniture stand out.
Choosing the Right Wood
Choosing the perfect wood for your rustic drawer handles is key. The right hardwood can make your project shine. Oak, pine, and cherry are top picks for their unique grain patterns and rustic charm.
Popular Wood Types
Oak is a top choice for rustic wood. It’s durable and has been used in furniture making for ages. Pine has a softer look with its light color and big grain. Cherry ages well, with its rich, warm tones.
| Wood Type | Durability | Grain Pattern | Color |
|---|---|---|---|
| Oak | High | Prominent | Light to medium brown |
| Pine | Medium | Straight, knotty | Pale yellow to light brown |
| Cherry | High | Fine, straight | Reddish-brown |
Wood Grain and Aesthetics
Wood grain patterns are key to your handles’ look. Straight-grained woods like hickory or ash are strong and clean. For a rustic feel, choose woods with big grain like oak or pine.
Think about your furniture when picking wood. Match the color, texture, and style of your space. The right wood will give your drawer handles a unique, rustic charm.
Essential Carving Tools
Carving wooden drawer handles needs the right tools. Let’s look at the must-haves for your beginner carving kit and safety gear.
Basic Knives and Chisels
Begin with a set of knives and chisels. A craftsman’s knife and hook knife are great for details. Chisels in different sizes are for various cuts. Keep them sharp for the best results.
Carving Tools for Beginners
Newcomers need a basic set of tools. A drawknife is good for rough cuts, and an adze for hollowing. A froe is useful for splitting wood along the grain. These tools are essential for your kit.
Safety Equipment
Wood carving safety is key. Always wear cut-resistant gloves and eye protection. A dust mask is helpful when sanding. Proper gear prevents accidents and lets you carve longer.
| Tool | Use | Beginner Friendly |
|---|---|---|
| Carving Knife | Detailed cuts | Yes |
| Chisel Set | Various cuts | Yes |
| Drawknife | Rough cuts | Moderate |
| Adze | Hollowing | Moderate |
| Froe | Splitting wood | Yes |
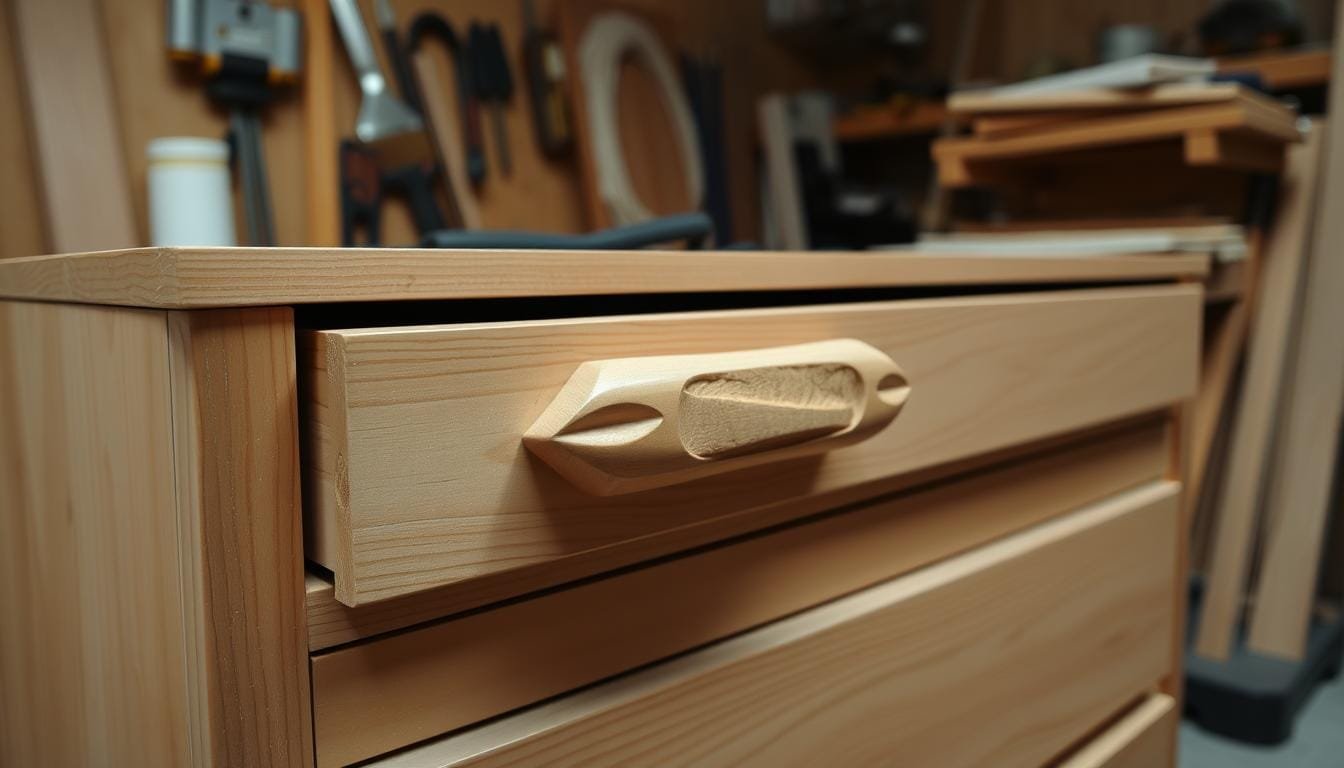
Designing Your Rustic Handle
Making rustic handle designs is an art that mixes nature with personal style. It lets you create custom drawer pulls that fit your furniture and decor.
Nature-Inspired Shapes and Styles
For rustic handles, look to nature for ideas. Think of twigs, leaves, or bark textures. These can be turned into unique drawer pulls that bring character to your furniture.
It’s important to match your door hardware with the room’s other elements. This creates a smooth design.
Sketching Your Design
Begin by sketching your ideas. Think about the size of your drawers and the style of your furniture. For a unified look, design a set of handles with similar themes but slight differences.
This approach is great for small spaces like apartments. It helps avoid visual clutter.
Remember, buying multiple handles of the same design can save money. Many stores offer discounts on sets or bulk purchases. Some even give free shipping on big orders. This is helpful for large projects or when furnishing an entire piece.
By using nature-inspired woodworking, you can make rustic handles that are both useful and beautiful. These custom drawer pulls will make your furniture stand out. They show off your personal style and love for natural beauty.
Preparing the Wood
Wood preparation techniques are key for rustic drawer handles. This step is the start of your project. It makes sure the surface is smooth and ready to work on.
Cutting Wood to Size
Begin with a piece of pine wood that’s 150mm wide, 200mm long, and 70mm thick. Cut it down to make handles about 150mm x 40mm. These sizes are good for a comfortable grip and fit well with your drawers.
Sanding and Smoothing
Sanding wood is vital for a clean surface. Start with 120 grit sandpaper for the first smooth. Then, use 180 grit for an even finer finish. This two-step process gets rid of rough spots and readies the wood for carving.
Marking Your Design
Use woodworking measurements to draw your design on the wood. Mark important points and outlines carefully. This helps guide your carving and keeps your handles consistent.
| Wood Type | Initial Size (mm) | Final Handle Size (mm) | Sandpaper Grits |
|---|---|---|---|
| Pine | 150 x 200 x 70 | 150 x 40 | 120, 180 |
Remember, good preparation is essential for carving success. Spend time on these steps to make your rustic drawer handles look great.
Basic Carving Techniques
Learning basic woodcarving skills is key to making rustic wooden drawer handles. This part covers important techniques. They help you make unique, textured pieces that highlight wood grain carving.
Understanding Carving Grain
Wood grain carving needs a good grasp of wood fiber alignment. Carving with the grain avoids splits and makes cuts smoother. Pine is great for beginners because of its straight grain.
Oak and maple are tougher but offer stunning textures when carved right.
Carving Techniques and Texture
Adding texture to wood brings depth and character to your handles. Begin with simple cuts using a bandsaw blade with 2- to 3-tooth-per-inch. This mimics sawmill marks.
For a weathered look, use different sandpaper grits (100, 120, and 150) to make uneven wear patterns.
To get a bark-like texture, use a gouge for shallow, curved cuts. For a rough-hewn look, a V-tool carves irregular lines across the grain. Remember, small pieces need less distressing than big ones.
- Use a gouge for rounded cuts
- Apply V-tool for sharp, angular textures
- Create depth with layered carving techniques
Practice these basic woodcarving skills often to get better. With time, you’ll understand wood grain and texture well. This will help you make truly unique and rustic drawer handles.
Detailing Your Carved Handles
Mastering detailed wood carving takes your rustic handles to the next level. This stage transforms simple shapes into detailed wooden handles. They catch the eye and feel great to touch.
Enhancing Features with Fine Tools
Use small gouges and V-tools to add delicate details. Carve leaf veins, bark textures, or knot patterns to bring your design to life. These fine details make your handles unique and showcase your craftsmanship.
Adding Curves and Angles
Curved and angled cuts create depth and interest. Use sweeping motions with a gouge to form smooth curves. For sharp angles, employ a chip carving knife. These techniques add character to your handles, making them stand out.

Finishing Touches for Depth
Wood carving depth techniques elevate your handles from good to great. Try undercutting to create shadows and add dimension. Relief carving can make certain elements pop. These methods bring your design to life, turning a simple piece of wood into a work of.
| Technique | Tool | Effect |
|---|---|---|
| Leaf veins | V-tool | Delicate, natural look |
| Smooth curves | Gouge | Flowing, organic feel |
| Sharp angles | Chip carving knife | Geometric precision |
| Undercutting | Small gouge | Shadow and depth |
| Relief carving | Various chisels | 3D effect |
Finishing Your Handles
The final step in making rustic wooden drawer handles is applying the perfect finish. This step protects your work and brings out the wood’s natural beauty. Let’s look at how to pick and apply the right wood finish for handles.
Choosing the Right Finish
Choosing a wood finish for handles depends on what look you want and how much protection you need. For a rustic look, consider these options:
- Linseed oil: Enhances grain and provides a natural sheen
- Beeswax: Offers a smooth, matte finish
- Colored wax: Adds depth and subtle tinting
- Rustic wood staining: Creates an aged, weathered look
Applying Finish Effectively
To apply your chosen finish well:
- Sand handles with 150-grit sandpaper for a smooth surface
- Apply thin, even coats using a soft cloth
- Allow each coat to dry completely before adding the next
- Buff gently between coats for a smoother finish
Rustic Finish Techniques
For an authentic rustic look, try these techniques:
- Mix 1 cup water with 2 teaspoons black paint for a gray wash
- Create a whitewash by diluting white paint with water
- Distress edges with sandpaper after applying protective wood coatings
- Use a wire brush to accentuate wood grain before finishing
Remember, the key to a great rustic finish is embracing imperfections. Try different methods to get the look you want while making sure your handles are protected for daily use.
Installing Your Carved Handles
Now that you’ve made your rustic wooden handles, it’s time to install them. This step needs careful attention and the right tools. This way, your new handles will look great and work well.
Installation Tools
Here are the essential items for a smooth installation:
- Drill with appropriate bits
- Screwdriver
- Measuring tape
- Pencil
- Level
- 8/32 thread, 1″ long screws (standard for cabinet hardware)
Ensuring Proper Alignment
Aligning your drawer pulls is key for a neat look. Use a level to draw straight lines before drilling. For long drawers, use two knobs or pulls.
Place knobs on lower cabinets in the upper corner opposite the hinges. For upper cabinets, center knobs in the corner or align them at the bottom.

Securing Handles
Here’s how to secure your wooden handles:
- Mark drill points using your measurements
- Drill pilot holes carefully
- Attach handles using appropriate screws
- Tighten securely, but avoid over-tightening to prevent damage
Proper installation makes your carved handles last and work well. Take your time with each step for the best results in your rustic drawer makeover.
Tips and Tricks for Successful Carving
Mastering wood carving takes time and practice. By following a few key tips, you can improve your skills. This will help you create stunning rustic drawer handles. Let’s explore some essential techniques and common pitfalls to avoid.
Common Mistakes to Avoid
When carving wooden handles, beginners often make mistakes. Carving against the grain is a common error that leads to splintering. Always work with the grain for smoother results.
Another issue is applying finish unevenly, which can mar the final appearance. Take your time and apply thin, even coats for best results.
Troubleshooting wood projects is a vital skill. If you encounter tear-out or chipping, try switching to a sharper tool or adjusting your cutting angle. Remember, patience is key when working on intricacies. Rushing can lead to mistakes that are difficult to correct.
To boost your carving technique improvements, practice regularly on scrap wood before tackling your final project. This allows you to refine your skills without the pressure of perfection. As you gain confidence, experiment with different woods and more complex designs to expand your abilities.


