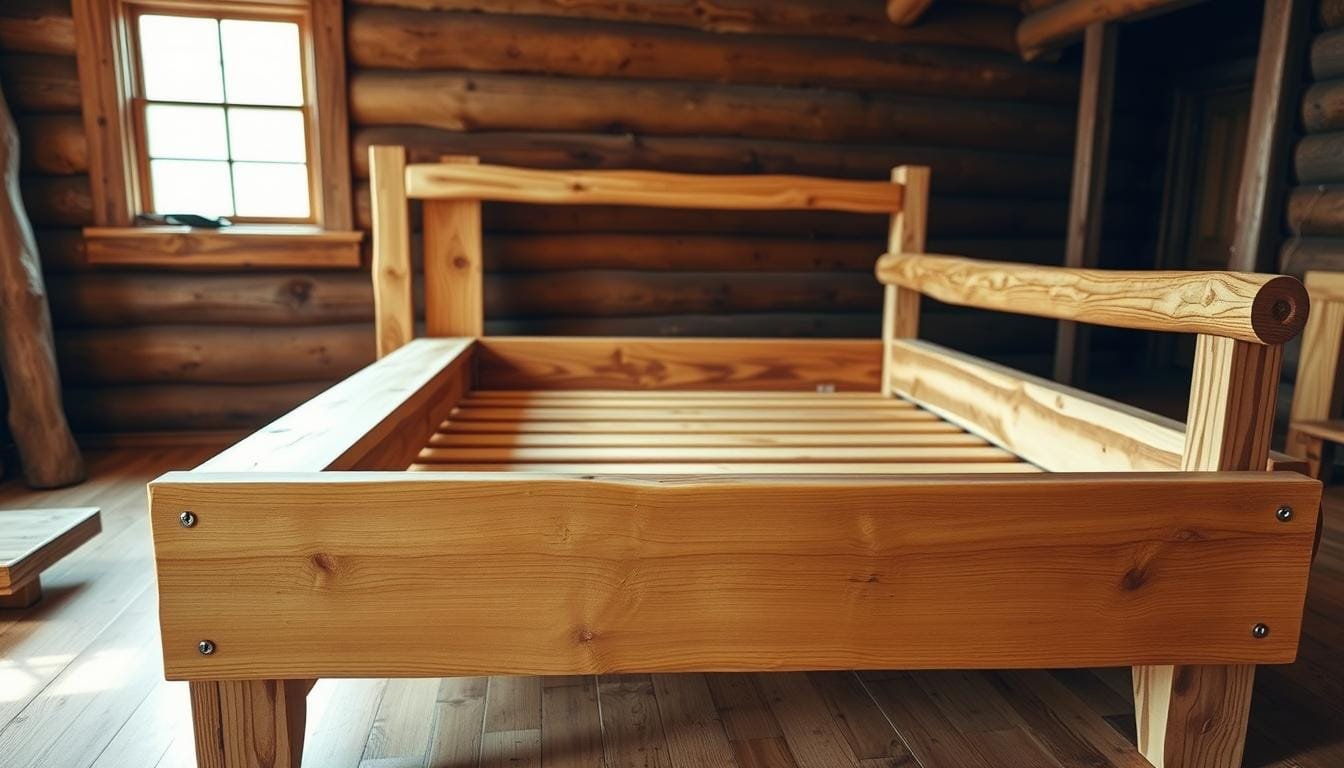
Imagine a cozy cabin in the woods, full of rustic charm and the smell of pine. As you enter, your gaze falls on a beautiful handmade wooden bed frame. It captures the spirit of cabin life perfectly.
I started a DIY bed frame project for my cabin, and it exceeded my expectations. I saved a lot of money, spending only $350. This is compared to over $2,000 for a similar bed from a high-end store. Plus, I felt incredibly proud of creating something with my own hands.
Building a handmade wooden bed frame is an exciting journey. It mixes woodworking art with practical cabin furniture, creating a unique piece. From choosing the right wood to adding the final touches, each step lets you add your personal touch to your space.
Are you ready to make your cabin special with a unique DIY bed frame? Let’s explore the world of custom cabin furniture. We’ll see how you can make a cozy sleeping area that’s both strong and lovely.
Why Choose a Handmade Wooden Bed Frame?
A custom bed frame made from wood adds charm and character to your space. It also lasts a long time, making it a great choice for rustic cabin decor.
Benefits of Handmade Furniture
Choosing a handmade wooden bed frame means you get something unique and well-made. The demand for wooden furniture made by hand has grown by 15% each year. This shows more people want products that are good for the planet.
About 60% of buyers are ready to spend more for items that are eco-friendly. This includes wooden bed frames.
- Customization to fit your cabin’s specific needs
- Quality craftsmanship ensures longevity
- Sense of accomplishment from DIY projects
- Cost-effective compared to retail prices
Aesthetic Appeal and Durability of Wood
Wooden furniture is not just about looks. It’s also durable. About 70% of people choose wood because it’s versatile in design. Wooden bed frames can last over 20 years, much longer than metal or plastic ones.
They keep 50-70% of their value if you take good care of them.
| Feature | Wooden Bed Frame | Other Materials |
|---|---|---|
| Lifespan | 20+ years | 5-10 years |
| Maintenance Costs | 25% lower over a decade | Higher replacement costs |
| Environmental Impact | 30% reduced carbon footprint | Higher carbon footprint |
| Health Benefits | Improved sleep for 80% with respiratory conditions | Potential allergen exposure |
Choosing a handmade wooden bed frame for your cabin is a smart choice. It looks great and is good for the planet. Plus, it’s durable and will last a long time.
Essential Tools and Materials
Building a wooden bed frame needs careful planning and the right tools. Let’s look at the must-have woodworking tools and wood types for your project.
Must-Have Woodworking Tools
To make a strong bed frame, you’ll need these tools:
- Circular saw or handsaw
- Drill and screwdriver
- Sandpaper or electric sander
- Measuring tape and square
- Clamps for stability
- Wood glue

Recommended Wood Types
Choosing the right wood is key for your bed frame’s strength and look. Popular choices are:
- Pine: Affordable and easy to work with
- Oak: Durable and looks great
- Poplar: Budget-friendly, about 100 board feet needed for a queen-size frame
When picking materials, think about strength, weight, and finish. For mattress support, use ¾-inch plywood or 1×4 boards. Make sure to space slats evenly and secure them well.
With these tools and the right lumber, you’re set to build your custom wooden bed frame. Now, measure your cabin space for a perfect fit.
Measuring Your Cabin Space
Before you start building your wooden bed frame, measure your cabin space. This ensures your bed fits well and looks good with your other furniture. Let’s look at how to pick the right bed size and layout tips.
Determining the Right Bed Size
The size of your bed depends on how much space you have and what you like. Here are some bedroom sizes for different bed sizes:
| Bed Size | Bed Dimensions | Minimum Room Size |
|---|---|---|
| Single | 3’0″ x 6’3″ (90cm x 190cm) | 7′ x 10′ (2.13m x 3.01m) |
| Double | 4’6″ x 6’3″ (137cm x 190cm) | 9′ x 9’6″ (2.74m x 2.9m) |
| King | 5′ x 6’6″ (150cm x 200cm) | 9’6″ x 10′ (2.9m x 3.05m) |
| Super King | 6′ x 6’6″ (180cm x 200cm) | 9’6″ x 11’6″ (2.9m x 3.51m) |
Layout Considerations
When planning your cabin’s layout, think about more than just bed size. Make sure there’s room to move and for other furniture. Storage beds need extra space for drawers, and TV beds are longer because of the mechanism.

A good layout makes your cabin more comfortable and useful. Measure your cabin well, imagine your bed in the space, and plan a layout that uses your cabin’s space well. With careful planning, your wooden bed frame will be the highlight of your cozy cabin.
Designing Your Wooden Bed Frame
Making a wooden bed frame for your cabin needs careful planning and creativity. Your bed frame design is key to your rustic furniture style. It should mix comfort with the look of a cabin.
Bed Frame Styles
Think about what bed frame style fits your cabin’s look. Platform beds are sleek, while sleigh beds are elegant. Four-poster beds make a cozy, enclosed space great for cold nights. Custom bed features can make your frame stand out.
Sketching Your Design Ideas
Start by sketching your ideas with a pencil and paper. Decide on the bed size you need, like twin, full, queen, or king. Don’t forget to think about mattress thickness when planning the frame’s height. Aim for a bed height of 16 to 24 inches for comfort.
Functional Features
Think about more than just the basic structure. Add storage drawers under the bed or a built-in headboard shelf. For bigger beds, include a center support rail for stability. Make sure slats are no more than 3 inches apart for mattress support, which is important for latex mattresses.
| Bed Size | Platform Dimensions | Mattress Size |
|---|---|---|
| Twin | 38 1/2″ x 75 1/2″ | 38″ x 75″ |
| Full | 54 1/2″ x 75 1/2″ | 54″ x 75″ |
| Queen | 60 1/2″ x 80 1/2″ | 60″ x 80″ |
| King | 76 1/2″ x 80 1/2″ | 76″ x 80″ |
Step-by-Step Guide to Building Your Bed Frame
Building a wooden bed frame is a fun DIY project. It combines woodworking and furniture assembly. This guide will help you from start to finish.
Preparing Your Work Area
Clear a big area for your bed frame project. Get all your tools and materials ready. Make sure you have good light and air for safety.
Cutting the Wood Pieces
Use a miter saw or table saw to cut your wood. For a queen-size bed (160 x 200 cm), you’ll need:
- Two side rails: 80 inches long
- Headboard and footboard: 78 1/2 inches wide
- Support slats: 20 pieces of 1×3 lumber
Sand all pieces with 100-220 grit sandpaper. This makes them smooth. Always wear safety goggles and a dust mask.
Assembling the Frame
Start by attaching the headboard and footboard to the side rails. Use metal corner brackets and 1 1/4-inch finish nails. Then, add joist hangers for the support slats.
Place the slats across the frame, keeping them evenly spaced. Use pocket hole screws to make the joints invisible. This makes the frame stronger.
If your bed is wider than 140 cm, add cross-connections for extra support. Attach the legs with 3-inch screws. Check all connections and tighten any loose screws before moving the frame.
Sanding and Finishing Your Bed Frame
After building your wooden bed frame, it’s time for the final steps. Sanding and finishing are key to a great finish. Let’s explore the techniques that will make your bed frame look professional.
Importance of Proper Sanding
Sanding your bed frame does more than just smooth out rough spots. It gets the wood ready for finishing, ensuring a strong bond and a perfect look. Begin with 100-150 grit sandpaper to remove any flaws. Then, move to 220 grit for a smooth finish. This step not only improves the wood’s texture but also highlights its natural beauty.
Choosing the Right Finish
Choosing the right finish is vital for protecting and beautifying your bed frame. Wood stains and varnishes offer different benefits. For a natural look, clear satin polyurethane is a good choice. It protects well while letting the wood grain show. Shanty 2 Chic suggests applying three coats for the best results.
Applying Finish
When applying your chosen finish, be patient. Follow these steps for the best results:
- Clean the surface well to remove all dust
- Apply the first coat evenly with a brush or cloth
- Let it dry completely (about 2 hours)
- Lightly sand with 220 grit between coats
- Apply more coats, letting each dry before adding the next
Remember, proper finishing not only makes your bed frame look better but also protects it. This ensures it remains a treasured piece for many years.
Customizing Your Bed Frame
Your handmade wooden bed frame can be more than just a place to sleep. It’s a chance to create personalized furniture that fits your cabin’s style and needs. With custom bed features, you can turn a simple frame into a unique centerpiece.
Personalized Designs
Make your bed frame stand out with custom touches. Carve nature scenes into the headboard or add inlays with local wood types. Paint accents that match your cabin’s color scheme. These small details can make a big impact on your bedroom’s look.
Adding Storage Solutions
Built-in storage can solve space issues in small cabins. Consider adding under-bed drawers using thinner boards for the boxes and fronts. Remember, drawers will add weight, so plan for extra support. You might also add shelves to the headboard for books or decor items.
When designing storage, think about what you’ll keep in it. Measure items to ensure they’ll fit. With smart planning, your bed frame can offer both style and function, making it a true custom piece for your cabin retreat.


